【目的】
iOS6から使用ができるようになったCollectionViewを使ってみます。
1.プロジェクトを作成
Single View Applicationを選択してプロジェクトを作成する。

2.Storyboard上で「UICollectionView」を配置する
Object LibraryからCollectionViewを選択してViewにドラッグする。
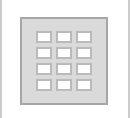
結果、このようになります。(AutoLayoutの設定も忘れずに)

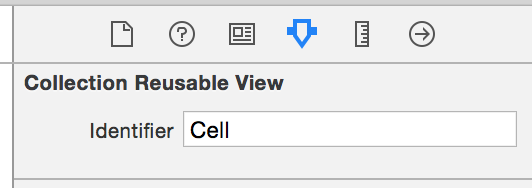
次にセルの識別子(Identifier) を設定します。
ここでは、単純に”Cell”としておきます。
AutoLayoutの設定も忘れずに・・・。
3.「ViewController」と接続する
UICollectionViewを使用するためにViewControllerと紐づけます。
Assistant editorで、storyboardとViewController.hを表示し、ドラッグして接続します。
また、UICollectionViewはセルをどのように表示するか要求をしてきます。その要求をしょりするUICollectionViewDataSourceも使用できるようにしておきます。
同じようにUICollectionViewのイベントを処理するUICollectionViewDelegateも使用できるようにしておきます。
.h
@interface ViewController : UIViewController<UICollectionViewDataSource,UICollectionViewDelegate>
# pragma mark - プロパティ
// コレクションビュー
@property (weak, nonatomic) IBOutlet UICollectionView *myCollectionView;

@end
.m
- (void)viewDidLoad {
    [super viewDidLoad];

    // データの要求を受け取る先を自分自身に設定する
    self.myCollectionView.dataSource = self;
    // イベントの受け取り先を自分自身に設定する
    self.myCollectionView.delegate = self;
}

4.「UICollectionViewDataSource」の要求に対して対応していきます。
まずは、セクションの数をいくつにするか答えます。
.m
- (NSInteger)numberOfSectionsInCollectionView:(UICollectionView *)collectionView
{
    return 2;
}
次にセルの数を幾つにするか答えます。
ここでは、1つ目のセクションは2つのセルを作成して、2つ目のセクションは4つ作成することします。
.m
- (NSInteger)collectionView:(UICollectionView *)collectionView numberOfItemsInSection:(NSInteger)section{
    if (section == 0) {
        return 2;
    }
    else{
        return 4;
    }
}
最後に表示するセルを設定します。
.m
- (UICollectionViewCell *)collectionView:(UICollectionView *)collectionView cellForItemAtIndexPath:(NSIndexPath *)indexPath
{
    NSString * cellIdentifier = @"Cell";
    UICollectionViewCell *cell = [collectionView dequeueReusableCellWithReuseIdentifier:cellIdentifier forIndexPath:indexPath];
    if (indexPath.section == 0) {
        // 1つめのセクションは、背景色を赤にする
        cell.backgroundColor = [UIColor redColor];
    }
    else{
        // 2つ目のセクションは背景色を緑にする
        cell.backgroundColor = [UIColor greenColor];
    }
    return cell;
}
実行するとこのようになります。

【結果】
基本的にはUITableViewと同じような考え方で、作ることができました。
次回以降は、これをベースにいろんなことをしていきたいと思います。
何かあれば、コメントをいただけると嬉しいです。