はじめに
この記事はGizumoエンジニア Advent Calendar 2015の17日目の記事です。
今回は、ServiceWorkerのPushAPIを使ってブラウザにPush通知を表示させてみたいと思います!
このような記事はすでにあるので、今回は、
- サンプルプログラムを用いて、より簡単にPush通知を体験してみる
- どんな流れでPush通知がくるのか流れを把握する
この2点を中心に進めて行きます。
そして以下の点には触れません
- Service Worker 及び Push APIの詳しい仕様
今回はService WorkerのPush通知を体験し、おおまかな流れを掴むことを目的としています。
まだあまりJSに触れたことがない方も是非Push通知を体験してみてください!!
それでは始めます!
開発環境
Chrome 42以上
MAMP(MAMPのインストールはこちら)
上記が使えれば準備OKです。
Service Workerとは
Service Workerとはブラウザではなく、バックグラウンドで動作するJavaScriptのことを言います。
Service Workerを使えば、オフラインでwebサイトが見れたり、ブラウザにpush通知を送ることができます。
↓詳しくはこちら↓
http://www.html5rocks.com/ja/tutorials/service-worker/introduction/
Push通知の準備
それではPush通知の準備をしていきます。
Push通知を体験するには以下の設定が必要になります。
サンプルプログラムのダウンロード
こちらのサイトから「push-messaging-and-notifications」をダウンロードしてください。
今回は下記4ファイルを使用します。
- index.html
- main.js
- service-worker.js
- manifest.sample.json
Google Developer Consoleでプロジェクトの作成
今回のサンプルではPush通知にGoogleのAPIであるGCM(Google Cloud Messaging)を使用します。
-
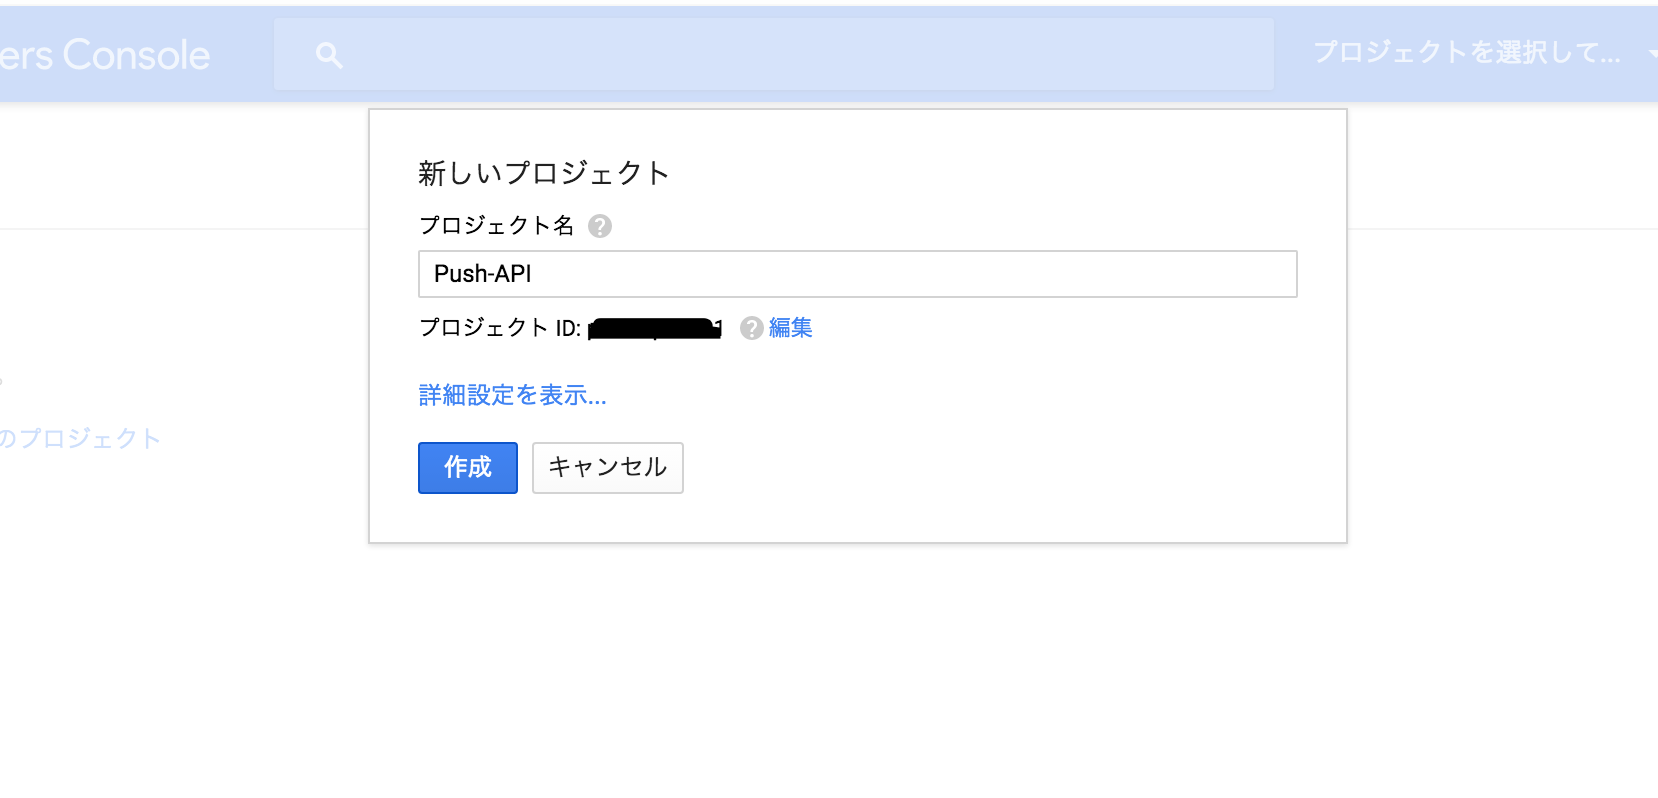
Google Developer Consoleページの「プロジェクトを作成」を押下し、「プロジェクト名」は好きなプロジェクト名を、「プロジェクトID」はデフォルトのままにし、「作成」ボタンをクリックしてください。
-
左のメニューボタンからAPIManagerを選択し検索欄に「Google Cloud Messaging for Android」のAPIを有効にしてください。

-
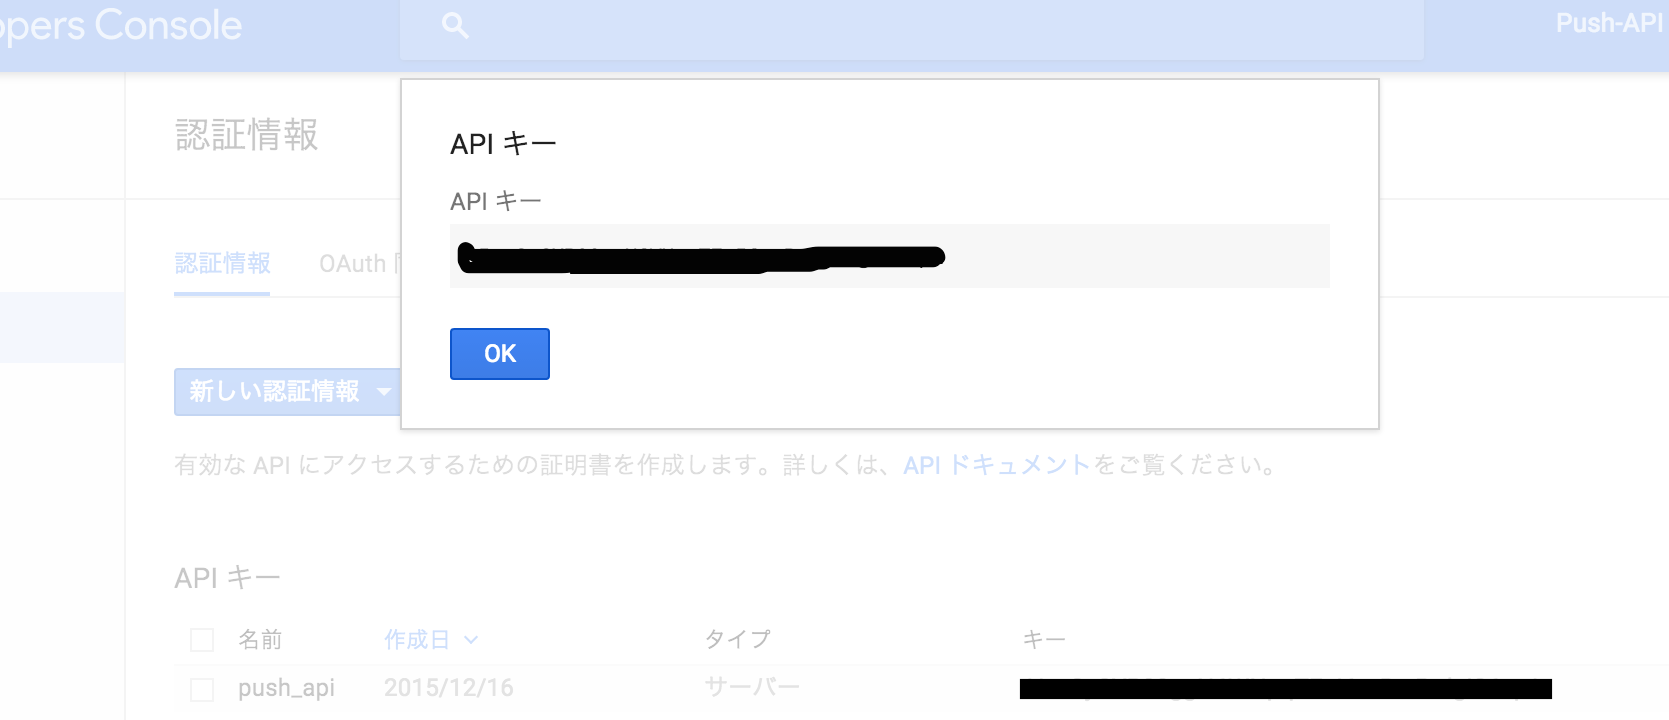
「認証情報」→「新しい認証情報」→「APIkey」→「サーバーキー」の順に押下し、作成したAPIkeyをコピーしておいて下さい。
サンプルソースを修正する
サンプルソースに以下の設定を反映させてください。
manifest.sample.json → manifest.json(ファイル名の変更)
'use strict';

var API_KEY = 'ここにAPIkeyを入れてください';
var GCM_ENDPOINT = 'https://android.googleapis.com/gcm/send';

var curlCommandDiv = document.querySelector('.js-curl-command');
var isPushEnabled = false;
{
  "name": "Push Demo",
  "short_name": "Push Demo",
  "icons": [{
        "src": "images/icon-192x192.png",
        "sizes": "192x192"
      }],
  "start_url": "./index.html?homescreen=1",
  "display": "standalone",
  "gcm_sender_id": "ここにプロジェクト番号を入れてください",

  "//": "gcm_user_visible_only is only needed until Chrome 44 is in stable ",<img width="1266" alt="スクリーンショット 2015-12-14 21.59.05.png" src="https://qiita-image-store.s3.amazonaws.com/0/102556/6c4613d5-d907-cc4c-6189-d863008e50b2.png">

  "gcm_user_visible_only": true
}
いざPush通知
それではPush通知をおこなってみましょう!
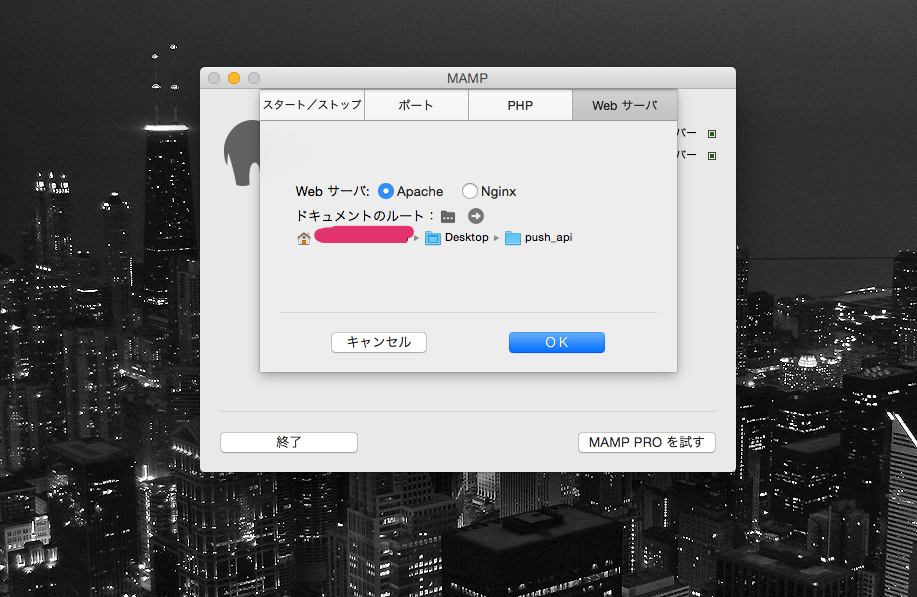
今回はlocalhostでPush通知を行うのでMAMPのルートディレクトリに今回のサンプルを設定してください。
こんな感じです
準備ができたらlocalhostにアクセスし、ブラウザのPush通知を許可にします。
「cURL Command to Send Push」に表示されるコマンドをコピーし、ターミナル(winの場合はコマンドプロンプト)に貼って Enter!!
すると・・・
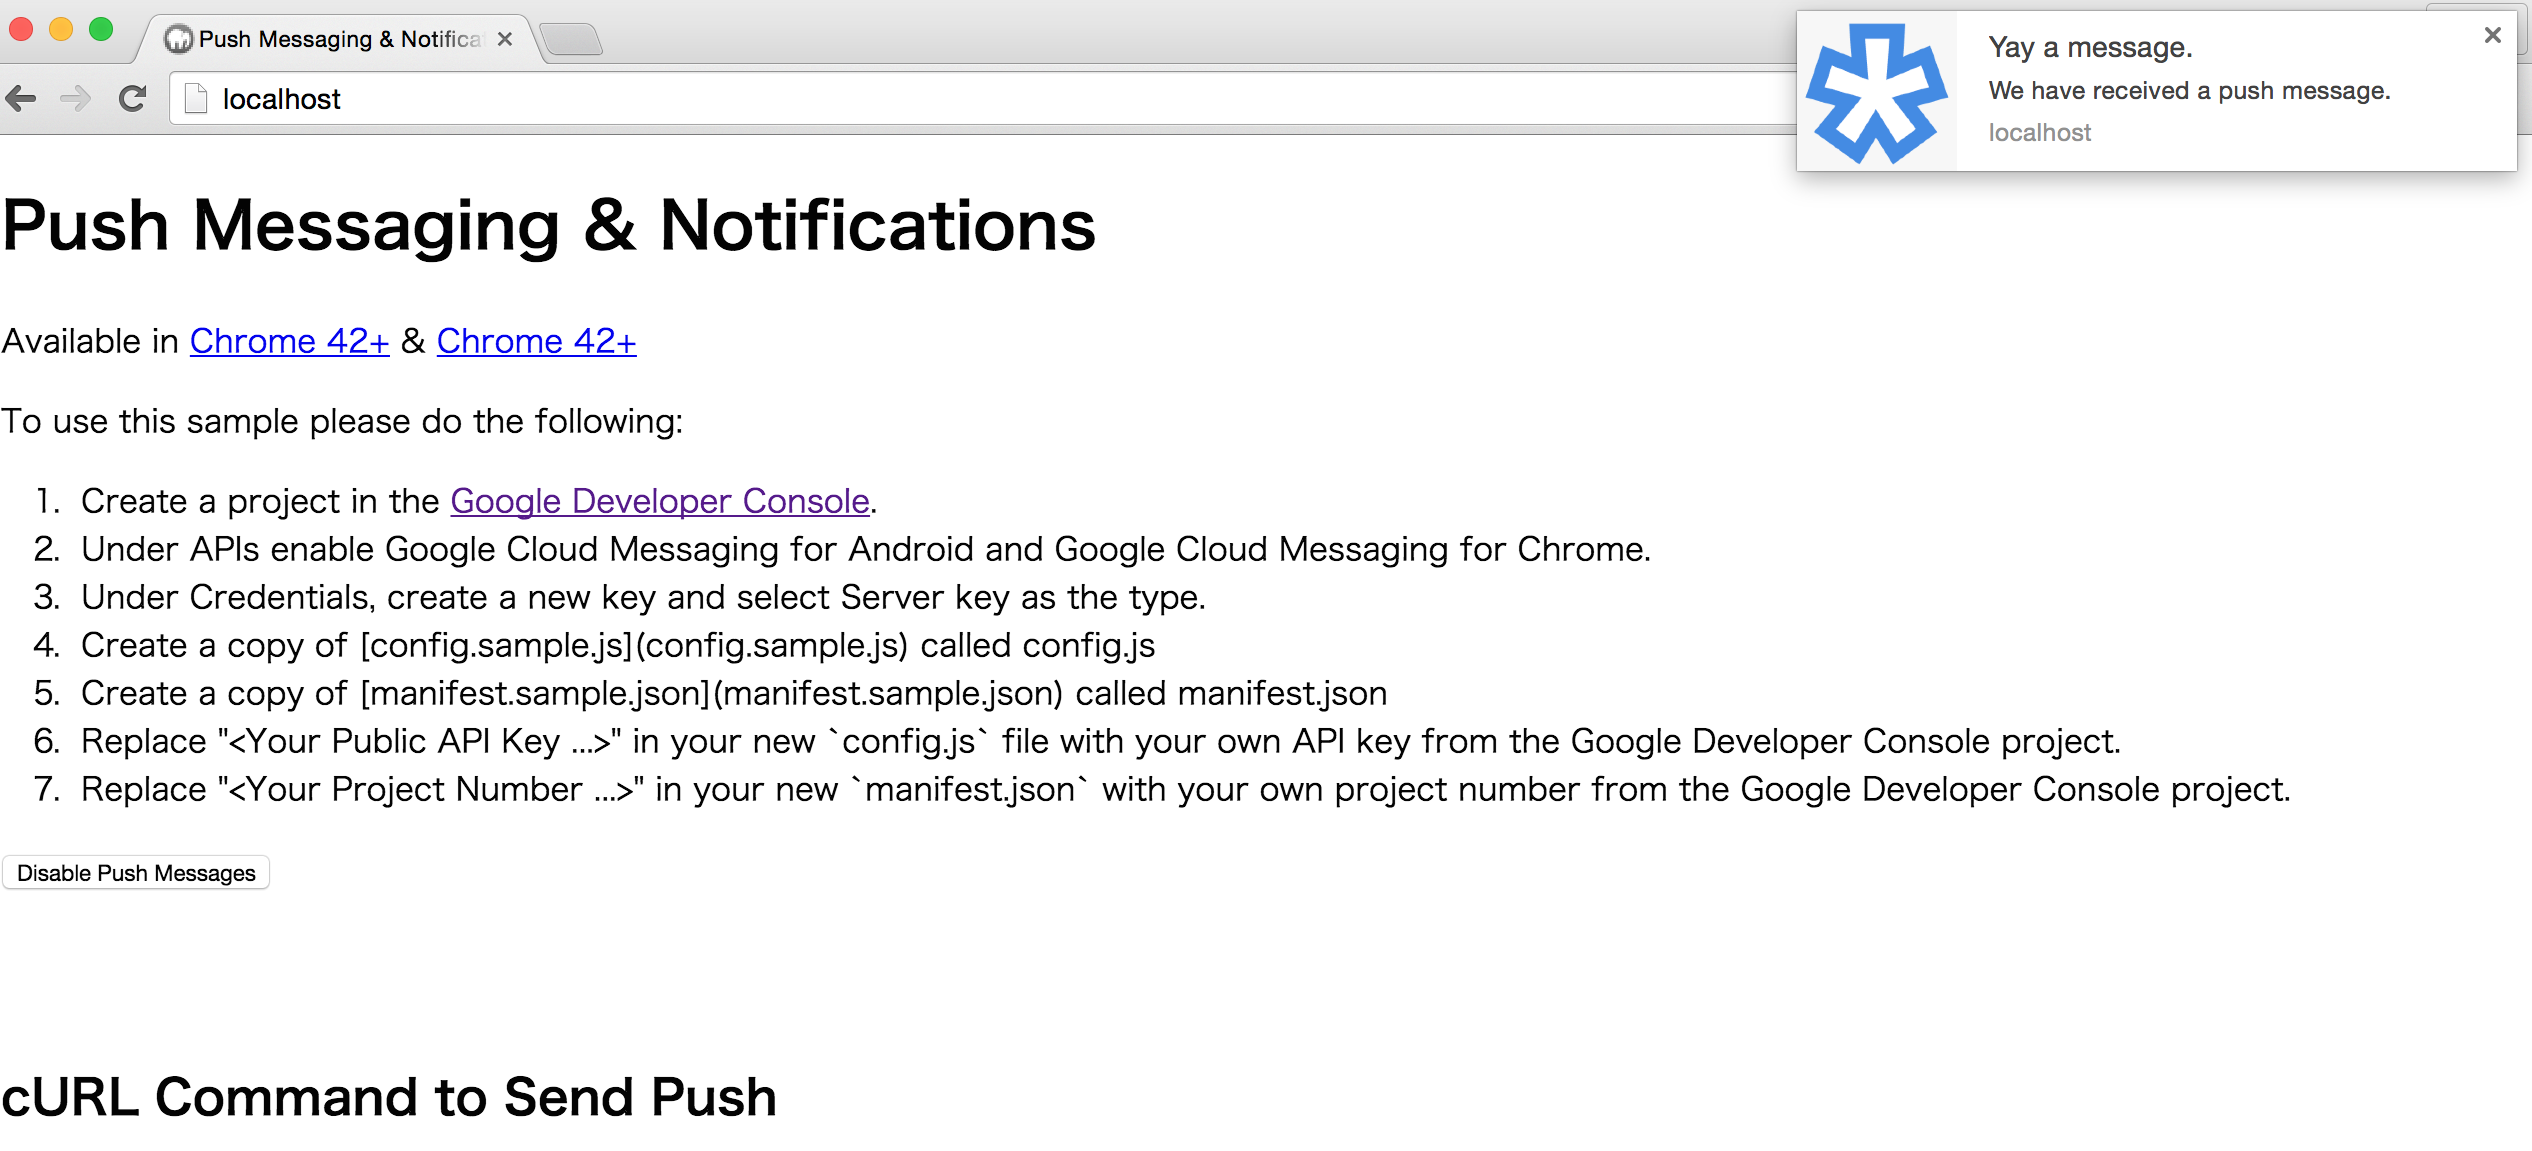
見事Push通知を受け取ることができました!
ブラウザを閉じて再度ターミナルにコマンドを打ってもPush通知を受け取ることができます!
サンプルプログラムの解説
それではどんな順番でPush通知されたのか、簡単に見ていきたいと思います。
各JSファイルの役割
今回使用したmain.jsとservice-worker.jsの役割を紹介します。
main.js
・ブラウザがPush通知を許可しているか、Service Workerに対応しているかを判断する。
・対応していれば、Service Workerを常駐させ、Push通知を送るためのURLみたいなもの(endpoint)を取得し、画面に表示する。
service-worker.js
・GCMからのPush通知を受け取り、ブラウザにPush通知を表示させる。
それぞれはこんな感じの内容になっています!
各JSファイルの内容
それではmain.jsとservice-worker.jsの内容を少しずつですが解説していきます。
main.js
まずブラウザにアクセスした際に以下の関数が実行されます。
// 203行目〜221行目

window.addEventListener('load', function() {
  // ...省略

  if ('serviceWorker' in navigator) {
    navigator.serviceWorker.register('./service-worker.js')
    .then(initialiseState);
  } else {
    window.Demo.debug.log('Service workers aren\'t supported in this browser.');
  }
});
-
if ('serviceWorker' in navigator)
でnavigatorオブジェクトにserviceWorkerがあったら、service-worker.jsを常駐させ、initialiseState関数を実行します。
次にinitialiseState関数です。
// 203行目〜221行目

function initialiseState() {

  navigator.serviceWorker.ready.then(function(serviceWorkerRegistration) {

    serviceWorkerRegistration.pushManager.getSubscription()
      .then(function(subscription) {

        var pushButton = document.querySelector('.js-push-button');
        pushButton.disabled = false;

        if (!subscription) {
          return;
        }

        sendSubscriptionToServer(subscription);

        pushButton.textContent = 'Disable Push Messages';
        isPushEnabled = true;
      })
      .catch(function(err) {
        window.Demo.debug.log('Error during getSubscription()', err);
      });
  });
}
-
navigator.serviceWorker.ready
PromiseオブジェクトとserviceWorkerRegistrationを返し、serviceWorkerRegistrationオブジェクトを引数に関数を実行します。 -
serviceWorkerRegistration.pushManager.getSubscription()
serviceWorkerRegistrationのpushManagerを経由してgetSubscriptionを実行するとsubscriptionオブジェクトが返ってきます。このなかにendpointが格納されています。 -
sendSubscriptionToServer(subscription);
そして先ほどのsubscriptionオブジェクトを引数に設定し、sendSubscriptionToServerを実行!
// 30行目〜44行目

function sendSubscriptionToServer(subscription) {
  var mergedEndpoint = endpointWorkaround(subscription);
  showCurlCommand(mergedEndpoint);
}
-
var mergedEndpoint = endpointWorkaround(subscription)
subscriptionオブジェクトのendpointを取得してmergedEndpointに代入します。
subscription.endpointと同義ですね! -
showCurlCommand(mergedEndpoint)
mergedEndpointを引数にshowCurlCommandを実行!!
// 49行目〜65行目

function showCurlCommand(mergedEndpoint) {
  // ...省略

  var curlCommand = 'curl --header "Authorization: key=' + API_KEY +
    '" --header Content-Type:"application/json" ' + GCM_ENDPOINT +
    ' -d "{\\"registration_ids\\":[\\"' + subscriptionId + '\\"]}"';

  curlCommandDiv.textContent = curlCommand;
}
あとはendpointを代入してcurlCommandを作成し、テキストとして出力させます。
サンプルではターミナルにコマンドを貼り付けただけでしたが、
実際はたくさんのユーザのendpointを保存しておかないといけないので、DBに持っておく必要がありそうです。
以上でmain.jsはおしまいです!
service-worker.js
こちらは比較的読みやすいのでさくっと見ます!
// 203行目〜221行目

self.addEventListener('push', function(event) {
  var title = 'Yay a message.';
  var body = 'We have received a push message.';
  var icon = '/images/icon-192x192.png';
  var tag = 'simple-push-demo-notification-tag';

  event.waitUntil(
    self.registration.showNotification(title, {
      body: body,
      icon: icon,
      tag: tag
    })
  );
});
-
self.addEventListener('push', function(event){}
これでPush通知のイベントを取得できます。
var title = 'Yay a message.';
var body = 'We have received a push message.';
var icon = '/images/icon-192x192.png';
このようにクライアント側にPush通知の内容を書くので、サーバー側からPush通知の内容を動的に指定することはできないようです。
(実はできるみたいです。Web Pushでブラウザにプッシュ通知を送ってみる)
あとはself.registration.showNotification()を通じて変数を代入していきます!
かなりざっくりでしたが、
以上でservice-worker.jsの解説を終わります!
終わりに
いかがでしたでしょうか?
ブラウザにPush通知を送れるこの技術は、有効に使えばかなり強力なツールになると思います。
今回はPCで実装しましたが、AndroidのChromeでもService WorkerのPush APIを使用することができるので、サーバーに上げて是非試してみてください。
以上になります!
最後までご覧頂きありがとうございました!