neo4jとは
neo4jとはNeo Technologyが開発したJavaベースのグラフデータベースです。(日本語ページ)
グラフデータベースは、一つ一つのデータを行で表現するリレーショナルデータベースと異なり、
ノード(頂点)、リレーションシップ(エッジ)、プロパティ(属性)という3つの基本構成要素でデータを格納します。
グラフデータベースが有用なのはTwitterやFacebookのように、フォローや友人関係を扱う時です。
「友人のそのまた友人を探す」や「任意の二人を選択し、最短の関係(パス)を探す」などの問題を解こうとしたとき、
リレーショナルデータベースでは関係の探索に大量の結合演算が必要になりますが、
グラフ構造をそのまま格納しているグラフデータベースなら高速に処理することが可能です。
neo4jはオープンソースですが、ライセンスはAGPLv3なので、商用利用などの際はライセンス選択の手引きを参考にしてください。
neo4jのインストール
neo4jはjavaベースなので事前にjavaをインストールしてください。
その上でmacならbrweでインストールすることが可能です。
$ brew install neo4j
neo4jにはデフォルトでブラウザからアクセスできる機能が組み込まれています。
neo4jを起動し、
http://localhost:7474/webadmin/
にアクセスする事でブラウザからデータなどが確認可能です。
rubyからneo4jを利用する
rubyからneo4jを利用するために
neographyのGemを使用します。
Gemfileに
gem 'neography'を記述してbundle installします。
rubyからneo4jに接続してみます。
neo4jのポートなどがデフォルトのままなら、
neographyをrequireしてNeography::Rest.newするだけなので簡単です。
require 'neography'
@neo = Neography::Rest.new
接続先などの設定がデフォルトと異なる場合でも
Neography::Rest.newの引数に設定を渡すだけです。
ノードの作成、プロパティの追加、リレーションの追加などのサンプルです。
require 'neography'
@neo = Neography::Rest.new

# ノード作成
node1 = @neo.create_node(name: "tanaka", age: 20)
node2 = @neo.create_node(name: "suzuki", age: 24)

# ノードにプロパティを追加
@neo.set_node_properties(node1, {weight: '60kg'})

# 関係を追加(node1 -> node2 方向)
@neo.create_relationship(:friend, node1, node2)

# 関係を取得
@neo.get_node_relationships(node1, :out, :friend)
@neo.get_node_relationships(node2, :in, :friend)
それぞれの行を実行すると、
REST APIの結果をハッシュに格納した物が返ります。
このままだと少々扱いにくいです。
{
  "extensions" => {},
  "paged_traverse" => "http://localhost:7474/db/data/node/15/paged/traverse/{returnType}{?pageSize,leaseTime}",
  "outgoing_relationships" => "http://localhost:7474/db/data/node/15/relationships/out",
  "traverse" => "http://localhost:7474/db/data/node/15/traverse/{returnType}",
  "all_typed_relationships" => "http://localhost:7474/db/data/node/15/relationships/all/{-list|&|types}",
  "property" => "http://localhost:7474/db/data/node/15/properties/{key}",
  "all_relationships" => "http://localhost:7474/db/data/node/15/relationships/all",
  "self" => "http://localhost:7474/db/data/node/15",
  "properties" => "http://localhost:7474/db/data/node/15/properties",
  "outgoing_typed_relationships" => "http://localhost:7474/db/data/node/15/relationships/out/{-list|&|types}",
  "incoming_relationships" => "http://localhost:7474/db/data/node/15/relationships/in",
  "incoming_typed_relationships" => "http://localhost:7474/db/data/node/15/relationships/in/{-list|&|types}",
  "create_relationship" => "http://localhost:7474/db/data/node/15/relationships",
  "data" => {"weight" => "60kg", "name" => "tanaka", "age" => 20}
}
rubyからneo4jを利用する2
前述の利用では、
返ってくるデータが少々扱いにくいところがありました。
そこでneographyには抽象化度を上げた利用方法が用意されています。
例えばノードの作成は以下のようになります。
node1 = Neography::Node.create(name: "tanaka", age: 20)
このとき返ってくるのはNeography::Nodeクラスになります。
プロパティへのアクセスも抽象化されています。
# プロパティ :age を取得
node1[:age]
# ドットでもアクセス可能
node1.name
# プロパティの変更
node1[:age] = 32
# 新しくプロパティを追加
node1.weight = 190
# プロパティの削除
node1.age = nil
ノードの削除はdelで行います
node1.del
接続先の設定について変更する場合は
Neography.configureブロックで行います。
Neography.configure do |config|
  config.protocol       = "http://"
  config.server         = "localhost"
  config.port           = 7474
  config.directory      = ""  # prefix this path with '/'
  config.cypher_path    = "/cypher"
  config.gremlin_path   = "/ext/GremlinPlugin/graphdb/execute_script"
  config.log_file       = "neography.log"
  config.log_enabled    = false
  config.max_threads    = 20
  config.authentication = nil  # 'basic' or 'digest'
  config.username       = nil
  config.password       = nil
  config.parser         = MultiJsonParser
end
接続先はNeography.configurationでアクセスすることが可能です。
また、接続先を引数に取ることも出来ます。
@neo2 = Neography::Rest.new({:server => '192.168.10.1'})
Neography::Node.create({name: "tanaka"}, @neo2)
続いて、ノード間にリレーションを張ってみます。
リレーションには方向性があり、outgoing,incoming,bothでアクセスします。
# ノードの作成
n1 = Neography::Node.create(name: "tanaka", age: 20)
n2 = Neography::Node.create(name: "suzuki", age: 25)

# n1からn2方向へfriend関係を追加
n1.outgoing(:friend) << n2
# n2からn1方向へfriend関係を追加
n1.incoming(:friend) << n2
# n1、n2間にfriend関係を追加(両方向)
n1.both(:friend) << n2
ノードのリレーションはrelsでアクセスできます。
# n1の持つ全てのリレーションを取得
n1.rels
# n1の持つリレーションの中で種類がfriendの物を取得
n1.rels(:friend)
# n1の持つリレーションの中で種類がfriendであり、かつn1から出る方向のリレーションを取得
n1.rels(:friend).outgoing
リレーションを取得すれば、開始ノード、終端ノードにアクセスできます。
# リレーションの取得
rel = n1.rels(:friend).outgoing.first
# 開始ノードの取得
rel.start_node
# 終端ノードの取得
rel.end_node
# リレーションの削除
rel.del
rubyからneo4jを利用する3
Neography::Node#relsでリレーション
Neography::Relationshipを取得したときは、
開始ノードや終端ノードにアクセスしただけでした。
もう少し進んでNeography::NodeTraverserを利用してみましょう。
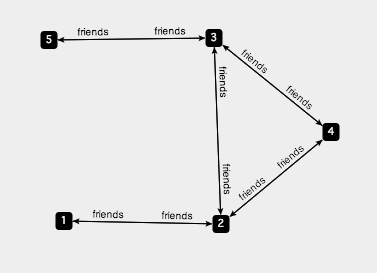
5つのノードを作成し、リレーションとして友人関係(friends)を定義します。
require 'neography'

# ノードの作成
n1 = Neography::Node.create(name: "1")
n2 = Neography::Node.create(name: "2")
n3 = Neography::Node.create(name: "3")
n4 = Neography::Node.create(name: "4")
n5 = Neography::Node.create(name: "5")

# 関係の追加
n1.both(:friends) << n2
n2.both(:friends) << n3
n2.both(:friends) << n4
n3.both(:friends) << n4
n3.both(:friends) << n5
関係をグラフにすると以下のような物になります。
ここからNeography::NodeTraverserを利用します。
Neography::NodeTraverserの利用には、
リレーションを張るのに使用した
outgoing,incoming,bothを使います。
ノード"1"を基準にして友人を辿ってみます。
n1.outgoing(:friends).map {|n| n.name}
# => ["2"]
2関係先まで見てみます。
n1.outgoing(:friends).depth(2).map {|n| n.name}
# => ["2", "4", "3", "1"]
3関係先までにしてみます。
n1.outgoing(:friends).depth(3).map {|n| n.name}
# => ["2", "4", "3", "2", "3", "5", "4", "2", "1", "2"]
デフォルトでは深さ優先探索が使われているので、
orderで幅優先探索に変更してみます。
n1.outgoing(:friends).depth(3).order(:breadth).map {|n| n.name}
# => ["2", "4", "3", "1", "3", "2", "5", "4", "2", "2"]
:breadth以外にも"breadth","breadth first","breadthFirst",:wide,"wide"の指定でも同じです。
friends関係が各ノード間で双方向に張られているので、
トラバースの結果に同一ノードが含まれています。
そこで、重複したノードを除外してみます。
n1.outgoing(:friends).depth(3).order(:breadth).uniqueness(:nodeglobal).map {|n| n.name}
# => ["2", "4", "3", "5"]
:nodeglobalは"node global","nodeglobal","node_global"としてしても同じです。
uniqueenssの指定は、
"node global"以外にも
"node path","node recent","relationship global", "relationship path","relationship recent"がありますが、今回は割愛します。
次に、2関係先だけの友達に限定してみます。
ベースは先ほどの物を使います。
n1.outgoing(:friends).depth(2).order(:breadth).uniqueness(:nodeglobal).map {|n| n.name}
# => ["2", "4", "3"]
この指定だと1関係先のノード"2"が含まれているので、ここにfilterを追加します。
n1.outgoing(:friends).depth(2).order(:breadth).uniqueness(:nodeglobal).filter("position.length() == 2;").map {|n| n.name}
# => ["4", "3"]
2関係先だけに限定できました。
ここまでをまとめると
require 'neography'

# ノードの作成
n1 = Neography::Node.create(name: "1")
n2 = Neography::Node.create(name: "2")
n3 = Neography::Node.create(name: "3")
n4 = Neography::Node.create(name: "4")
n5 = Neography::Node.create(name: "5")

# 関係の追加
n1.both(:friends) << n2
n2.both(:friends) << n3
n2.both(:friends) << n4
n3.both(:friends) << n4
n3.both(:friends) << n5

# 友人の推薦
def suggestions_for(node)
  node.outgoing(:friends).
    depth(2).
    order(:breadth).
    uniqueness(:nodeglobal).
    filter("position.length() == 2;").
    map{|n| n.name }.join(', ')
end
puts "#{n1.name}さんに推薦する人:#{suggestions_for(n1)}"
puts "#{n3.name}さんに推薦する人:#{suggestions_for(n3)}"
puts "#{n5.name}さんに推薦する人:#{suggestions_for(n5)}"

# 結果
# 1さんに推薦する人:3, 4
# 3さんに推薦する人:1
# 5さんに推薦する人:2, 4
最後にノード間の経路を求めてみます。
# n1からn5までの全ての友人関係の経路を最大深度を4として検索
n1.all_paths_to(n5).outgoing(:friends).depth(4).to_a
# ループした経路を除外
n1.all_simple_paths_to(n5).outgoing(:friends).depth(4).to_a
# 最短経路の場合
n1.all_shortest_paths_to(n5).outgoing(:friends).depth(4).to_a

# リレーションだけ取得
n1.shortest_path_to(n5).outgoing(:friends).depth(4).rels.to_a
# ノードだけ取得
n1.shortest_path_to(n5).outgoing(:friends).depth(4).nodes.to_a

# 最短経路を表示
n1.shortest_path_to(n5).outgoing(:friends).depth(4).nodes.first.map {|n| n.name}
# => ["1", "2", "3", "5"]