前の記事の続きです。
MeshBuilderのコア部分にあたるTango3DRの後編になります。
- 3D Reconstruction serverの作成
- カメラパラメータの設定
- GridIndexArrayの更新
- メッシュの作成
の3、4についてまとめます。
GridIndexArray
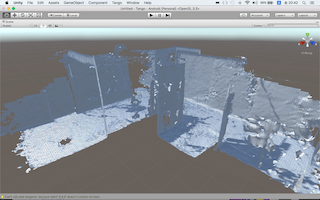
GridIndexArrayについては、MeshBuilderで作成されたメッシュを見るとわかりやすいです。
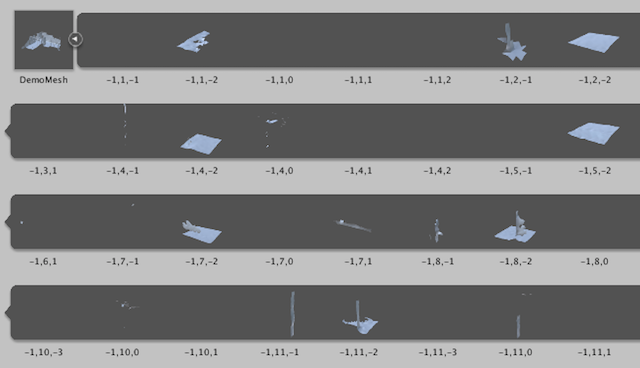
Exportされたメッシュは、小さなメッシュの集合体になっており、各メッシュ・セグメントは"-1,1,2"といった3つの整数が名称になっています。
この分割単位がGrid Cellで、割り振られた3つの整数がGridIndex、GridIndexを配列にしたのがGridIndexArrayです。
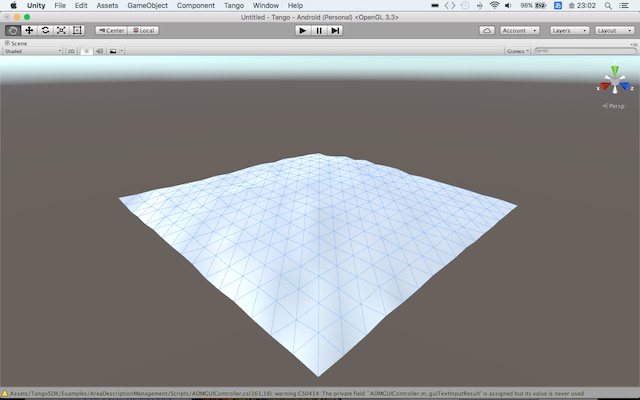
GridIndexArrayのリファレンスには、Grid Cellは16×16×16のvoxelと書いてあります。
実際に、平面(床)に相当するGrid Cellのメッシュを見てみると、確かに16分割されていました。
ソースコードの解析
前編と同じく、対象は以下のファイルだけです。
- TangoSDK/Core/Scripts/TangoWrappers/Tango3DReconstruction.cs
GridIndexArrayの更新
pointCloud更新時に実行されるOnTangoPointCloudMultithreadedAvailable()で_UpdateDepth()が実行されます。
private void _UpdateDepth(TangoPointCloudIntPtr pointCloud, Matrix4x4 depthPose)
{
    ...

    APIPointCloud apiCloud;
    apiCloud.numPoints = pointCloud.m_numPoints;
    apiCloud.points = pointCloud.m_points;
    apiCloud.timestamp = pointCloud.m_timestamp;

    APIPose apiDepthPose = APIPose.FromMatrix4x4(ref depthPose);

    if (!m_sendColorToUpdate)
    {
         // No need to wait for a color image, update reconstruction immediately.
         IntPtr rawUpdatedIndices;
         Status result = (Status)API.Tango3DR_update(
             m_context, ref apiCloud, ref apiDepthPose, IntPtr.Zero, IntPtr.Zero, out rawUpdatedIndices);

        ...

        _AddUpdatedIndices(rawUpdatedIndices);
        API.Tango3DR_GridIndexArray_destroy(rawUpdatedIndices);
    }
    else
    {
        lock (m_lockObject)
        {
            // We need both a color image and a depth cloud to update reconstruction.  Cache the depth cloud
            // because there are much less depth points than pixels.
            m_mostRecentDepth = apiCloud;
            m_mostRecentDepth.points = IntPtr.Zero;
            Marshal.Copy(pointCloud.m_points, m_mostRecentDepthPoints, 0, pointCloud.m_numPoints * 4);

            m_mostRecentDepthPose = apiDepthPose;
            m_mostRecentDepthIsValid = true;
        }
    }
}
colorCameraの色情報を使うか否かで処理が分かれています。
利用しない場合は、ここでTango3DR_update()を行います。
3D Reconstruction serverの情報が更新され、rawUpdatedIndicesに更新されたGrid CellのGridIndexArrayが返ってくるので、_AddUpdatedIndices()に渡します。
色情報を利用する場合は、m_mostRecentDepth、m_mostRecentDepthPoseをセットした上で、colorCameraの情報を待ちます。
更新されると、OnTangoImageMultithreadedAvailable()→_UpdateColor()→Tango3DR_update()→_AddUpdatedIndices()という流れになります。
private void _AddUpdatedIndices(IntPtr rawUpdatedIndices)
{
    int numUpdatedIndices = Marshal.ReadInt32(rawUpdatedIndices, 0);
    IntPtr rawIndices = Marshal.ReadIntPtr(rawUpdatedIndices, 4);
    lock (m_lockObject)
    {
        if (m_updatedIndices.Count == 0)
        {
            // Update in fast mode, no duplicates are possible.
            for (int it = 0; it < numUpdatedIndices; ++it)
            {
                GridIndex index;
                index.x = Marshal.ReadInt32(rawIndices, (0 + (it * 3)) * 4);
                index.y = Marshal.ReadInt32(rawIndices, (1 + (it * 3)) * 4);
                index.z = Marshal.ReadInt32(rawIndices, (2 + (it * 3)) * 4);
                m_updatedIndices.Add(index);
            }
        }
        else
        {
            // Duplicates are possible, need to check while adding.
            for (int it = 0; it < numUpdatedIndices; ++it)
            {
                GridIndex index;
                index.x = Marshal.ReadInt32(rawIndices, (0 + (it * 3)) * 4);
                index.y = Marshal.ReadInt32(rawIndices, (1 + (it * 3)) * 4);
                index.z = Marshal.ReadInt32(rawIndices, (2 + (it * 3)) * 4);
                if (!m_updatedIndices.Contains(index))
                {
                    m_updatedIndices.Add(index);
                }
            }
        }
    }
}
更新されたGrid CellのGridInexをm_updatedIndicesに追加しています。
m_updatedIndicesが空であれば存在チェックをせずに追加し、データがあれば重複させないように存在チェックが入ってます。
メッシュの作成
UI側の処理を追っていないので、少し飛んでしまいますが、GridIndexを指定してExtractMeshSegment()を実行すると、そのGrid Cellのメッシュを書き出します。
internal Status ExtractMeshSegment(
    GridIndex gridIndex, Vector3[] vertices, Vector3[] normals, Color32[] colors, int[] triangles,
    out int numVertices, out int numTriangles)
{
    APIMeshGCHandles pinnedHandles = APIMeshGCHandles.Alloc(vertices, normals, colors, triangles);
    APIMesh mesh = APIMesh.FromArrays(vertices, normals, colors, triangles);

    int result = API.Tango3DR_extractPreallocatedMeshSegment(m_context, ref gridIndex, ref mesh);
    numVertices = (int)mesh.numVertices;
    numTriangles = (int)mesh.numFaces;
    pinnedHandles.Free();

    return (Status)result;
}
ここでは、Tango3DR_extractPreallocatedMeshSegment()を使っていますが、GridIndexArrayを渡して複数のGrid Cellを1つのメッシュとして返す関数、すべてのGrid Cellのメッシュを返す関数もあります。
まとめ
後編では、Tango3DRがGridIndexArrayを用いて、メッシュを作成する流れをまとめました。
元々、屋内向けのマップ構築や屋内ナビゲーションへの活用に興味があってTangoの学習を始めたので、仕組みの理解という点では、かなり視界がクリアになった気がします。