Tangoと統合したくて試したところ、とりあえずCloud Vision APIには繋がったので、まとめておきます。
Google Cloud Vision API
画像データを送信することで、Googleが画像解析した結果をJSONで取得するAPIです。
https://cloud.google.com/vision/
料金体系は、1000ユニット/月まで無料、以降も1000ユニットあたり$1.5なので、個人で試す分にはコストは然程かかりません。
ユニットは機能単位の利用回数で、1枚の画像に対して顔検知とラベル検知をリクエストした場合、HTTPリクエストは1回でも2ユニット利用したことになります。
https://cloud.google.com/vision/pricing
Cloud Vision APIの準備
まず、Google Cloud Platformで課金可能な状態にして、APIを有効にします。
初めてGCPを利用する場合、クレジットカードの登録は必要ですが、$300分のクレジットが付きます。
https://cloud.google.com/vision/docs/quickstart
APIが利用可能になったら、API Keyを作成します。
https://cloud.google.com/vision/docs/common/auth
Unityでの実装
画像データの取得
Cloud Vision APIでリクエストする画像は、バイナリの画像データをBase64エンコードする必要があります。
一旦、Texture2Dに入れてから、Texture2D.EncodeToJPG()(PNGでも可)→Convert.ToBase64String()が簡単です。
var texture = new Texture2D(Screen.width, Screen.height);
texture.ReadPixels(new Rect(0, 0, Screen.width, Screen.height), 0, 0);
byte[] jpg = texture.EncodeToJPG();
string encode = Convert.ToBase64String (jpg);

StartCoroutine(requestVisionAPI(encode));
上記の例では、予めカメラ映像が画面に写るようにしておいて、Texture2D.ReadPixels()で取得したScreenShotをリクエスト画像にしています。簡単ですが、画面上のGUIやARマーカーもろとも解析しちゃうのでケースバイケースで。
Cloud Vision APIへのリクエスト
requestBodyにBase64エンコードした画像とリクエストパラメータをセットした後、JSONに変換して、UnityWebRequestのPOSTデータとします。
JSON変換は、JsonUtilityを使ってます。
ヘッダの指定で悩んでいたところ、以下の記事が一発回答でした。
http://qiita.com/mattak/items/d01926bc57f8ab1f569a
private IEnumerator requestVisionAPI(string base64Image)
{
    string apiKey = "[GCPで発行したAPI Key]";
    string url = "https://vision.googleapis.com/v1/images:annotate?key=" + apiKey;

    // requestBodyを作成
    var requests = new requestBody ();
    requests.requests = new List<AnnotateImageRequest>();

    var request = new AnnotateImageRequest();
    request.image = new Image();
    request.image.content = base64Image;

    request.features = new List<Feature>();
    var feature = new Feature ();
    feature.type = FeatureType.LABEL_DETECTION.ToString();
    feature.maxResults = 10;
    request.features.Add (feature);

    requests.requests.Add (request);

    // JSONに変換
    string jsonRequestBody = JsonUtility.ToJson (requests);

    // ヘッダを"application/json"にして投げる
    var webRequest = new UnityWebRequest(url, "POST");
    byte[] postData = Encoding.UTF8.GetBytes(jsonRequestBody);
    webRequest.uploadHandler = (UploadHandler) new UploadHandlerRaw(postData);
    webRequest.downloadHandler = (DownloadHandler) new DownloadHandlerBuffer();
    webRequest.SetRequestHeader("Content-Type", "application/json");

    yield return webRequest.Send();

    if (webRequest.isError) {
        // エラー時の処理
        AndroidHelper.ShowAndroidToastMessage (webRequest.error);
    } else {
        // 成功時の処理
        AndroidHelper.ShowAndroidToastMessage (webRequest.downloadHandler.text);
        var responses = JsonUtility.FromJson<Responsebody>(webRequest.downloadHandler.text);

    }
}
requestBodyとresponseBodyですが、JSON変換を行うために、classを定義してあげる必要があります。
APIのリファレンスを見ながら、利用するものを黙々と定義していきます。
https://cloud.google.com/vision/docs/reference/rest/v1/images/annotate
[Serializable]
public class requestBody
{
    public List<AnnotateImageRequest> requests;
}

[Serializable]
public class AnnotateImageRequest
{
    public Image image;
    public List<Feature> features;
    //public string imageContext;
}

[Serializable]
public class Image
{
    public string content;
    //public ImageSource source;
}

[Serializable]
public class ImageSource
{
    public string gcsImageUri;
}

[Serializable]
public class Feature
{
    public string type;
    public int maxResults;
}

public enum FeatureType {
    TYPE_UNSPECIFIED,
    FACE_DETECTION,
    LANDMARK_DETECTION,
    LOGO_DETECTION,
    LABEL_DETECTION,
    TEXT_DETECTION,
    SAFE_SEARCH_DETECTION,
    IMAGE_PROPERTIES
}

[Serializable]
public class ImageContext
{
    public LatLongRect latLongRect;
    public string languageHints;
}

[Serializable]
public class LatLongRect
{
    public LatLng minLatLng;
    public LatLng maxLatLng;
}

[Serializable]
public class LatLng
{
    public float latitude;
    public float longitude;
}

[Serializable]
public class responseBody {
    public List<AnnotateImageResponse> responses;
}

[Serializable]
public class AnnotateImageResponse {
    public List<EntityAnnotation> labelAnnotations;
}

[Serializable]
public class EntityAnnotation {
    public string mid;
    public string locale;
    public string description;
    public float score;
    public float confidence;
    public float topicality;
    public BoundingPoly boundingPoly;
    public List<LocationInfo> locations;
    public List<Property> properties;
}

[Serializable]
public class BoundingPoly {
    public List<Vertex> vertices;
}

[Serializable]
public class Vertex {
    public float x;
    public float y;
}

[Serializable]
public class LocationInfo {
    LatLng latLng;
}

[Serializable]
public class Property {
    string name;
    string value;
}
ところどころコメントアウトしているのは、requestBodyを作る際に無指定だとAPIが"Bad Request"エラーを返却するため。
利用する場合、requestBodyを作る際に何かしら値を設定するか、項目を除外するかしないといけない。
responceBodyに関しては、受け取るものだけ定義しています。定義していないものは、responseに含まれていてもJSONデコードしてresponceBodyに格納する際に無視されるはず。
テスト
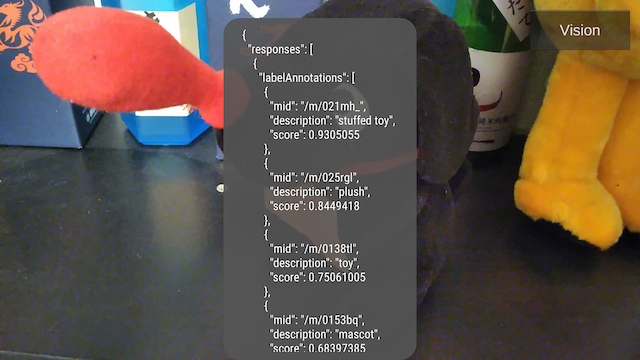
"Vision"ボタンを押したら、その時点の画像フレームをCloud Vision APIで解析するようにしました。

"ハッケンくんぬいぐるみ"の画像を送ったところ、以下の解析結果を得たので、動作に問題はなさそうです。
"stuffed toy":ぬいぐるみ
"plush":プラッシュ (これもぬいぐるみ的な意味らしい)
"toy":おもちゃ
"mascot":マスコット