TensorFlowチュートリアルその2
Deep MNIST for Experts
https://www.tensorflow.org/versions/r0.8/tutorials/mnist/pros/index.html
前のチュートリアルが、単純にソフトマックス回帰するだけだったのに対し、今度は畳込みニューラルネットで学習を行います。正答率が91%から99%にアップするとか。
深層学習への知識が足りなさすぎたので、MLPシリーズの深層学習という本で勉強しはじめました。
畳込みニューラルネット
画像認識によく使われる方法です。中間層に畳込み層とプーリング層を複数繰り返し、最終的に全結合層を経て、出力層へと至ります。今回はクラス分類なので、出力層は前回と同様にソフトマックスになります。
畳込み層
入力よりも小さなサイズのフィルタを使って、積和計算をすることを畳込みといいます。前回の単純な画像認識ではピクセルごとに重みをつけていましたが、もっと広い範囲で重み付けしていきます。
畳込みの入力と出力のサイズですが、フィルタサイズの他にストライドとパディングが影響します。ストライドはフィルタをどれだけずらして入力に適用するかです。パディングはフィルタをずらしていったときにはみ出た部分をどうするかになります。
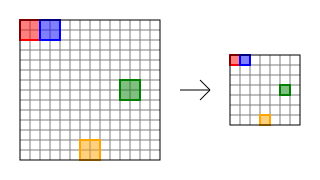
画像は19x19の入力に対して、5x5のフィルタ、ストライド1、パディングあり、の畳込みのイメージです。入力と出力のサイズが同じになります。
プーリング層
プーリング層では収束のためにデータを小さくしていきます。
プーリングの方法としては、各点の平均をとったり、最大値をとったりします。画像認識では最大値を使うのが一般的なようです。
画像は14x14の入力に対して、2x2のサイズ、ストライド2でプーリングを行っているイメージです。ぴったしおさまっているため、パディングは発生していません。出力は入力の縦横半分になります。
学習戦略
今回のチュートリアルでは、畳込み層とプーリング層のペアを2回行い、その後全結合層を経てソフトマックスします。
畳込み層は5x5のフィルタ、ストライド1、パディングあり、活性化関数はReLU。プーリング層は2x2、ストライド1、最大プーリング。1回目の畳込みは32枚、2回目の畳込みは64枚のフィルタを使います。
全結合層は1024ユニットで活性化関数はReLUを用います。
過適合を避けるためのドロップアウトを入れて、最後にソフトマックス回帰します。
トレーニングは交差エントロピーが最小になるように確率的勾配降下法のAdamで最適化します。
ソースコード
# Import Data
from tensorflow.examples.tutorials.mnist import input_data

import tensorflow as tf

mnist = input_data.read_data_sets("MNIST_data/", one_hot=True)

sess = tf.InteractiveSession()

# Model
x = tf.placeholder(tf.float32, [None, 784])
y_ = tf.placeholder(tf.float32, [None, 10])

# Weight Initialization
def weight_variable(shape, name):
    initial = tf.truncated_normal(shape, stddev=0.1)
    return tf.Variable(initial, name=name)

def bias_variable(shape, name):
    initial = tf.constant(0.1, shape=shape)
    return tf.Variable(initial, name=name)

# Convolution and Pooling
def conv2d(x, W):
    return tf.nn.conv2d(x, W, strides=[1, 1, 1, 1], padding='SAME')

def max_pool_2x2(x):
    return tf.nn.max_pool(x, ksize=[1, 2, 2, 1],
                          strides=[1, 2, 2, 1], padding='SAME')

# First Convolutional Layer
W_conv1 = weight_variable([5, 5, 1, 32], 'W_conv1')
b_conv1 = bias_variable([32], 'b_conv1')

x_image = tf.reshape(x, [-1, 28, 28, 1])

h_conv1 = tf.nn.relu(conv2d(x_image, W_conv1) + b_conv1)
h_pool1 = max_pool_2x2(h_conv1)

# Second Convolutional Layer
W_conv2 = weight_variable([5, 5, 32, 64], 'W_conv2')
b_conv2 = bias_variable([64], 'b_conv2')

h_conv2 = tf.nn.relu(conv2d(h_pool1, W_conv2) + b_conv2)
h_pool2 = max_pool_2x2(h_conv2)

# Density Connected Layer
W_fc1 = weight_variable([7 * 7 * 64, 1024], 'W_fc1')
b_fc1 = bias_variable([1024], 'b_fc1')

h_pool2_flat = tf.reshape(h_pool2, [-1, 7 * 7 * 64])
h_fc1 = tf.nn.relu(tf.matmul(h_pool2_flat, W_fc1) + b_fc1)

# Dropout
keep_prob = tf.placeholder(tf.float32)
h_fc1_drop = tf.nn.dropout(h_fc1, keep_prob)

# Readout Layer
W_fc2 = weight_variable([1024, 10], 'W_fc2')
b_fc2 = bias_variable([10], 'b_fc2')

y_conv = tf.nn.softmax(tf.matmul(h_fc1_drop, W_fc2) + b_fc2)

# Train and Evaluate the Model
cross_entropy = tf.reduce_mean(-tf.reduce_sum(y_ * tf.log(y_conv), reduction_indices=[1]))
train_step = tf.train.AdamOptimizer(1e-4).minimize(cross_entropy)
correct_prediction = tf.equal(tf.argmax(y_conv, 1), tf.argmax(y_, 1))
accuracy = tf.reduce_mean(tf.cast(correct_prediction, tf.float32))
init_op = tf.initialize_all_variables()
saver = tf.train.Saver()
sess.run(init_op)
for i in range(20000):
    batch = mnist.train.next_batch(50)
    if i % 100 == 0:
        train_accuracy = accuracy.eval(feed_dict={
            x: batch[0], y_: batch[1], keep_prob: 1.0})
        print("step %d, training accuracy %g" % (i, train_accuracy))
    train_step.run(feed_dict={x: batch[0], y_: batch[1], keep_prob: 0.5})

saver.save(sess, 'mnist.ckpt')

print(sess.run(accuracy, feed_dict={
    x: mnist.test.images, y_: mnist.test.labels, keep_prob: 1.0}))
コード内容
適当に抜粋しながら。。。
# Weight Initialization
def weight_variable(shape, name):
    initial = tf.truncated_normal(shape, stddev=0.1)
    return tf.Variable(initial, name=name)

def bias_variable(shape, name):
    initial = tf.constant(0.1, shape=shape)
    return tf.Variable(initial, name=name)
今回、重みとバイアスを複数用意する必要があるので、初期化用の関数を定義しています。重みは標準偏差0.1の正規分布からランダムに、バイアスは固定値0.1で初期化します。
# Convolution and Pooling
def conv2d(x, W):
    return tf.nn.conv2d(x, W, strides=[1, 1, 1, 1], padding='SAME')

def max_pool_2x2(x):
    return tf.nn.max_pool(x, ksize=[1, 2, 2, 1],
                          strides=[1, 2, 2, 1], padding='SAME')
畳込みとプーリング用の関数定義。
ストライド(strides)とプーリングサイズ(ksize)は$[1, y, x, 1]$で指定。パディング(padding)はパディングする場合はSAME、しない場合はVALIDを指定します。
for i in range(20000):
    batch = mnist.train.next_batch(50)
    if i % 100 == 0:
        train_accuracy = accuracy.eval(feed_dict={
            x: batch[0], y_: batch[1], keep_prob: 1.0})
        print("step %d, training accuracy %g" % (i, train_accuracy))
    train_step.run(feed_dict={x: batch[0], y_: batch[1], keep_prob: 0.5})
ドロップアウトでの選出確率はトレーニング時は0.5を設定。正答率を表示の際にはドロップアウトなし。
saver = tf.train.Saver()
saver.save(sess, 'mnist.ckpt')
このへんは学習内容をあとで再利用するために保存しています。
実行結果
むっちゃ時間かかります。GPU使いたい。。。
$ python mnist_experts.py
Extracting MNIST_data/train-images-idx3-ubyte.gz
Extracting MNIST_data/train-labels-idx1-ubyte.gz
Extracting MNIST_data/t10k-images-idx3-ubyte.gz
Extracting MNIST_data/t10k-labels-idx1-ubyte.gz
step 0, training accuracy 0.08
step 100, training accuracy 0.84
step 200, training accuracy 0.9

[SNIP]

step 19700, training accuracy 1
step 19800, training accuracy 1
step 19900, training accuracy 1
0.9931
無事99%突破。
手書き文字認識
使った画像はこれと同じ。
69行以下を以下のように書き換え。
saver = tf.train.Saver()
saver.restore(sess, 'mnist.ckpt')

from PIL import Image
import numpy
import sys

print(sys.argv)
image = Image.open(sys.argv[1]).convert('L')
image.thumbnail((28, 28))
image = 1 - numpy.asarray(image, dtype=numpy.float32) / 255
image = (image * 2 - 0.5).clip(0,1)
image = image.reshape(1, 784)
p = sess.run(y_conv, feed_dict={x: image, y_: [[0.0] * 10], keep_prob: 1.0})[0]
print(p)
print(numpy.argmax(p))
実行結果
$ python piyo.py IMG_0738.JPG
[  2.06287275e-03   1.74993195e-03   4.54939815e-04   7.90851656e-03
   2.34299470e-02   2.60760845e-03   5.51027420e-04   1.70881534e-03
   1.58075709e-02   9.43718731e-01]
9

$ python piyo.py IMG_0739.JPG
[  2.62831487e-02   8.93540913e-04   8.38274121e-01   8.43088049e-03
   6.77698408e-04   1.14618964e-03   3.20915715e-04   5.88077062e-04
   4.33761925e-02   8.00093859e-02]
2

$ python piyo.py IMG_0740.JPG
[  1.53723324e-03   4.16706243e-05   3.47848509e-05   9.35698044e-04
   5.70868782e-04   9.34737563e-01   4.11881716e-04   1.19289827e-04
   5.45489453e-02   7.06205983e-03]
5
見事に正解!