先日行われた ng-kyoto Angular Meetup #3 にて、「CSS in JS と CSS Modules」という発表を行いました。
Angular Meetup にも関わらず、React における Component のスタイリングに関する内容で、最後に「React 勢がこんなに頑張っているのに Angular ときたら」と煽るつもりだったのですが、直前の @armorik83 さんの発表で Angular 2 で同じような機能が実装されることを知り、慌ててオチを書き換えたのでした。
というわけでこの記事では、 Angular 2 で Component のスタイルをどのように実装するか、CSS のカプセル化(ローカルスコープ化)がどのように行われるのかについて、見ていきたいと思います。
前提
- この記事を執筆した時点での Angular 2 の最新バージョンは 2.0.0-alpha.51 です。
デモ用アプリ
デモ用アプリを http://jmblog.github.io/angular2-styling-components-demo/ に用意しました。
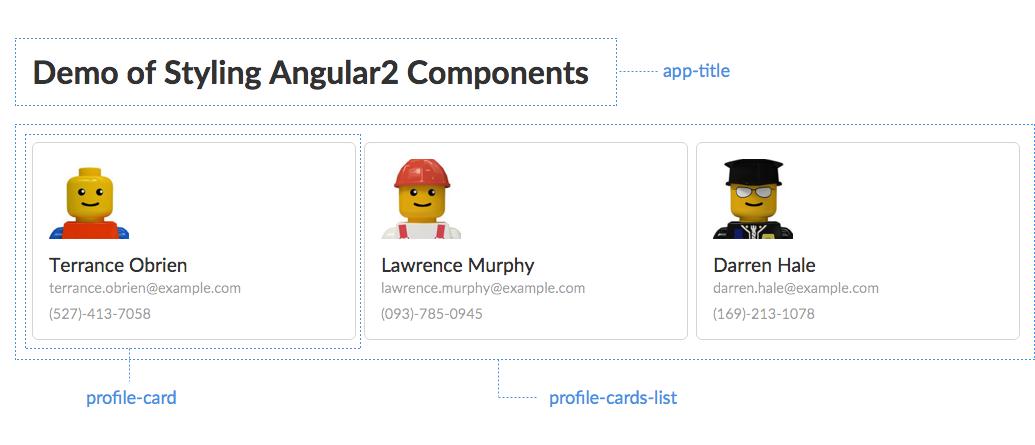
ソースコード一式は jmblog/angular2-styling-components-demo で入手可能です。興味のある方は Fork してご自身の環境でいろいろと触ってみてください。
Component のスタイル実装
Angular 2 で Component のスタイルを実装する方法には、3通りあります。
- ViewMetadata の
stylesプロパティを使う - ViewMetadata の
styleUrlsプロパティを使う - テンプレートに
<style>エレメントで埋め込む
その1. ViewMetadata の styles プロパティを使う
ViewMetadata の styles プロパティを使って TypeScript 内に CSS を記述する方法です。
import {Component} from 'angular2/angular2';

@Component({
  selector: 'app-title',
  template: `
    <h1 class="title">Demo of Styling Angular2 Components</h1>
  `,
  styles: [`
    .title {
      margin-bottom: 3rem;
    }
  `]
})
export class AppTitleComponent {}
CSS のコード量が少なければまぁこれでもよいのですが、多くなってくると分離したくなってきますね。あと、エディタによっては HTML や CSS がうまくハイライトされないかもしれません。
その2. ViewMetadata の styleUrls プロパティを使う
CSS を外部ファイルにして、ViewMetadata の styleUrls プロパティで指定する方法です。
import {Component, CORE_DIRECTIVES} from 'angular2/angular2';
import {PeopleService} from '../../services/people';
import {ProfileCardComponent} from '../profile-card/profile-card';

@Component({
  selector: 'profile-cards-list',
  templateUrl: './components/profile-cards-list/profile-cards-list.html',
  styleUrls: ['./components/profile-cards-list/profile-cards-list.css'],
  providers: [PeopleService],
  directives: [CORE_DIRECTIVES, ProfileCardComponent]
})
export class ProfileCardsListComponent {
  constructor(public peopleService:PeopleService) {
    peopleService.people
      .subscribe(people => this.people = people);
  }
}
この場合、AngularJS 1.x にもあった templateUrl と同じように、CSS ファイルが XHR により取得されます。

Sass などのプリプロセッサや Autoprefixer を利用するのであれば、独立した CSS ファイルになっているほうが断然都合がいいので、この方法を選択することになるかと思います。
なお、外部ファイル数が増えば増えるほど、HTTPリクエスト数も増えてしまい、パフォーマンスの問題が出てきますが、gulp-inline-ng2-template という gulp プラグインを利用すると、templateUrl や styleUrls で指定した外部ファイルを template と styles に展開してくれるので、この問題を回避することができます。
その3. テンプレートに <style> エレメントで埋め込む
テンプレート(HTML)の中に <style> エレメントを使って CSS を記述する方法です。
import {Component, Input} from 'angular2/angular2';

@Component({
  selector: 'profile-card',
  templateUrl: './components/profile-card/profile-card.html'
})
export class ProfileCardComponent {
  @Input() person;
}
<style>
  .profile-card {...}
  .image {...}
  .name {...}
  .email {...}
</style>
<div class="profile-card">
  <div class="image"><img src="{{person.picture.medium}}" width="80"></div>
  <div class="name">{{person.name.first}} {{person.name.last}}</div>
  <div class="email">{{person.email}}</div>
<div>
HTMLとCSSが同一ファイル内で隣接しているため、コードが書きやすいです。styles を使う場合と違って、通常のHTMLファイルにコードを書くことができますし、Sass や Autoprefixer を使わないのであれば、案外悪くないのではと思います。
CSS のカプセル化(ローカルスコープ化)
このように、スタイルの定義の方法にはいくつかありますが、どの方法を使っても、スタイルはそれぞれのコンポーネントに閉じたスコープにのみ適用されるようになっています。
この CSS のカプセル化(ローカルスコープ化)がどのように実現されているのか、その仕組みを見てみましょう。
カプセル化の仕組み
例えば、デモ用アプリの app-title コンポーネントと profile-card コンポーネントには、それぞれ .title という同じ名前のクラスが存在しています。
@Component({
  selector: 'app-title',
  template: `
    <h1 class="title">Demo of Styling Angular2 Components</h1>
  `,
  styles: [`
    .title {
      margin-bottom: 3rem;
    }
  `]
})
<style>
...
.title {
  text-transform: capitalize;
  font-size: 1.2rem;
  font-weight: 400;
}
...
</style>

<div class="profile-card">
  ...
  <div class="title">{{person.name.first}} {{person.name.last}}</div>
  ...
</div>
同じ名前を使っていますが、これらはお互い依存関係のない(つまりお互いのスタイルに影響を与え合わない)、独立したクラスを想定しています。
ブラウザでアプリを実行すると、次のようにコンポーネントごとのスタイル定義が <head> の中に <style> で追加されていることが確認できるかと思います。
<!DOCTYPE html>
<html>
<head>
  ...
  <style>
    .title[_ngcontent-hpw-2] {
      margin-bottom: 3rem;
    }
  </style>
  <style>
    ...
    .title[_ngcontent-hpw-5] {
      text-transform: capitalize;
      font-size: 1.2rem;
      font-weight: 400;
    }
    ...
  </style>
</head>
<body>
 ...
</body>
</html>
また、コンポーネントの DOM 部分は次のようになっています。
<app-title _nghost-hpw-2="">
  <h1 class="title" _ngcontent-hpw-2="">Demo of Styling Angular2 Components</h1>
</app-title>
<profile-card _ngcontent-hpw-3="" _nghost-hpw-5="">
  <div class="profile-card" _ngcontent-hpw-5="">
    ...
    <div class="title" _ngcontent-hpw-5="">terrance obrien</div>
    ...
  </div>
</profile-card>
注目すべきは _nghost-hpw-*, _ngcontent-hpw-* という部分です。これは Angular 2 が実行時に自動で挿入する属性で、hpw の部分はブラウザをリロードするたびに変化します。最後の数字の部分は 各要素のレベル(階層)を表しています。
そして、これらを属性セレクタとしてスタイル定義に適用することで、仮に同じ名前のクラスであっても、適用される範囲がコンポーネント内に限られることになります。
これにより、ローカルスコープ(カプセル化)を実現しているというわけです。
.title[_ngcontent-hpw-2] {
  margin-bottom: 3rem;
}

.title[_ngcontent-hpw-5] {
  text-transform: capitalize;
  font-size: 1.2rem;
  font-weight: 400;
}
なお、この挙動は encapsulation というプロパティで変更することができます。このプロパティにセットできるのは次の3種類です。
- ViewEncapsulation.None
- ViewEncapsulation.Emulated
- ViewEncapsulation.Native
ViewEncapsulation.None
ViewEncapsulation.None を指定すると、カプセル化は一切行われず、すべてグローバルスコープに展開されます。
import {Component, ViewEncapsulation} from 'angular2/angular2';

@Component({
  selector: 'app-title',
  template: ...
  styles: ...
  encapsulation: ViewEncapsulation.None
})
export class AppTitleComponent {}
<!DOCTYPE html>
<html>
<head>
  <style>
    .title {
      margin-bottom: 3rem;
    }
  </style>
</head>
<body>
  <my-app>
    <app-title>
      <h1 class="title">Demo of Styling Angular2 Components</h1>
    </app-title>
  </my-app>
</body>
</html>
なお、スタイルの定義がないコンポーネントに対しては、無駄な処理を防ぐため ViewEncapsulation.None がデフォルト値になるようです。
ViewEncapsulation.Emulated
スタイルの定義がある場合のデフォルトはこれになります。上で見たように、各要素に独自の属性を割り当てることで、ローカルスコープ化を実現しています。
ViewEncapsulation.Native
ネイティブ、つまり W3C で仕様策定中の Shadow DOM を使います。

Shadow DOM に対応していないブラウザで実行するとエラーとなってしまうので、現時点では利用は限られるでしょう。

まとめ
以上、Angular 2 のスタイル実装の方法と CSS のカプセル化(ローカルスコープ化)について簡単にまとめてみました。
Angular1.x の頃と比べるとずいぶんモダンになっている印象を受けました。ただ、コンポーネントの外部からスタイルを変更する方法が提供されているのかなど、わからない部分も多いので、引き続きウォッチしていきたいと思います。