Chef client-serverモデルの入門者向け解説。
いまだになぜなのかはよく分からないが、Chef-soloや Knife-soloの解説はよくあるのにChef client-server版の解説があまり見当たらない。英語で検索すればたくさんヒットするし、英語圏でChefはclient-server版が主流に感じる。実際、私の今の勤め先であるベルリンのスタートアップでもそんな何千何万のサーバ数ではなく、小規模な数のサーバ数だがChefはclient-server版を利用している。
日本語情報でChef-soloが主流なのは最初に誰かが日本語でChef-soloを解説して、そこから派生して誰もがそれに沿って環境を構築しているうちに日本語のノウハウがSoloばっかりに溜まって、どんどんそっちに行ってしまったのかもしれない。日本語書籍にしても決まったようにSoloばかり。なんかもったいない気がするのでChef client-server入門を書くことにした。
Chefの概念とか
Chefの基本概念は以下のリンクを参考に。(ただし事例はSoloとなっている)
DevOps時代の必須知識:インフラストラクチャ自動化フレームワーク「Chef」
構成管理ツールChefを使ってみよう|VPSならConoHa
なぜChefはclient-server版を使うべきなのか
面倒だから、大雑把に言う。
Chef-solo:簡易版
Chef client-server:全部入り
だったら全部入り使った方がいいだろうよ、と。
もう少し踏み込むとChef-soloでサーバー管理してもスケーラブルではない。Chef-soloでゴリゴリ設定して無理やりたくさんのサーバーを管理する方法の解説を読んだことがあるが、もう無駄な努力という感想しかなかった。
1台から大量のサーバー数まで全部カバーできるのがChef client-server版。サーバー数がたとえ1台でもChef client-server版はきっちり動く。わざわざSoloを使う必要はあまり無い。
もっと正直に言うとITエンジニアの姿勢として「サーバは1台だし、うちのサービスがスケールなんてする訳ないからSoloでいいんです」という発想がそもそも気に食わない。現状がたとえサーバー1台でも「俺の技術でいつかはサーバー***台までスケールさせてやるぜ!だからChefはclient-serverだ」ぐらいの気概を持った方が仕事が楽しいに決まってる。ということで男は黙ってChef client-server、と思うのですがいかがでしょうか?
実はSoloのメリットがいまいちまだ分かっていない。Soloは学習コストが低いのがメリットとお考えなら本記事で本当にChef client-serverの学習コストはそんなに高いのか、ご確認いただきたい。他にSoloにしかないすごいメリットをご存知でしたら、ぜひコメントを入れていただければ幸いです。
Chef の構成

Workstation:Chef Serverへ構成の定義をアップロードしたり設定変更を行う操作端末。手元のPC、MacBookとか。
Chef Server:Chefの設定ファイルを管理するサーバー
Node:Chefによって管理されているサーバー。例えばWebアプリの入ったサーバー
Hosted Chef serverを使えば楽ちん
なぜ無駄にSoloに人気があるのかというときっとChef Serverが不要という点があると思う。そこはChef社が用意しているHosted Chef serverを使えば楽ちんに済む。Chef社が用意するウェブアプリに登録してしまえばそれだけでChefサーバーを使える仕組み。自分でChef用のサーバーを立てたりインストーすする必要は無い。しかも5ノードまで無料。
VagrantでUbuntuの仮想環境を作ってChef client-serverを試す
環境はMacOSでやりました。異なる環境の場合は脳内変換して読んでください。
VirtualBoxのインストール
これらのVagrantの環境構築はChefには直接関係無いが、仮想環境でテストをするにはどうしても必要なので用意する。
こちらのダウンロードページからOS X hostsを選択してdmgファイルをダウンロード。
Downloads – Oracle VM VirtualBox
ダブルクリックして指定の通りにNextボタンを押して完了させる。終了したら以下のコマンドで確認。
$ VBoxManage --version
5.1.14r112924
このようにバージョンが出ればOk。
Vagrantのインストール
こちらのダウンロードページからMAC OS X を選択してdmgファイルをダウンロード。
Download - Vagrant by HashiCorp
ダブルクリックして指定の通りにNextボタンを押して完了させる。終了したら以下のコマンドで確認。
$ vagrant --version
Vagrant 1.9.1
このようにバージョンが出ればOk。
Vagrantの立ち上げ
$ cd ~
$ mkdir Vagrant
$ cd Vagrant
$ vagrant box add bento/ubuntu-14.04 --provider=virtualbox
==> box: Loading metadata for box 'bento/ubuntu-14.04'
    box: URL: https://atlas.hashicorp.com/bento/ubuntu-14.04
==> box: Adding box 'bento/ubuntu-14.04' (v........

$ vagrant init bento/ubuntu-14.04
A `Vagrantfile` has been placed in this directory. You are now
ready to `vagrant up` your first virtual environment! Please read
the comments in the Vagrantfile as well as documentation on
`vagrantup.com` for more information on using Vagrant.
sshでUbuntuに入る際にIPアドレスを指定して本物っぽくしたいのでVagrantfileの以下のコメントアウトされている部分をアンコメントしてIPアドレス指定する。
これでUbuntuの仮想環境が192.168.33.10のアドレスで立ち上がる。
Vagrant.configure("2") do |config|
  config.vm.network "private_network", ip: "192.168.33.10"
Ubuntuの仮想環境をvagrant upコマンドで立ち上げる。
$ vagrant up
Bringing machine 'default' up with 'virtualbox' provider...
==> default: Checking if box 'bento/ubuntu-14.04' is up to date...
==> default: Machine already provisioned. Run `vagrant provision` or use the `--provision`
==> default: flag to force pr......
$ vagrant status
Current machine states:

default                   running (virtualbox)
status確認 をしてrunning (virtualbox)となっていればOk。
このVagrant環境の中にsshのIPアドレスを指定して入る。
$ vagrant ssh-config
Host default
  HostName 127.0.0.1
  User vagrant
  Port 2222
  UserKnownHostsFile /dev/null
  StrictHostKeyChecking no
  PasswordAuthentication no
  IdentityFile "/Users/user_name/VirtualBox VMs/.vagrant/machines/default/virtualbox/private_key"
  IdentitiesOnly yes
  LogLevel FATAL
.ssh/configに設定を書き込む。
$ vagrant ssh-config --host 192.168.33.10 >> ~/.ssh/config
.ssh/configの中身はこのようになっているはず。
$ vim ~/.ssh/config
Host 192.168.33.10
  HostName 127.0.0.1
  User vagrant
  Port 2222
  UserKnownHostsFile /dev/null
  StrictHostKeyChecking no
  PasswordAuthentication no
  IdentityFile /Users/xxxx/.vagrant/machines/default/virtualbox/private_key
  IdentitiesOnly yes
  LogLevel FATAL
これでIPアドレスを指定してVagrant環境に入れる。ユーザー名はvagrant
$ ssh vagrant@192.168.33.10
Welcome to Ubuntu 14.04.5 LTS (GNU/Linux 3.13.0-103-generic x86_64)

 * Documentation:  https://help.ubuntu.com/

  System information as of Sun Feb 26 14:21:04 UTC 2017

  System load:  0.0               Processes:           85
  Usage of /:   4.4% of 38.02GB   Users logged in:     1
  Memory usage: 8%                IP address for eth0: 10.0.2.15
  Swap usage:   0%                IP address for eth1: 192.168.33.10
Terminalのプロンプトが$からvagrant@vagrant:~$に変わっていることからVagrant内に入ったことが分かる。
curlを使ってソフトをインストールするので一応最新版を入れておく。
vagrant@vagrant:~$ sudo apt-get update
Get:1 http://security.ubuntu.com trusty-security InRelease [65.9 kB]
Get:2 http://security.ubuntu.com trusty-security/main Sources [126 kB]
Ign http://us.archive.ubuntu.com trusty InRelease
  :
  :
Hit http://us.archive.ubuntu.com trusty/restricted Translation-en
Hit http://us.archive.ubuntu.com trusty/universe Translation-en
Fetched 6491 kB in 12s (529 kB/s)
Reading package lists... Done
vagrant@vagrant:~$ sudo apt-get -y install curl
Reading package lists... Done
Building dependency tree
Reading state information... Done
curl is already the newest version.
0 upgraded, 0 newly installed, 0 to remove and 55 not upgraded.
curlを使って最新のchefdkをインストールする。2017年2月25日時点でのStable Release最新版は1.2.22
vagrant@vagrant:~$ curl https://omnitruck.chef.io/install.sh | sudo bash -s -- -P chefdk -c stable -v 1.2.22

  % Total    % Received % Xferd  Average Speed   Time    Time     Time  Current
                                 Dload  Upload   Total   Spent    Left  Speed
100 20500  100 20500    0     0  85952      0 --:--:-- --:--:-- --:--:-- 85774
ubuntu 14.04 x86_64
Getting information for chefdk stable 1.2.22 for ubuntu...
downloading https://omnitruck.chef.io/stable/chefdk/metadata?v=1.2.22&p=ubuntu&pv=14.04&m=x86_64
  to file /tmp/install.sh.4035/metadata.txt
trying wget...
sha1    b61c7ba2ad5be8845545e9561224803d44d9cb67
sha256  518ecf308764c08a647ddabc6511af231affd2bf3e6526e60ef581926c8e7105
url https://packages.chef.io/files/stable/chefdk/1.2.22/ubuntu/14.04/chefdk_1.2.22-1_amd64.deb
version 1.2.22
downloaded metadata file looks valid...
downloading https://packages.chef.io/files/stable/chefdk/1.2.22/ubuntu/14.04/chefdk_1.2.22-1_amd64.deb
  to file /tmp/install.sh.4035/chefdk_1.2.22-1_amd64.deb
trying wget...
Comparing checksum with sha256sum...
Installing chefdk 1.2.22
installing with dpkg...
(Reading database ... 79397 files and directories currently installed.)
Preparing to unpack .../chefdk_1.2.22-1_amd64.deb ...
Unpacking chefdk (1.2.22-1) over (0.18.30-1) ...
Setting up chefdk (1.2.22-1) ...
Thank you for installing Chef Development Kit!
これでNodeの用意は完了。一旦Vagrant環境から外に出る。
vagrant@vagrant:~$ exit
logout
Connection to 127.0.0.1 closed.
WorkstationにChefDkをインストールする。
こちらのダウンロードページからOS X を選択してdmgファイルをダウンロード。
ダブルクリックして指定の通りにNextボタンを押して完了させる。終了したら以下のコマンドで確認。
$ chef --version
Chef Development Kit Version: 1.2.22
chef-client version: 12.18.31
delivery version: master (0b746cafed65a9ea1a79de3cc546e7922de9187c)
berks version: 2017-02-25T00:34:32.658873 76260] 2017-02-25T00:34:32.659015 76260] 2017-02-25T00:34:32.659127 76260] 2017-02-25T00:34:32.659225 76260] 2017-02-25T00:34:32.693541 76260] 2017-02-25T00:34:32.693687 76260] 5.6.0
kitchen version: 1.15.0
chefの作業ディレクトリを作る。名前はなんでもいい。
$ mkdir ~/chef-sample
$ cd ~/chef-sample
Hosted Chef serverの登録
ここでサインアップする。
Create New Organization をクリックしてOrganizationを作る。organizationの名前にはだいたい会社名を入れる。ただしユニークであること。もし同名が先に取られていたら残念。
Create Organizationをクリックして、Organization作成は終了。
.chefディレクトリ
これからChefの大切なツールのひとつであるknifeを使う。knifeはカレントディレクトに入っている.chefディレクトリを探す。もし無ければ上位ディレクトに遡って探しに行ってしまうので、ここに作っておく。
$ mkdir ~/chef-sample/.chef
knife config ファイルを作成する
ログインしてAdministration タブをひらく

Generate Knife Configをクリックしてknofe.rbをダウンロードする。
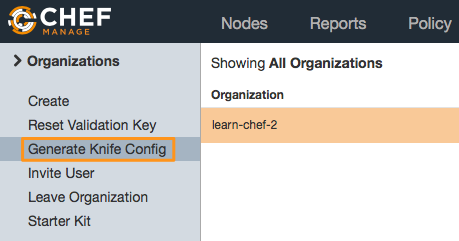
ダウンロードしたknife.rbを.chef以下に移動する。
$ cp ~/Downloads/knife.rb ~/chef-sample/.chef
knife.rbの中身はこのようになっているはず。
$ cat .chef/knife.rb
# See http://docs.chef.io/config_rb_knife.html for more information on knife configuration options

current_dir = File.dirname(__FILE__)
log_level                :info
log_location             STDOUT
node_name                "your user name"
client_key               "#{current_dir}/your_user_name.pem"
chef_server_url          "https://api.chef.io/organizations/your_organization_name"
cookbook_path            ["#{current_dir}/../cookbooks"]
RSA privateキーの設定
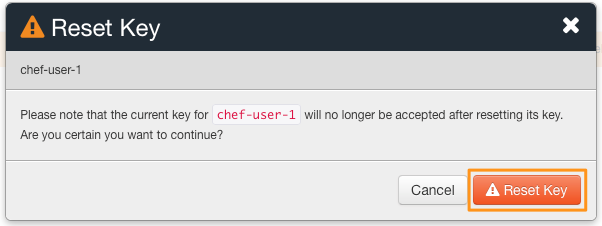
Administrationタブ -> Users -> ユーザー名 -> Reset key をクリック
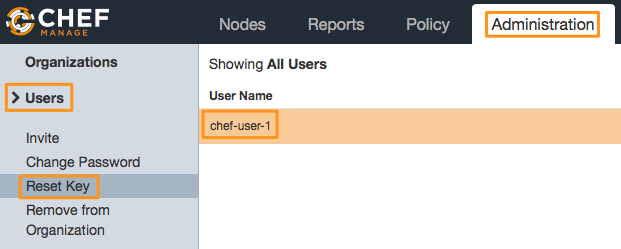
Reset keyをクリック
Download をクリック。たまにDownload ボタンが出ないことがあるが、そんな時はキーの内容をコピーしてペーストすればOk。
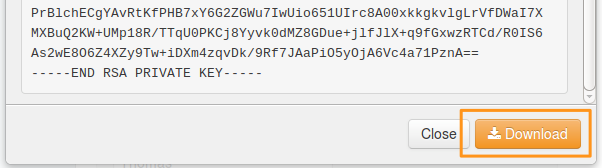
$ cp ~/Downloads/username.pem ~/chef-sample/.chef
中身はこのようになっているはず。
$ cat ~/chef-sample/.chef/username.pem
-----BEGIN RSA PRIVATE KEY-----
MIIEowIBAAKCAQEAqJCxFv1BoqlTJeK5zTZ6vX6hvQuDzlaN0v+Fo5R2zobP72Ga
N8GUOhaY........
Chefサーバーとの接続確認
.chefファイルの用意ができたことで、Chefサーバーとの接続確認がknifeコマンドを通して可能になる。
$ ls ~/chef-sample/.chef
chef-user-1.pem
knife.rb
このコマンドで確認する。Successfully verified と出ていればOk。
$ knife ssl check
Connecting to host api.chef.io:443
Successfully verified certificates from `api.chef.io'
Cookbooks の作成
cookbooksディレクトリの作成
$ mkdir ~/chef-sample/cookbooks
$ cd ~/chef-sample/cookbooks
今までSoloで使ってきたクックブックをそのまま入れてもOkだし、最初のテストとしてのおすすめはChef社が用意しているサンプル。以下のgit cloneコマンドでサンプルが手に入る。
$ git clone https://github.com/learn-chef/learn_chef_httpd.git
Cloning into 'learn_chef_apache2'...
中身はこのような構成になっている。
$ tree
.
└── learn_chef_apache2
    ├── Berksfile
    ├── LICENSE
    ├── README.md
    ├── chefignore
    ├── metadata.rb
    ├── recipes
    │   └── default.rb
    ├── spec
    │   ├── spec_helper.rb
    │   └── unit
    │       └── recipes
    │           └── default_spec.rb
    ├── templates
    │   └── index.html.erb
    └── test
        └── smoke
            └── default
                └── default_test.rb

9 directories, 10 files
できればApacheではなくNginxの方が好みなのだが、そこはまーいい。
レシピはこのようになっている。特に凝ったことはしていない。
#
# Cookbook Name:: learn_chef_apache2
# Recipe:: default
#
# Copyright (c) 2016 The Authors, All Rights Reserved.
apt_update 'Update the apt cache daily' do
  frequency 86_400
  action :periodic
end

package 'apache2'

service 'apache2' do
  supports status: true
  action [:enable, :start]
end

template '/var/www/html/index.html' do # ~FC033
  source 'index.html.erb'
end
立ち上げた後はindex.html.erbを入れている。
そのindex.html.erbはこのような感じ。
<html>
  <body>
    <h1>hello world</h1>
  </body>
</html>
cookbook をChef serverにアップロード
作成したcookbookをknifeコマンドを使ってアップロードする。アップロード先はもちろんChefサーバー。
$ knife cookbook upload learn_chef_apache2
Uploading learn_chef_apache2 [0.1.0]
Uploaded 1 cookbook.
以下のコマンドで確認できる。
$ knife cookbook list
learn_chef_apache2   0.1.0
Bootstrap コマンド
knifeのBootstrapコマンドでノードを立ち上げる。
基本的なコマンドの実行方法はこれ。
$ knife bootstrap ADDRESS --ssh-user USER --sudo --identity-file IDENTITY_FILE --node-name node1-ubuntu --run-list 'recipe[learn_chef_apache2]'
この大文字に当たるUSERやらIDENTITY_FILEを環境に合わせて変えればOk。
今回構築した仮想環境に合わせて実行する場合は以下のようになる。
$ knife bootstrap 192.168.33.10 --ssh-user vagrant --ssh-password 'vagrant' --sudo --use-sudo-password --node-name node1-ubuntu --run-list 'recipe[learn_chef_apache2]'
de-name node1-ubuntu --run-list 'recipe[learn_chef_apache2]'
Creating new client for node1-ubuntu
Creating new node for node1-ubuntu
Connecting to 192.168.33.10
192.168.33.10 -----> Existing Chef installation detected
192.168.33.10 Starting the first Chef Client run...
192.168.33.10 [2017-02-26T20:23:52+00:00] INFO: Forking chef instance to converge...
192.168.33.10 Starting Chef Client, version 12.18.31
192.168.33.10 [2017-02-26T20:23:52+00:00] INFO: *** Chef 12.18.31 ***
192.168.33.10 [2017-02-26T20:23:52+00:00] INFO: Platform: x86_64-linux
192.168.33.10 [2017-02-26T20:23:52+00:00] INFO: Chef-client pid: 1936
192.168.33.10 [2017-02-26T20:23:54+00:00] INFO: Setting the run_list to ["recipe[learn_chef_apache2]"] from CLI o
ptions
  :
  :
192.168.33.10 [2017-02-26T20:24:11+00:00] INFO: Report handlers complete
192.168.33.10 Chef Client finished, 2/5 resources updated in 19 seconds
192.168.33.10 [2017-02-26T20:24:11+00:00] INFO: Sending resource update report (run-id: f250af06-734d-49ad-8dfe-a3f0fab5fc30)
結果の確認
$ knife node list
node1-ubuntu
$ knife node show node1-ubuntu
Node Name:   node1-ubuntu
Environment: _default
FQDN:        vagrant.vm
IP:          10.0.2.15
Run List:    recipe[learn_chef_apache2]
Roles:
Recipes:     learn_chef_apache2, learn_chef_apache2::default
Platform:    ubuntu 14.04
Tags:
$ curl 192.168.33.10
<html>
  <body>
    <h1>hello world</h1>
  </body>
</html>
cookbookの更新
cookbookを更新して、それをNodeに反映させる。
cookbooks/learn_chef_apache2/templates/index.html.erb
のhello worldメッセージを以下のように変更してみる。
<html>
  <body>
    <h1>hello from <%= node['fqdn'] %></h1>
  </body>
</html>
変更した内容をアップロードする。
$ knife cookbook upload learn_chef_apache2
Uploading learn_chef_apache2 [0.1.0]
Uploaded 1 cookbook.
workstation から更新してもいいが、今回はNodeが1つなのでsshで中に入ってchef-clientを実行する。
$ ssh vagrant@192.168.33.10
Welcome to Ubuntu 14.04.5 LTS (GNU/Linux 3.13.0-103-generic x86_64)
vagrant@vagrant:~$ sudo chef-client
[2017-02-26T20:33:45+00:00] INFO: Forking chef instance to converge...
Starting Chef Client, version 12.18.31
[2017-02-26T20:33:45+00:00] INFO: *** Chef 12.18.31 ***
[2017-02-26T20:33:45+00:00] INFO: Platform: x86_64-linux
[2017-02-26T20:33:45+00:00] INFO: Chef-client pid: 12161
[2017-02-26T20:33:48+00:00] INFO: Run List is [recipe[learn_chef_apache2]]
[2017-02-26T20:33:48+00:00] INFO: Run List expands to [learn_chef_apache2]
[2017-02-26T20:33:48+00:00] INFO: Starting Chef Run for node2-ubuntu
[2017-02-26T20:33:48+00:00] INFO: Running start handlers
[2017-02-26T20:33:48+00:00] INFO: Start handlers complete.
  :
  :

    - update content in file /var/www/html/index.html from ef4ffd to 379617
    --- /var/www/html/index.html        2017-02-26 20:24:10.499619000 +0000
    +++ /var/www/html/.chef-index20170226-12161-6sbj7l.html     2017-02-26 20:33:50.685567000 +0000
    @@ -1,6 +1,6 @@
     <html>
       <body>
    -    <h1>hello world</h1>
    +    <h1>hello from vagrant.vm</h1>
       </body>
     </html>
[2017-02-26T20:33:51+00:00] INFO: Chef Run complete in 3.898848562 seconds

Running handlers:
[2017-02-26T20:33:51+00:00] INFO: Running report handlers
Running handlers complete
[2017-02-26T20:33:51+00:00] INFO: Report handlers complete
Chef Client finished, 1/5 resources updated in 06 seconds
[2017-02-26T20:33:51+00:00] INFO: Sending resource update report (run-id: a678282a-517a-4d24-95bd-1e36cb87dae6)
実行結果の最後あたりにindex.htmlを更新したメッセージが見える。
更新結果の確認
Ubuntuをexitして、内容確認する。
vagrant@vagrant:~$ exit
exit
Connection to 127.0.0.1 closed.
$ curl 192.168.33.10
<html>
  <body>
    <h1>hello from vagrant.vm</h1>
  </body>
</html>
しっかり更新されている。
基本的な流れではこれで終了。後はご自身のサーバー構成に合わせて設定を付加するだけ。
Soloと比較していかがだったでしょうか?そんなにclient-serverはややこし過ぎて学習コストが高いー!と言うほどのことでも無いのでは。
この記事で多少なりとも「ChefはSoloじゃなくてclient-serverにしとくか。なんと言っても全部入りだしスケールしやすいし」と思っていただければ幸いである。Chef client-serverを導入したいけど日本語情報が少ないしな、と躊躇される方も多いように感じている。この記事を機にChef client-serverの日本語の言及がウェブ上に増えて欲しい。それもあって本記事の異論反論もぜひご自身のブログなどを使ってたくさん載せてください。
エンジニアの皆様へ
「ほとんどのエンジニアには解けるが、下位10%のダメなエンジニアにだけ解けないパズル?」なるものをシリーズ化して8パズル作成した。もしご興味あれば解いてみてください。
http://tango-ruby.hatenablog.com/entry/2015/11/30/122814