-
[New Project]->
[Empty Project]プロジェクトがつくられ、AppDelegate.hとAppDelegate.mができる。
-
[New File]->
[UIViewCotroller subclass]->
[class名]ViewController1
[with XIB]チェックを外すプロジェクト内にViewController1.hとViewController1.mができる。
-
コードを書く
まず表示させる画面をつくる
ViewController1.m
# import "ViewController1.h"

@implementation ViewController1

〜略〜

// Implement viewDidLoad to do additional setup after loading the view, typically from a nib.
- (void)viewDidLoad
{
    [super viewDidLoad];

    UILabel* label = [[[UILabel alloc] initWithFrame:self.view.bounds] autorelease];
    label.text = @"Hello, world!";
    label.textAlignment = UITextAlignmentCenter;
    label.backgroundColor = [UIColor whiteColor];
    label.textColor = [UIColor blackColor];
    label.autoresizingMask = UIViewAutoresizingFlexibleWidth | UIViewAutoresizingFlexibleHeight;
    [self.view addSubview:label];
}

〜略〜
-
コードを書く
次にアプリケーションから先ほど作成した画面を呼び、自身のビューに追加する
AppDelegate.h
# import <UIKit/UIKit.h>

@interface AppDelegate : UIResponder <UIApplicationDelegate>
{
    UIViewController* viewController1_;
}

@property (strong, nonatomic) UIWindow *window;

@end
AppDelegate.m
〜略〜

- (void)dealloc
{
    [viewController1_ release];

    [_window release];
    [super dealloc];
}

- (BOOL)application:(UIApplication *)application didFinishLaunchingWithOptions:(NSDictionary *)launchOptions
{
    self.window = [[[UIWindow alloc] initWithFrame:[[UIScreen mainScreen] bounds]] autorelease];
    // Override point for customization after application launch.

    viewController1_ = [[ViewController1 alloc] init];
    [self.window addSubview:viewController1_.view];
    [self.window makeKeyAndVisible];
    return YES;
}

〜略〜
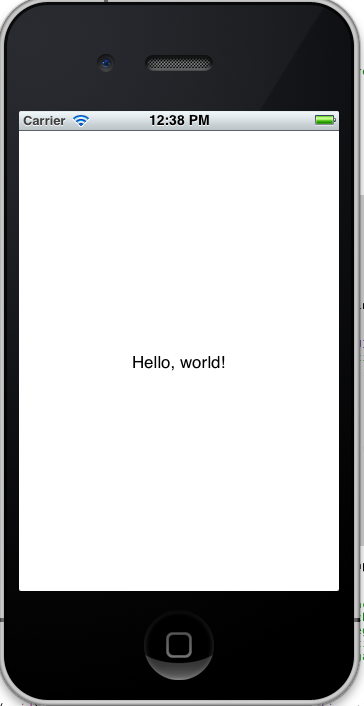
これで以下のような画面が表示される。
ブログやってます:PAPA-tronix !