はじめに
LINEアカウントを利用したログイン機能の実装方法について、まとめました。
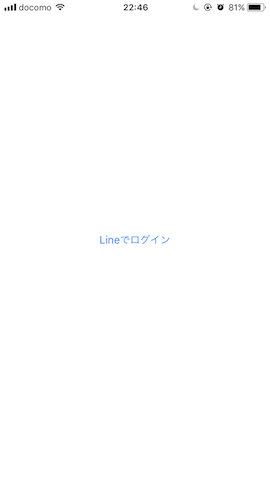
①ログイン画面
ログインボタンを押下すると、認証画面に遷移する
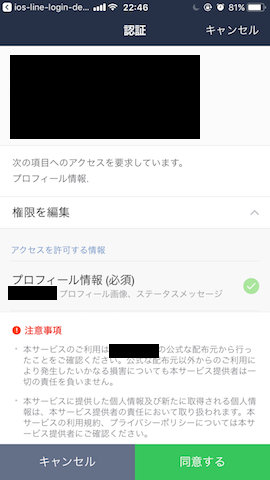
②認証画面
認証画面で同意するボタンを押下すると、ログインできる
手順
①LINE Business Centerでアカウントを登録する
②チャネルを作成し、Channel IDを取得する

③Bundle IDとiOS Schemeを設定する
LINE developersのTechnical configurationからBundle IDとiOS Schemeを設定する
なお、iOS Schemeは、「line3rdp.{Bundle-ID}」という命名にすること
下記の例は、Bundle IDが「jp.st-ventures.ios-line-login-demo」

④Cocoa PodsでLineSDKをインストールする
Podfile
pod 'LineSDK', '~> 4.0.2'
⑤Line SDKをダウンロードする
LINE developersのDownload SDKからLineSDK_ios_4.0.2.zipをダウンロードする

⑥フレームワークを追加する
下記のフレームワークを追加する
・CoreTelephony.framework
・Security.framework
・LineSDK.framework ← ⑤でダウンロードしたSDK

⑦Capabilitiesの「Keychain Sharing」をONにする

⑧Info.plistを設定する
Info.plistにチャネルIDとURLスキームを設定する
なお、チャネルIDは、②で取得した値を設定する
Info.plist
<key>LineSDKConfig</key>
<dict>
    <key>ChannelID</key>
    <string>{CHANNEL ID}</string>
</dict>
Info.plist
<key>CFBundleURLTypes</key>
<array>
    <dict>
        <key>CFBundleTypeRole</key>
        <string>Editor</string>
        <key>CFBundleURLSchemes</key>
        <array>
            <string>line3rdp.$(PRODUCT_BUNDLE_IDENTIFIER)</string>
        </array>
    </dict>
</array>
<key>LSApplicationQueriesSchemes</key>
<array>
    <string>lineauth</string>
    <string>line3rdp.$(PRODUCT_BUNDLE_IDENTIFIER)</string>
</array>
⑨AppDelegateにLINEからアプリが呼ばれたときの処理を追加する
AppDelegate.swift
import UIKit
import LineSDK

@UIApplicationMain
class AppDelegate: UIResponder, UIApplicationDelegate {

    func application(_ app: UIApplication, open url: URL, options: [UIApplicationOpenURLOptionsKey : Any] = [:]) -> Bool {
        return LineSDKLogin.sharedInstance().handleOpen(url)
    }
}
⑩ログイン画面で、ログイン処理を実装する
ViewController.swift
import UIKit
import LineSDK

final class ViewController: UIViewController {

    override func viewDidLoad() {
        super.viewDidLoad()
        LineSDKLogin.sharedInstance().delegate = self
    }

    @IBAction func didTapLogin(_ sender: UIButton) {
        LineSDKLogin.sharedInstance().start()
    }
}
// MARK: - LineSDKLoginDelegate
extension ViewController: LineSDKLoginDelegate {

    func didLogin(_ login: LineSDKLogin,
                  credential: LineSDKCredential?,
                  profile: LineSDKProfile?,
                  error: Error?) {

        if error != nil {
            print(error.debugDescription)
            return
        }

        // アクセストークン
        if let accessToken = credential?.accessToken {
            print("accessToken : \(accessToken)")
        }

        // 表示名
        if let displayName = profile?.displayName {
            print("displayName : \(displayName)")
        }

        // ユーザID
        if let userID = profile?.userID {
            print("userID : \(userID)")
        }

        // プロフィール写真のURL
        if let pictureURL = profile?.pictureURL {
            print("profile Picture URL : \(pictureURL)")
        }
    }
}
■補足情報
ちなみに、ログアウトは、下記のとおり。
        let apiClient = LineSDKAPI(configuration: LineSDKConfiguration.defaultConfig())

        apiClient.logout(queue: .main) { (success, error) in

            if error != nil {
                print(error?.localizedDescription ?? "")
                return
            }

            if success {
                self.dismiss(animated: true, completion: nil)
            }
        }
公式マニュアル
詳細は、公式マニュアルに丁寧に記載されています。