今回は、実際にコードに書かれている要素や言葉についてまとめたいと思います。
まず、基本的に画面表示は activity_◯◯◯.xml string.xml の2つのファイルを編集して作成します。
activity.xml は ProjectFile > res > layout の中にあり、
画面表示内容の編集、
string.xml は ProjectFile > res > value の中にあり、変数宣言するときに編集します。
string.xml で変数を宣言し、activity.xml 内で扱うという形になりますね。
画面を構成する要素は以下のようになります。
基本要素
横幅、縦幅の指定
android:layout_width = "30dp"
android:layout_height = "40dp"
このふたつで View や LinearLayout の横幅,縦幅を設定することができ、数値を指定するか "match_parent" **"wrap_content"**の2つを指定することができます。
この2つは、
match_parent は 画面いっぱいに表示。
wrap_content は ビューを適切なサイズに自動調節して表示。
という働きがあります。
数値を指定するとき、通常は 1dp = 1px と考えていいのですが、PCの設定によって変わるので、↓のサイトを参照してください。
http://qiita.com/nein37/items/0a92556a80c6c14503b2
http://tande.jp/lab/2012/03/1660
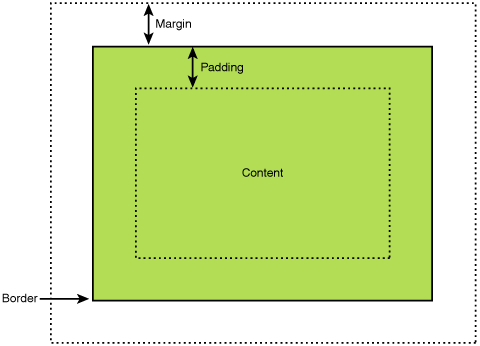
余白の指定
android:layout_merginTop = "5dp"
android:layout_merginBottom = "10dp"
ScrollView スクロールバー
 <ScrollView xmlns:android="http://schemas.android.com/apk/res/android">

     ・
     ・
     ・
     ・
 </ScrollView>
スクロールバーを画面に設定する場合、設置したいビューまたはレイアウトの定義を囲むようにしてスクロールの定義を行います。
これで囲まれた要素を、スクロールで見れるようになります。
LinearLayout
<LinearLayout
	android:layout_width="match_parent"
	android:layout_height="wrap_content"
	android:orientation="horizontal" >
	<TextView
		android:layout_width="70dp"
		android:layout_height="wrap_content"
		android:text="@string/name" />
	<EditText
		android:id="@+id/name"
		android:layout_width="200dp"
		android:layout_height="wrap_content"
		android:inputType="text" />
</LinearLayout>
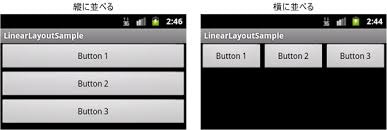
ビューを縦横に並べて配置するレイアウトです。
基本的にこの LinearLayout の中に他のビューを入れ、配置していく形になります。
orientation は、中に入れている要素を横並びにするか縦並びにするか設定できるものです。横並びのときは "horizontal"、縦並びのときは "vertical" で指定できます。

TextView テキスト表示
 <TextView
        android:layout_width="match_parent"
		android:layout_height="wrap_content"
		android:text="@string/ hoge "
		android:textSize="24.0sp" />
画面に文字を表示するときは TextView を使用にします。
text = "@string/ hoge " で指定した文字列を表示するとこができます。@string/ hoge は string.xnl内にある hoge という変数を扱う。ということになりますね。
" "内にそのまま文字を打ち込むこともできますが、変数で扱うほうが推奨されています。
EditText テキストボックス
<EditText
			android:id="@+id/ id_hoge "
			android:layout_width="200dp"
			android:layout_height="wrap_content"
			android:inputType="text" />
テキストボックスを作成したい場合は EditText を使います。これで文字を打ち込めるスペースを作ることができます。
@+id/ hoge は hoge という名前の id を作成する、という意味です。
HTMLを学んだことがあるひとはわかりやすいと思います。
この id は設定されたレイアウトやビューの情報をプログラムでオブジェクトとして呼び出すことができるようになります。文字を入力したり、値を選択したりするビューの結果を取得されるときに用いられるもののようです。
値を動的に扱いたいときに使われるものですね。
inputType は文字列を受け付けるときは "text"、数字を受け付けるときは"number"などを設定できます。
inputTypeの他に hint というものがあり、入力欄にデフィルトで入力内容のヒント文字を設定することができます。
こちらの2つのどちらかを設定しないと警告マークが表示されます。
CheckBox チェックボックス
<CheckBox
		    android:id="@+id/ id_hoge "
			android:layout_width="160dp"
			android:layout_height="wrap_content"
			android:text="@string/ hogehoge" />
複数選択できるチェックボックスを作成した場合は、CheckBox を使います。
text を追加すると、表示されたチェックボックスの右側に設定した文字列が表示されます。
□ hogehoge
このような表示になるということですね。
RadioButton ラジオボタン
<RadioGroup
	android:id="@+id/ id_hoge "
	android:layout_width="match_parent"
	android:layout_height="wrap_content"
	android:orientation="horizontal" >
	<RadioButton
		android:id="@+id/ hogebutton1 "
		android:layout_width="wrap_content"
		android:layout_height="wrap_content"
		android:text="@string/ hoge1 " />
	<RadioButton
		android:id="@+id/ hogebutton2 "
		android:layout_width="wrap_content"
		android:layout_height="wrap_content"
		android:text="@string/ hoge2 " />
</RadioGroup>
単一選択を行うラジオボタンを作成したい場合は、 RadioGroup RadioButton を使います。
ひとつだけの選択肢なら RadioButton 単体でOKですが、複数の選択肢のなかでひとつだけ選ばせる場合は、
RadioGroup で RadioButton を囲ってやらないといけません。
orientation で横並びか縦並びかを指定できます。
Spinner 選択ボックス
<Spinner
			android:id="@+id/ id_hoge "
			android:layout_width="85dp"
			android:layout_height="wrap_content"
			android:layout_paddingTop="25dp"
			android:layout_paddingBottom="5dp"
			android:entries="@array/ hoge " />
選択ボックスを作成する場合、 Spinner を使います。
entries 複数文字列を設定するもので、配列で扱われるので、string.xml で書く内容も変わります。
<string-array name=" hoge ">
     <item>あいうえお</item>
     <item>かきくけこ</item>
     <item>さしすせそ</item>
</string-array>
配列の変数は string-array で作成できます。
を増やすことで追加することが可能です。
ListView リスト一覧
<ListView
	android:id = "@+id/ id_hogelist "
	android:layout_width = "match_parent"
	android:layout_height = "250dp"
	android:paddingTop = "25dp"
	android:paddingBottom = "5dp"
	android:entries = "@array/ hogelist"	/>
リスト一覧を作成したい場合、 ListView を使います。
ListView にはもともとスクロール機能が付いているので、Scroll のように書き込む必要はありません。これもArrayを使いますね。
Button ボタン
<Button
	    android:id="@+id/ id_hoge"
	    android:layout_width="180dp"
		android:layout_height="wrap_content"
		android:layout_gravity="center_horizontal"
		android:text="@string/ hoge " />
ボタンを作成したい場合、 Button を使用します。
送信ボタンだったり、更新するときによく使われると思います。
まとめ
以上が基本的なタグになります。 レイアウトの種類には LinearLayout の他に
- TableLayout
- FrameLayout
- RelativeLayout
とありますが、別の機会にまとめたいと思います。
次はサンプルコードを試して見たいと思います。
開発環境
Eclipse Mars
JDK 8
Android SDK 6.0
