はじめに
自分のドメインを利用したメールサーバの構築方法は、インターネットを探せばいくらでも転がっています。
しかしながら、
- OSのバージョンなどを理由とした情報の古さ
- Let's Encryptとサービスの連携自体がまだ多く見られない
→自分で記事を作ってしまおう
というおはなしに。
この記事では表題通りの運用が最低限可能というレベルを前提としていますので、もしプラスアルファの設定が必要な場合は別途各自で追加するようにしてください。
前提条件
- CentOS 7にsudo権限のあるユーザが発行されていること
- DNSレコードをA、MXともに適切に設定済みであること(今回の例ではA:example.com, MX:mail.example.com)
- SELinuxやFirewalldの設定は既に済んでいること
おもにやること
- SSL証明書の取得
- 送信メールサーバ(Postfix)の導入と設定
- 受信メールサーバ(Dovecot)の導入と設定
1. Let's Encryptでラクラク証明書発行
Let's Encryptはmozilla、Akamai、Cisco、Google、Facebookなどををはじめとした大手IT企業の支援を受けて2014年に創設されたプロジェクトで、個人でも信頼されたサーバ証明書を無料で発行することができます。
※導入前に、自分のサーバーでWebサーバが動いている場合は落とします。
sudo yum list installed gitとしてgitが入ってるかを確認
無ければsudo yum -y install gitとしてインストールします。
続けて、
git clone https://github.com/letsencrypt/letsencrypt
cd letsencrypt/
./letsencrypt-auto --help
これで鍵作成の準備はOKです。
必要に応じてsudo用のパスワードを要求されるので入れてあげましょう。
./letsencrypt-auto certonly --standalone \
-d mail.example.com \
-m 管理用メールアドレス@example.com \
--agree-tos
と入力すれば自動で鍵作成のセットアップが始まります。
-d以下は自分が取得したドメインに合わせて変更してください。
セットアップ終了後、/etc/letsencrypt/live/cloud.example.jp/fullchain.pemのような形でファイルが作成されます。
2. Postfixを入れよう
sudo yum -y install postfixするだけ。
といってもCentOSの場合デフォで入ってると思います!
設定ファイルを以下のように編集します
#myhostname = host.domain.tld
 ↓
myhostname = mail.example.com

#mydomain = domain.tld
 ↓
mydomain = example.com

#myorigin = $mydomain
 ↓
myorigin = $mydomain

inet_interfaces = localhost
 ↓
inet_interfaces = all

mydestination = $myhostname, localhost.$mydomain, localhost
 ↓
mydestination = $myhostname, localhost.$mydomain, localhost, $mydomain


#home_mailbox = Maildir/
 ↓
home_mailbox = Maildir/

#smtpd_banner = $myhostname ESMTP $mail_name
 ↓
smtpd_banner = $myhostname ESMTP


以下をファイルの最後に追記

smtpd_sasl_auth_enable = yes

smtpd_sasl_type = dovecot

smtpd_sasl_path = private/auth

smtpd_use_tls = yes

smtp_tls_security_level = may

smtpd_tls_cert_file = /etc/letsencrypt/live/mail.example.com/fullchain.pem
smtpd_tls_key_file = /etc/letsencrypt/live/mail.example.com/privkey.pem

smtpd_tls_loglevel = 1

smtpd_tls_received_header = yes

smtpd_tls_session_cache_database = btree:/var/lib/postfix/smtpd_scache

smtpd_tls_session_cache_timeout = 3600s

smtpd_recipient_restrictions =
    permit_mynetworks
    permit_sasl_authenticated
    reject_unauth_destination
続いて、
#smtps     inet  n       -       n       -       -       smtpd
#  -o syslog_name=postfix/smtps
#  -o smtpd_tls_wrappermode=yes
#  -o smtpd_sasl_auth_enable=yes
#  -o smtpd_reject_unlisted_recipient=no
#  -o smtpd_client_restrictions=$mua_client_restrictions
#  -o smtpd_helo_restrictions=$mua_helo_restrictions
#  -o smtpd_sender_restrictions=$mua_sender_restrictions
#  -o smtpd_recipient_restrictions=permit_sasl_authenticated,reject
#  -o milter_macro_daemon_name=ORIGINATING
 ↓
smtps     inet  n       -       n       -       -       smtpd
#  -o syslog_name=postfix/smtps
  -o smtpd_tls_wrappermode=yes
  -o smtpd_sasl_auth_enable=yes
#  -o smtpd_reject_unlisted_recipient=no
#  -o smtpd_client_restrictions=$mua_client_restrictions
#  -o smtpd_helo_restrictions=$mua_helo_restrictions
#  -o smtpd_sender_restrictions=$mua_sender_restrictions
  -o smtpd_recipient_restrictions=permit_sasl_authenticated,reject
#  -o milter_macro_daemon_name=ORIGINATING
以上を変更した後に、以下コマンドを入力
postmap /etc/postfix/access
postfix check
何もエラーが表示されなければ
systemctl start postfix
systemctl enable postfix
これでpostfixの設定は終了。
3. Dovecotを入れよう
まずはsudo yum -y install dovecotでインストールしてから各種設定ファイルをガリガリいじっていきます。
service imap-login {
  inet_listener imap {
    #port = 143
     ↓
    port = 0
  }
  inet_listener imaps {
    #port = 993
    #ssl = yes
     ↓
    port = 993
    ssl = yes
  }
}

service pop3-login {
  inet_listener pop3 {
    #port = 110
     ↓
    port = 0
  }
  inet_listener pop3s {
    #port = 995
    #ssl = yes
     ↓
    port = 995
    ssl = yes
  }
}
service auth {
 (略)
  # Postfix smtp-auth
  #unix_listener /var/spool/postfix/private/auth {
  #  mode = 0666
  #}
 ↓
  unix_listener /var/spool/postfix/private/auth {
    mode = 0660
    user = postfix
    group = postfix
  }
}
#disable_plaintext_auth = yes
 ↓
disable_plaintext_auth = no

auth_mechanisms = plain
 ↓
auth_mechanisms = plain login
ssl = required
 ↓
ssl = yes

#ssl_cert = </etc/pki/dovecot/certs/dovecot.pem
#ssl_key = </etc/pki/dovecot/private/dovecot.pem
 ↓
ssl_cert = </etc/letsencrypt/live/mail.example.com/fullchain.pem
ssl_key = </etc/letsencrypt/live/mail.example.com/privkey.pem
#mail_location =
 ↓
mail_location = maildir:~/Maildir
最後にDovecotを起動させましょう。
systemctl start dovecot
systemctl enable dovecot
受信サーバはこれだけ。
3. 最後にアカウントの配布
useradd -s /sbin/nologin user
passwd user
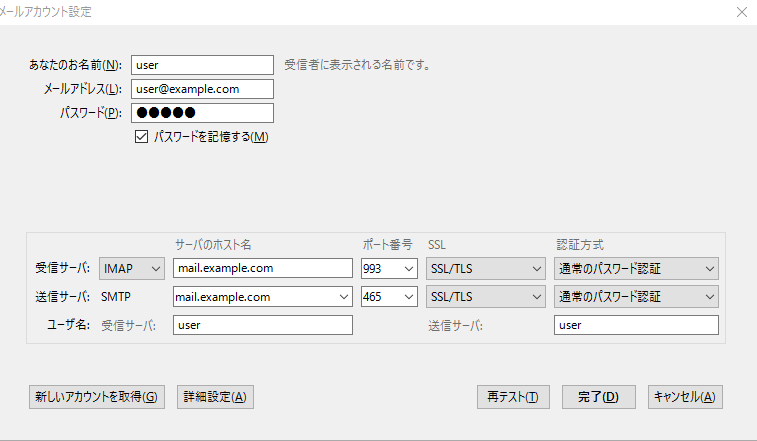
4. クライアントでの設定
Thunderbirdを例に...