Nightwatch.jsを使ったテストの作成と、gulpから実行する際に工夫した点を紹介します。
Nightwatch.jsとは
Nightwatch.jsは、End-to-Endのブラウザテストを自動化するフレームワークです。
フレームワーク自体はNode.js上で動き、テストの実行はSelenium WebDriver APIと連携することで様々なブラウザでのテストを可能にしています。
Node.js製のE2Eテストフレームワークとしては、ユニットテストも含んだ統合型のIntern、AngularJSとの親和性が高いProtractorと並び、人気のあるフレームワークです。(2015年9月時点)
- 公式サイト : http://nightwatchjs.org/
- GitHub : https://github.com/nightwatchjs/nightwatch
gulpベースのプロジェクトで使うには
公式のDeveloper Guideに従うと、Selenium ServerやChromveDriverを個別にインストールする必要があったり、CLIベースの実行方法しか紹介されていませんでした。
ここではgulpプロジェクトに組み込むためのセットアップ手順を紹介します。以下を行います。
- すべての依存モジュールをnpmでインストールする
- APIでNightwatchを実行し、gulpタスクに組み込む
サンプルコード
GitHubにてこれらを実装したデモプロジェクトを公開しています。
https://github.com/htanjo/nightwatch-gulp-demo
npmで依存モジュールのインストール
まず最低限必要なNightwatch、gulp、Selenium Serverをインストールします。
Selenium Serverはjarのファイル名にバージョン番号を含むため、--save-exactを使ってバージョンを固定しました。
$ npm install --save-dev nightwatch gulp
$ npm install --save-dev --save-exact selenium-server-standalone-jar
package.json
...
"devDependencies": {
  "gulp": "^3.9.0",
  "nightwatch": "^0.8.3",
  "selenium-server-standalone-jar": "2.47.1"    // 固定バージョン。"^"が付かない。
}
...
Nightwatchは、標準ではFirefox上でテストを行います。ChromeやPhantomJSでテストしたい場合は、それぞれのバイナリをインストールします。
$ npm install --save-dev chromedriver phantomjs
ディレクトリ構成
この記事では以下のような構成を想定します。
app配下が開発中のページで、テストはtest/specs/*.jsに書きます。test/reportsはNightwatchによって自動生成されるレポートです。
レポートはテストの実行のたびに出力されるので、.gitignoreで外した方がいいかもしれません。
project/
├── app/
│   └── index.html
├── test/
│   ├── specs/
│   │   └── app-spec.js
│   └── reports/
│       └── xxxxx.xml
├── node_modules/
├── gulpfile.js
├── nightwatch.json
└── package.json
Nightwatchの設定
Nightwatchの設定は、nightwatch.jsonというファイルで定義します。仕様はこちらです。
Nightwatch.js - Configuration
さきほどのディレクトリ構成に基づいて各種パスを設定します。npm installを実行するだけで、依存バイナリを含めた環境が再現できるようにします。
またこの例では、テストを実行するブラウザをPhantomJSとし、オプションでChromeとFirefoxを選択できるようにしました。
nightwatch.json
{
  "src_folders": ["test/specs"],
  "output_folder": "test/reports",
  "selenium": {
    "start_process": true,
    "server_path": "node_modules/selenium-server-standalone-jar/jar/selenium-server-standalone-2.47.1.jar",
    "host": "127.0.0.1",
    "port": 4444,
    "cli_args": {
      "phantomjs.binary.path": "node_modules/phantomjs/lib/phantom/bin/phantomjs",
      "webdriver.chrome.driver": "node_modules/chromedriver/lib/chromedriver/chromedriver"
    }
  },
  "test_settings": {
    "default": {
      "launch_url": "http://localhost",
      "selenium_port": 4444,
      "selenium_host": "localhost",
      "silent": true,
      "desiredCapabilities": {
        "browserName": "phantomjs"
      }
    },
    "chrome": {
      "desiredCapabilities": {
        "browserName": "chrome"
      }
    },
    "firefox": {
      "desiredCapabilities": {
        "browserName": "firefox"
      }
    }
  }
}
テストの作成
簡単なテストを書いてみます。E2Eテストはユニットテストより敷居が低くていいですね。
テスト対象のHTML
<!doctype html>
<html lang="en">
  <head>
    <meta charset="utf-8">
    <title>Nightwatch.js Demo</title>
  </head>
  <body>
    <div id="content">Hello, Nightwatch.js!</div>
  </body>
</html>
テスト内容
-
<title>が "Nightwatch.js Demo" である -
<div id="content">が "Hello, Nightwatch.js!" を含んでいる
テストコード : test/specs/app-spec.js
'use strict';

module.exports = {

  'Contents test' : function (browser) {
    browser
      .url('http://localhost:9100/')
      .pause(1000)
      .assert.title('Nightwatch.js Demo')
      .assert.containsText('#content', 'Hello, Nightwatch.js!')
      .end();
  }

};
テストコード用のリファレンスはこちらです。expectを使ったBDDスタイルの記法もサポートしています。
Nightwatch.js - API Reference
NightwatchをAPIから実行
これからNightwatchの実行スクリプトを作ります。
APIベースでテストを実行するには、nightwatch.runner()を使います。
実際はこれをgulpタスクに組み込みます。(次項)
var nightwatch = require('nightwatch');

nightwatch.runner({
  config: 'nightwatch.json'
}, function (passed) {
  // passed: true or false
});
.runner()の第一引数でCLIのオプションを渡せます。たとえば、env: 'chrome'を追加すれば、Chromeで実行されるようになります。
callbackではBoolean値でテストの実行結果が取得できました。
gulpfileの作成
gulpfile.jsは以下のようになりました。
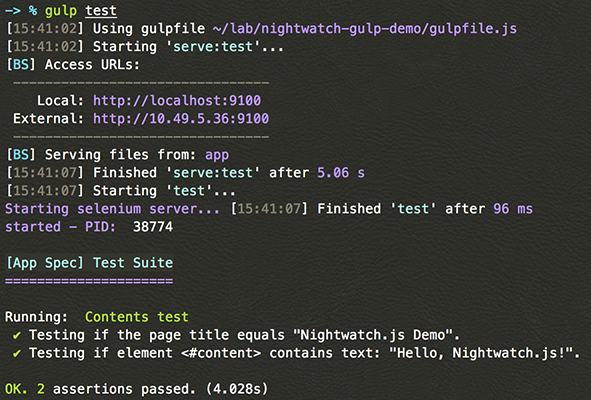
gulp testを実行すると、appをルートにしたWebサーバが起動し、それをテストします。
サーバの作成にはBrowserSyncを使っています。ConnectでもExpressでも構いません。
また、gulp-nightwatchというgulpプラグインがありますが、今回のケースではプラグインをかます必要性があまりないためNightwatchを直接使っています。
'use strict';

var gulp = require('gulp');
var bs = require('browser-sync').create();
var nightwatch = require('nightwatch');

gulp.task('serve:test', function (callback) {
  bs.init({
    notify: false,
    port: 9100,
    open: false,
    server: { baseDir: ['app'] },
    snippetOptions: { blacklist: ['/'] },
    ui: false
  }, function() {
    callback();
  });
});

gulp.task('test', ['serve:test'], function () {
  nightwatch.runner({
    config: 'nightwatch.json',
    env: 'default'
  }, function (passed) {
    if (passed) {
      process.exit();
    }
    else {
      process.exit(1);
    }
  });
});
実行結果
まとめ
- npmのdevDependenciesを活用すると、環境の共有が簡単!
- NightwatchのAPIを使うと、他のタスクと連携しやすい!
Nightwatch.js
http://nightwatchjs.org/