はじめに
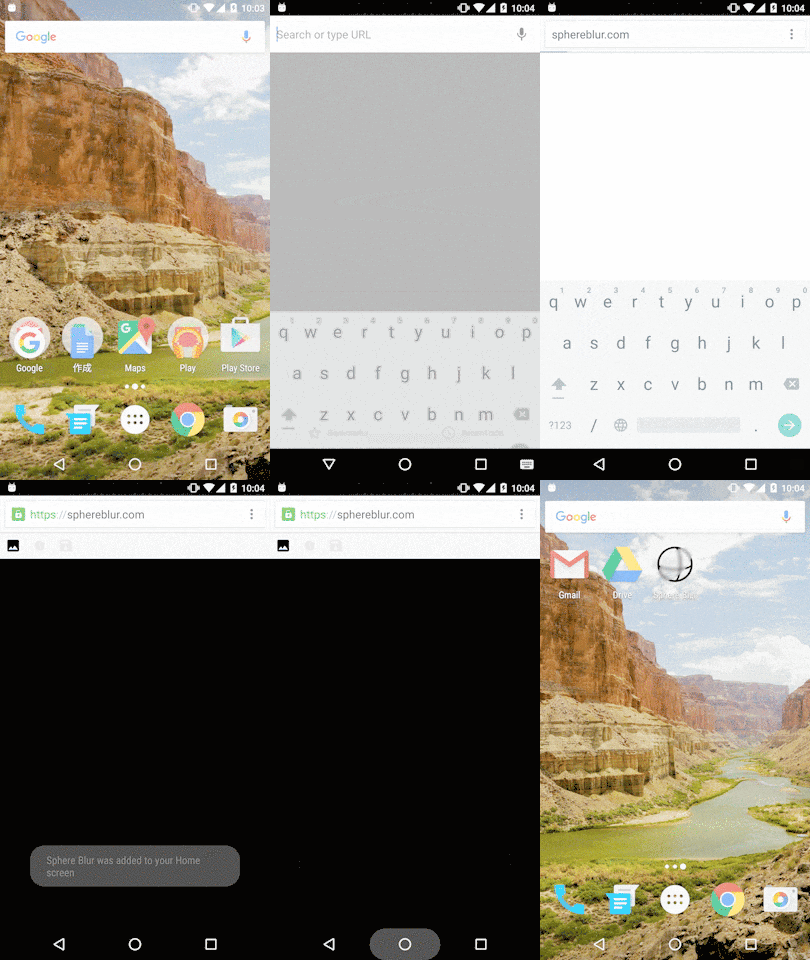
Thetaの360°画像にぼかしを入れるWebアプリSphereBlur.comを冬休みに作った際に、Web App Manifestを登録することで、このWebアプリを簡単にインストール(ホーム画面に追加)できるようにした。このWebアプリはService Workerを使ってオフラインでも動くようにしているので、ホーム画面から起動し、ネイティブアプリと同等の体験を提供できる。もちろん、Manifestを使っていない通常のページでも、メニュー画面から「ホーム画面に追加」を選ぶことで同様のことはできるが、下の動画のように、下から出てくるAppインストールバナーのボタンを一回タップするだけ登録できるのは利便性が高い。
Appインストールバナーの出し方
Google Developersのこの記事によるとAppインストールバナーを出すには下記の条件を満たす必要がある。
- Web App Manifestを登録していること
- Service Workerを登録していること
- HTTPSに対応していること
- ユーザーが5分以上経過後に再び訪れること
ただし、これらの条件は今後変更される可能性がある。
SphereBlur.comはすでにService Workerを使っているので、あとは、Web App Manifestを登録しておけば、頻繁に訪れてくれるユーザーに対してこのバナーを表示することができる。
Manifestの登録の仕方
SphereBlur.comでは、HTMLに下記のようなlinkエレメントを追加し、
<link rel="manifest" href="manifest.json">
下記のようなmanifest.jsonを登録している。
{
  "name": "Sphere Blur",
  "short_name": "Sphere Blur",
  "icons": [
    {"src": "img/sphereblur_36.png", "sizes": "36x36", "type": "image/png"},
    {"src": "img/sphereblur_48.png", "sizes": "48x48", "type": "image/png"},
    {"src": "img/sphereblur_72.png", "sizes": "72x72", "type": "image/png"},
    {"src": "img/sphereblur_96.png", "sizes": "96x96", "type": "image/png"},
    {"src": "img/sphereblur_144.png", "sizes": "144x144", "type": "image/png"},
    {"src": "img/sphereblur_192.png", "sizes": "192x192", "type": "image/png"},
    {"src": "img/sphereblur_256.png", "sizes": "256x256", "type": "image/png"},
    {"src": "img/sphereblur_512.png", "sizes": "512x512", "type": "image/png"}],
  "display": "standalone",
  "start_url": "/?homescreen",
  "display": "standalone"
}
Manifestファイルについてはこちらの記事がわかりやすい。こちらのWeb App Manifestの仕様にも書かれているが、"this specification is not stable"なので、今後変更される可能性があるので注意が必要。
インストールのコントロール
Manifestファイルをlinkエレメントで登録するだけだと、Chromeによって勝手にバナーが表示されて、サイト管理者はユーザーの環境でバナーがいつ表示されたのか、ユーザーがインストールしたのかキャンセルしたのかを知ることができない。この問題に対処するため、Alex RussellがこちらでBeforeInstallPromptイベントを提案している。BeforeInstallPromptイベントはインストールバナーが表示される直前に発行され、このイベントを使うと下記のようなことができる。
- インストールバナー表示のキャンセル
- インストールバナーの結果の検知
- インストールバナーを後で表示
下記のコードはこちらのサンプルを参考にしている。
インストールバナー表示をキャンセル
まだインストールバナーを出すべきではない場合は、BeforeInstallPromptEventオブジェクトのpreventDefault()を呼ぶことで表示をキャンセルすることができる。
window.addEventListener('beforeinstallprompt', function(e) {
    console.log('インストールバナーの表示をキャンセルします');
    e.preventDefault();
  });
インストールバナーの結果の検知
BeforeInstallPromptEvent.userChoiceが返すPromiseを使うことで、ユーザーがインストールをクリックしたのか、キャンセルしたのかを検知することができる。
window.addEventListener('beforeinstallprompt', function(e) {
    console.log('インストールバナーを表示します');
    e.userChoice.then(function(result) {
        if(result.outcome == 'dismissed') {
          console.log('キャンセルされました');
        } else {
          console.log('インストールされました');
        }
      });
  });
インストールバナーを後で表示
BeforeInstallPromptEventハンドラ内でpreventDefault()を呼んでおき、後でprompt()を呼ぶことで、独自のボタンがクリックされた際に再度インストールバナーを表示することができる。
var saveButton = document.getElementById('save_button');
var deferredPrompt;

window.addEventListener('beforeinstallprompt', function(e) {
    console.log('インストールバナーの表示をキャンセルします');
    e.preventDefault();
    saveButton.removeAttribute('disabled');
    deferredPrompt = e;
  });

saveButton.addEventListener('click', function() {
    if (deferredPrompt !== undefined) {
      deferredPrompt.prompt();
      deferredPrompt.userChoice.then(function(result) {
        if (result.outcome == 'dismissed') {
          console.log('キャンセルされました');
        } else {
          console.log('インストールされました');
        }
        deferredPrompt = null;
        saveButton.addAttribute('disabled');
      });
    }
  });
デバッグ方法 その1
Manifestによるインストールバナーの表示は、"ユーザーが5分以上経過後に再び訪れる"必要が有るため、デバッグが大変である。ChromeのDeveloper ToolsのApplicationタブにManifestという項目があるので、こちらを使うと便利である。"Add to homescreen"をクリックすることで、Developer Toolsからインストールバナーを表示することができる。

デバッグ方法 その2
Chromeではbypass-app-banner-engagement-checksというフラグが提供されている。chrome://flags/#bypass-app-banner-engagement-checksからこのフラグを有効にすることで、サイトに初めて訪れた場合でもインストールバナーを表示することができる。また、Win/Mac/Linux環境でもenable-add-to-shelfというフラグを有効にすることで、Android/ChromeOS環境と同様にインストールバナーを表示することができる。
