30
29

Delete article

Deleted articles cannot be recovered.

Draft of this article would be also deleted.

Are you sure you want to delete this article?

More than 5 years have passed since last update.

CasperJSで、EXCELに貼付ける為のスクリーンショットを撮る

Last updated at Posted at 2014-08-05

巷ではテスト結果をスクリーンショットをEXCELに貼る、というお仕事があるらしいので、スクリーンショットネタを。
CasperJS を利用して、スクリプトからWEB画面のスクリーンショットをとってみます。スクリプトなので、自動化することも出来ます。

環境構築の方法

前提

  • 環境は Mac OS X (Mavericks) とします。
  • インストールには npm を使います。
    • はいってなければ Homebrew 経由でインストール

       $ brew update
       $ brew install node
      
      • Homebrew自体が入ってなければ、Homebrewの公式ページどおり、次のようにインストール

         $ ruby -e "$(curl -fsSL https://raw.github.com/Homebrew/homebrew/go/install)"
        

        ※ 事前に Xcode のインストール(および起動して許諾への同意)が必要

環境構築の手順

  • PhamtomJS をインストール

     $ npm install -g phantomjs
    
  • 続いてCasperJS をインストール

     $ npm install -g casperjs
    

これで環境構築は完了。

スクリーンショットをとってみる

CasperJSのAPIドキュメントを参考に、CoffeeScriptで書いてみます。

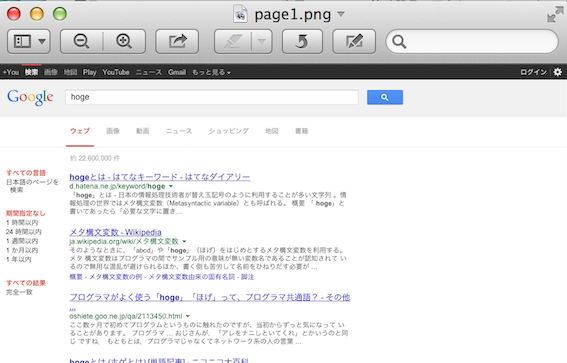
http://google.com を開き、検索ワード hoge で検索を実行(ここでキャプチャ)、検索結果の最初のリンクをクリックしてまたキャプチャ、という内容です。

casper-test.coffee
casper = require("casper").create()
	
casper.start()

casper.open("http://google.com")

casper.then ->
  @fill "form[action='/search']", q: "hoge", true

casper.then ->
  @capture "page1.png"

casper.then ->
  @click("h3.r a")

casper.then ->
  @capture "page2.png"
	
casper.run()

スクリプトを保存して、次のように実行。

$ casperjs casper-test.coffee

結果:

  • page1.png

    スクリーンショット 2014-08-05 14.13.29.png

  • page2.png

    スクリーンショット 2014-08-05 14.13.53.png

    ※なぜか背景が透過になった..

ほか

  • なぜか画面幅(ViewPort)の設定が上手くいかなかった。端末のWebKitのバージョンによる?
  • 本当は E2E テストで利用したいので^^; 次回はテストについて投稿します。
30
29
0

Register as a new user and use Qiita more conveniently

  1. You get articles that match your needs
  2. You can efficiently read back useful information
  3. You can use dark theme
What you can do with signing up
30
29

Delete article

Deleted articles cannot be recovered.

Draft of this article would be also deleted.

Are you sure you want to delete this article?