お世話になっております。@seto_hiです。
Androidエンジニアの皆様におかれましては本日もMaterial Designの実装で消耗されていることと心中お察し申し上げます。
本日はMaterial Designのガイドラインの重箱の隅をつついた実装をご紹介しますので、何かの間違いでご参考になれば幸いです。
コードは全てこちらのリポジトリに上げてあります。
ListのTop paddingとBottom padding
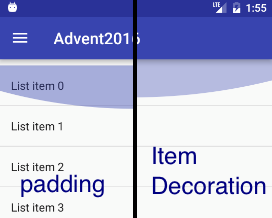
ガイドラインのListsを読むと、「Add 8dp of padding at the top and bottom of a list」という表現が12回も出てきます。
これをシンプルにRecyclerViewのpaddingTopとpaddingBottomで解決しようとすると、
スクロール限界のエフェクトがpaddingの下からになってしまったりスクロール時にアイテムが切れてしまったりと美しくありません。
ここは独自のItemDecorationを作って解決しましょう!
    @Override
    public void getItemOffsets(Rect outRect, View view, RecyclerView parent, RecyclerView.State state) {
        super.getItemOffsets(outRect, view, parent, state);
        if (parent.getChildAdapterPosition(view) == 0) {
            outRect.top += mPadding;
        } else if (parent.getChildAdapterPosition(view) == parent.getAdapter().getItemCount() - 1) {
            outRect.bottom += mPadding;
        }
    }
これで完璧ですね!
文字サイズ(Dense)
ガイドラインのTypographyを読むと、日本語は「Dense」に分類されると書いてあります。
しかしながら、Support LibraryにDenseのTextAppearanceはありません。
作りましょう。
<style name="TextAppearance.AppCompat.Body1.Dense" parent="TextAppearance.AppCompat.Body1">
    <item name="android:textSize">15sp</item>
</style>
xmlの全体はgithubをご覧下さい。
TextViewにはこのように適用します
<TextView
    android:layout_width="wrap_content"
    android:layout_height="wrap_content"
    android:textAppearance="@style/TextAppearance.AppCompat.Body1.Dense" />
NavigationDrawerのitemのBackground
ガイドラインのNavigation Drawerを読むと、未選択の項目に触れるとRipple Effectが出て、選択中の項目は背景色が灰色になるようなイラストがあります。
Design Support LibraryのNavigationViewを使えば何もしなくても実現できるのですが、諸事情によってRecyclerViewを使ってカスタマイズしたくなった際にはやや手間です。
ItemのViewでandroid:background="?attr/selectableItemBackground"としてみても選択時の背景色が出ませんし、
かといってRippleEffectと選択色を合わせたStateListDrawable自作するのも頭痛が痛いです。
そこで、LayerDrawableを使います。
TypedValue value = new TypedValue();
getContext().getTheme().resolveAttribute(R.attr.selectableItemBackground, value, true);
Drawable top = ContextCompat.getDrawable(getContext(), value.resourceId);
Drawable back = ContextCompat.getDrawable(getContext(), R.drawable.bg_checkable_list_item);
Drawable itemBackground = new LayerDrawable(new Drawable[]{back, top});
<?xml version="1.0" encoding="utf-8"?>
<selector xmlns:android="http://schemas.android.com/apk/res/android">
    <item android:drawable="@color/bgListItemChecked" android:state_checked="true" />
    <item android:drawable="@android:color/transparent" />
</selector>
これならば選択色部分のStateListDrawableを作るだけでいいですね。
ちなみにNavigationViewはForegroundDrawableに対応したLinearLayoutを実装し、foregroundには?attr/selectableItemBackground、backgroundには上記のようなStateListDrawableを設定していました。しかもStateListDrawableは?attr/colorControlHighlightを参照するためにJava上でゴリゴリ生成しています。なるほどね!
Auto Loading
ガイドラインのProgress & activityにあるTwo-phased loadsみたいなloadingを実装したくなりますが、RecyclerViewだと地味に面倒ではないでしょうか。
Adapter側で実装しようとするとListViewのHeaderViewListAdapterのようにAdapter in Adapterな実装になるかと思いますが、僕はあまりしっくり来ませんでした。
ここも独自のItemDecorationを作って解決しましょう!
どちらが正しい、ではなくItemDecorationの限界に挑戦したいのです。
実装を要約すると、
- ItemDecoration+Drawableのアニメーションで解決
- 独自のItemDecorationにDrawable.Callbackを実装する
- HandlerにはRecyclerViewを使う
ということをやっています。細かな実装はgithubをご覧下さい。
ちなみにRecyclerView#removeItemDecorationを適切に呼ばないとメモリリークします!
最後に
ItemDecoration最高!Drawable最高!
Material Designの実装にはまだまだつらみが多いですが、身を粉にして実装してユーザーを幸せにしていきましょう!
