ReactJS+Reduxで非同期Actionの実装をし、コンポーネントの再利用をする
ECMAScript2015(es6)の基本的な開発環境でWebpackとbrowserifyを利用したes6のビルド環境を作成した。そこで、CSVファイルを読み込んで、その内容(1列目で正規表現にヒットする)を反映するサンプルを取り扱ったが、そのサンプルをReact/Reduxで実現してみたかった。
また、そのサンプルでは非同期Actionとコンポーネントの再利用が必要で、実装するのに時間を要したので、環境構築方法も踏まえて、備忘録として記載。
Webpackを利用したビルド環境
Webpackを利用した。create-react-appをnpmコマンドでインストールして、ReactJS環境を作成するのもありだと思うが、同一のプロジェクトでes6だけで作り込んだページが存在したり、Vue.jsを利用して作成することもありえるので、それら包括するビルド環境も必要になると思い、ここではWebpackを利用した。もちろんWebpack以外でも実現はできると思うので、あくまで多少穿った個人的な意見。
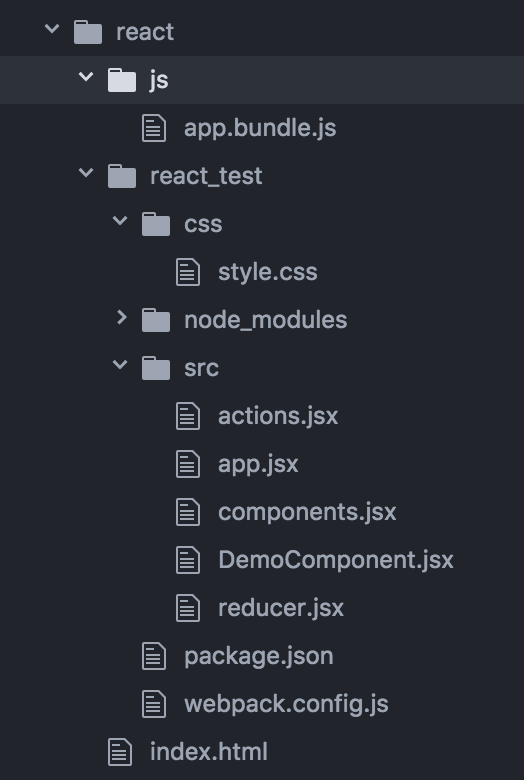
ディレクトリ構造
ここでは下図のディレクトリ構造とした。自分で言うのも、あれだが、あまり良くない。

インストール
node.jsがインストールされて、パスが通っている環境を構築した後、react/react_test/ディレクトリ配下で、下記を実行する。
redux-thunkを導入しているのは、非同期のActionを利用しているため。
npmの場合
$ npm init
$ npm install --save-dev webpack
$ npm install --save-dev react react-dom redux react-redux redux-thunk
$ npm install --save-dev babel-loader babel-core babel-preset-es2015 babel-preset-react
$ npm install --save-dev style-loader css-loader
yarnの場合
$ yarn init
$ yarn add --dev webpack
$ yarn add --dev react react-dom redux react-redux redux-thunk
$ yarn add --dev babel-loader babel-core babel-preset-es2015 babel-preset-react
$ yarn add --dev style-loader css-loader
package.json
インストールが完了すると、package.jsonが追加されているので、scriptsにproductionのビルドとdevelopmentのビルドを追加する。
{
  "name": "react_test",
  "version": "1.0.0",
  "description": "",
  "main": "index.js",
  "scripts": {
    "production": "webpack -p",
    "development": "webpack -d",
    "test": "echo \"Error: no test specified\" && exit 1"
  },
  "author": "",
  "license": "ISC",
  "dependencies": {
    "react": "^15.6.1",
    "react-dom": "^15.6.1",
    "react-redux": "^5.0.5",
    "redux": "^3.7.1"
  },
  "devDependencies": {
    "babel-core": "^6.25.0",
    "babel-loader": "^7.1.1",
    "babel-preset-es2015": "^6.24.1",
    "babel-preset-react": "^6.24.1",
    "css-loader": "^0.28.4",
    "redux-thunk": "^2.2.0",
    "style-loader": "^0.18.2",
    "webpack": "^3.0.0"
  }
}
webpack.config.js
webpack.config.jsを作成する。Reactで開発したソースの拡張子はjsxとすることを前提。
var webpack = require('webpack');

module.exports = {
  entry: {
    '../js/app': './src/app.jsx'
  },
  output: {
    path: __dirname,
    filename: '[name].bundle.js'
  },
  module: {
    loaders: [
      {
        test: /\.css$/,
        loaders: ['style-loader', 'css-loader?modules'],
      },
      {
        test: /\.jsx$/,
        exclude: /(node_modules|.git)/,
        loader: 'babel-loader',
        query: {
          presets: ['es2015', 'react']
        }
      },
      {
        test: /\.js$/,
        exclude: /(node_modules|.git)/,
        loader: "babel-loader",
        query:{
          presets: ['es2015']
        }
      }
    ]
  }
};
サンプル
起動ページ
<!DOCTYPE html>
<html>
  <head>
    <meta charset="UTF-8" />
    <title>React Test</title>
  </head>
  <body>
    <div class="react_container"></div>
    <script type="text/javascript" src="js/app.bundle.js"></script>
  </body>
</html>
スタイルシート
下記cssをjsxで読み込む。
.myMargin {
  margin: 20px;
}

.myHeight1 {
  height: 30px;
}

.myHeight2 {
  height: 50px;
}

.alertColor {
  color: red;
}
Action(非同期も含む)とState
今回のサンプルでは同じコンポーネントを2つ利用(コンポーネントの再利用)しているためnameでどのコンポーネントのActionなのか区別している。また、onFileChangeは非同期のActionとして用意。処理が完了したタイミングで該当のActionをdispatchしている。
export const CLEAR        = 'CLEAR'
export const READ         = "READ"
export const READ_SUCCESS = 'READ_SUCCESS'
export const READ_FAIL    = 'READ_FAIL'

export const onClickClear = (event, name) => ({
  type: CLEAR,
  name
})

const onStartRead = (name) => {
  return {
    type: READ,
    name
  }
}

const onFinishRead = (t, result, name) => {
  return {
    type: t,
    result,
    name
  }
}

export const onFileChange = (event, max, name) => {
  return dispatch => {
    const file     = event.target.files
    const reader   = new FileReader()
    reader.onload = (e) => {
      const csv   = e.target.result
      const lines = csv.split(/\r\n|\n/)
      let c = 0
      let t = ""
      lines.forEach((elm, idx) => {
        const data = elm.split(",")
        if (data.length > 0 && /^(https?)(:\/\/[-_.!~*'()a-zA-Z0-9;\/?:@&=+$,%#]+)$/.test(data[0])) {
          if (c >= max) {
            console.log('上限に達しています')
          } else {
            t += data[0] + "\n";
            c++
          }
        }
      })
      dispatch(onFinishRead(READ_SUCCESS, { text: t, lines: c }, name))
    }
    reader.onerror = () => {
      dispatch(onFinishRead(READ_FAIL, null, name))
    }
    if (file.length > 0) {
      dispatch(onStartRead(name))
      reader.readAsText(file[0])
    }
  }
}
Reducer
AcitonとStateから新しいStateを作成する。
コンポーネントの再利用をしているため、2つのStateを管理するようにしている。
import { combineReducers } from 'redux'
import * as actions from './actions.jsx'

const initialAppState = {
  message: "",
  text: "",
  lines: 0
}

const demo = (state = initialAppState, action) => {
  if (action.type === actions.CLEAR) {
    return {
      message: "クリアしました",
      text: "",
      lines: 0
    }
  } else if (action.type === actions.READ) {
    return {
      message: "Now Reading...",
      text: "",
      lines: 0
    }
  } else if (action.type === actions.READ_SUCCESS) {
    return {
      message: action.result.lines + "件登録しました",
      text: action.result.text,
      lines: action.result.lines
    }
  } else if (action.type === actions.READ_FAIL) {
    return {
      message: "ファイルの読込に失敗しました",
      text: "",
      lines: 0
    }
  } else {
    return state
  }
}

const createNamedWrapperReducer = (reducerFunction, reducerName) => {
    return (state, action) => {
        const {name} = action;
        const isInitializationCall = state === undefined;
        if(name !== reducerName && !isInitializationCall) return state;
        return reducerFunction(state, action)
    }
}

const reducer = combineReducers({
    demoA : createNamedWrapperReducer(demo, 'A'),
    demoB : createNamedWrapperReducer(demo, 'B'),
})

export default reducer
Component
このサンプルでContainerを細かく分けるかどうか悩んだが、備忘録も兼ねたかったので、細分化した。
import React from 'react'
import style from '../css/style.css';

export const alert = ({ message }) => (
  <div className={ style.alertColor }>{ message }</div>
)

export const currentStatus = ({ n }) => (
  <div>現在{ n }件登録されています<br /></div>
)

export const textArea = ({ max, text }) => {
  let s = style.myHeight1
  if (max > 3) s = style.myHeight2
  return (<div><textarea className={ s } value={ text } /><br /></div>)
}

export const clearButton = ({ onClick }) => (
  <button onClick={ onClick }>クリア</button>
)

export const inputFile = ({ onChange }) => (
  <input type="file" onChange={ onChange } />
)
Container(Componentの再利用)
Componentだけど、複数のComponentを束ねているということでContainerとして位置づけた。
コンポーネントを再利用しているため、demoAとdemoBの2つを用意した。
import React, { Component } from 'react'
import { connect } from 'react-redux'
import { bindActionCreators } from 'redux'
import * as components from './components.jsx'
import * as actions from './actions.jsx'
import style from '../css/style.css'

class DemoContainer extends Component {
  render() {
    const { demoA, demoB, actions } = this.props;
    return (
      <div>
        <div className={ style.myMargin }>
          <components.alert message={ demoA.message } />
          <components.currentStatus n={ demoA.lines } />
          <components.textArea max={ 3 } text={ demoA.text } />
          <components.clearButton onClick={ (e) => actions.onClickClear(e, "A") } />
          <components.inputFile onChange={ (e) => actions.onFileChange(e, this.props.maxLengthA, "A") } />
        </div>
        <div className={ style.myMargin }>
          <components.alert message={ demoB.message } />
          <components.currentStatus n={ demoB.lines } />
          <components.textArea max={ 5 } text={ demoB.text } />
          <components.clearButton onClick={ (e) => actions.onClickClear(e, "B") } />
          <components.inputFile onChange={ (e) => actions.onFileChange(e, this.props.maxLengthB, "B") } />
        </div>
      </div>
    )
  }
}

const mapState = (state, ownProps) => ({
  demoA: state.demoA,
  demoB: state.demoB
});

function mapDispatch(dispatch) {
  return {
    actions: bindActionCreators(actions, dispatch)
  }
}

export default connect(mapState, mapDispatch)(DemoContainer)
最後にapp.jsxでコンテナの呼び出しと、ストアを作成する。
import React from 'react'
import { render } from 'react-dom'
import { Provider } from 'react-redux'
import thunk from 'redux-thunk'
import { createStore, applyMiddleware } from 'redux'
import reducer from './reducer.jsx'
import DemoComponent from './DemoComponent.jsx'

const store = createStore(reducer, applyMiddleware(thunk))

render (
  <Provider store={ store }>
    <DemoComponent maxLengthA="3" maxLengthB="6" />
  </Provider>,
  document.querySelector('.react_container')
)
サンプルの実行
ビルド
パターン1、パターン2のいずれかのコマンドでビルドする。developmentはデバッグができる。
パターン1
npmの場合
$ npm run development
yarnの場合
$ yarn run development
パターン2
npmの場合
$ npm run production
yarnの場合
$ yarn run production
csvファイル
今回利用したcsvファイルはいつもと同様に以下。正規表現でhttpの形式にマッチしない場合はスキップされているかどうも確認できる。
http://hogehoge/01
ftp://hogehoge/02
http://hogehoge/03
http:/hogehoge/04
http://hogehoge/05
http://ほげほげ/06
http://hogehoge/07
http://hogehoge/08
http://hogehoge/09
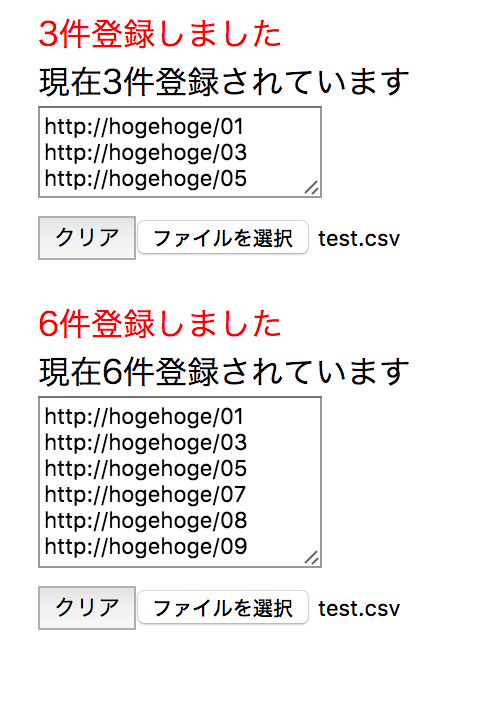
デモ
index.htmlをブラウザで開いて、test.csvを読み込ませると下図のようになる。
