MacでのVagrantによる仮想環境構築の情報は多くありますが、Windowsマシンで実現するためのTipsを記述します。
1. 環境構築
1-1. 仮想化支援機構の有効化
VirtualBoxでの仮想化のため、PCの「仮想化支援機構(Virtualization Technology)」を有効化しておく。
手順はPCのメーカー・機種ごとに異なるので、Webサイト等で確認すること。
以下はHP ProBook/EliteBookの場合。
- PCの電源ON直後、「F10 Setup」と表示されている時点でF10キーを押下
- BIOS画面が表示されたら、[システムコンフィグレーション]-[デバイス構成]に遷移
- 「Virtualization Technology (VTx)」にチェックし、保存
1-2. VirtualBoxのインストール
https://www.virtualbox.org/wiki/Downloads
より、WindowsOS版をダウンロード、インストールする。
1-3. Vagrantのインストール
https://www.vagrantup.com/downloads.html
より、WindowsOS版をダウンロード、インストールする。
1-4. CentOSのVirtualBoxへの登録
VirtualBox用boxファイルを
varant box add {適当な名前} {boxファイルURL}
で取得し、VirtualBoxに登録する。
コマンドプロンプトより
C:¥Users¥user> vagrant box add CentOS65 https://github.com/2creatives/vagrant-centos/releases/download/v6.5.3/centos65-x86_64-20140116.box
※最新のboxファイルURLは http://www.vagrantbox.es を参照
1-5. Vagrant初期設定
C:¥Users¥user> mkdir centos
C:¥Users¥user> cd centos
C:¥Users¥user¥centos> vagrant init CentOS65

C:¥Users¥user¥centos> dir
(Vagrantfileファイルが存在することを確認)
テキストエディタでVagrantfileを編集する。
Vagrant.configure(VAGRANTFILE_API_VERSION) do |config|

  config.vm.box = "CentOS65"

  #コメントアウトを外す
  config.vm.network "private_network", ip: "192.168.33.10"

  #メモリ割り当て(環境に合わせる)
  config.vm.provider "virtualbox" do |vb|
    vb.customize ["modifyvm", :id, "--memory", "1024"]
  end

end
2. CentOSの起動・接続・停止
2-1. CentOS起動
C:¥Users¥user¥centos> vagrant up
2-2. CentOSへの接続
Mac等だと vagrant ssh でアクセスできるが、WindowsにはデフォルトでSSHクライアントがインストールされていないので
C:¥Users¥user¥centos> vagrant ssh
`ssh` executable not found in any directories in the %PATH% variable.
となってしまう。
Windows PCでSSHによりアクセスするには
- Cygwinをインストールする
- Git(msysGit)をインストールする
- TeraTermやPuTTY等のSSHクライアントよりアクセスする
とあるが、ここでは手っ取り早くTeraTermでアクセスすることにする。
1)TeraTermのインストール
http://sourceforge.jp/projects/ttssh2/
より最新版をインストールする。
2)TeraTermからのアクセス
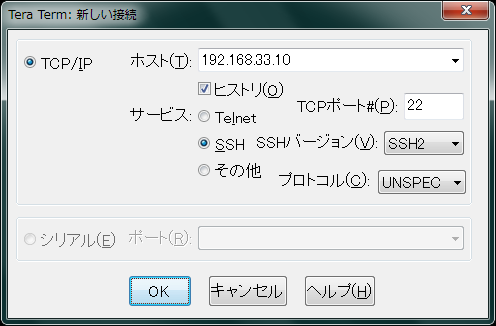
ホスト: 192.168.33.10
TCPポート:22
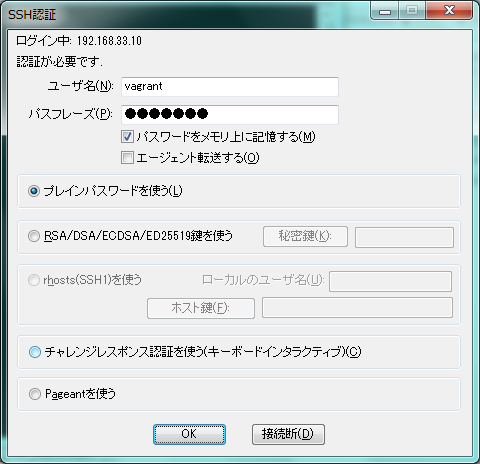
ユーザー名:vagrant
パスワード:vagrant
でログイン
[vagrant$vagrant-centos65 ~]$
2-3. CentOSの停止
方法1. vagrantコマンドで停止する
C:¥Users¥user¥centos> vagrant halt
方法2. CentOSにログインした状態でシャットダウンする
[vagrant$vagrant-centos65 ~]$ sudo shutdown -h now
3. フォルダ共有
CentOSの特定ディレクトリを、Windowsと共有することができる。
これにより、CentOS上でviなどを使用しなくても、Windows上のエディタ・IDEでソースコードの構築が可能となる。
3-1. 共有フォルダの指定
Vagrantfileに下記のように記述する。
  # config.vm.synced_folder "../data", "/vagrant_data"
  config.vm.synced_folder "../hello", "/var/www/html/hello"
3-2. ソースフォルダ・ファイルの作成
C:¥Users¥user¥hello フォルダを作成し、
その下にソースファイル(今回はHTMLファイル)を置く。
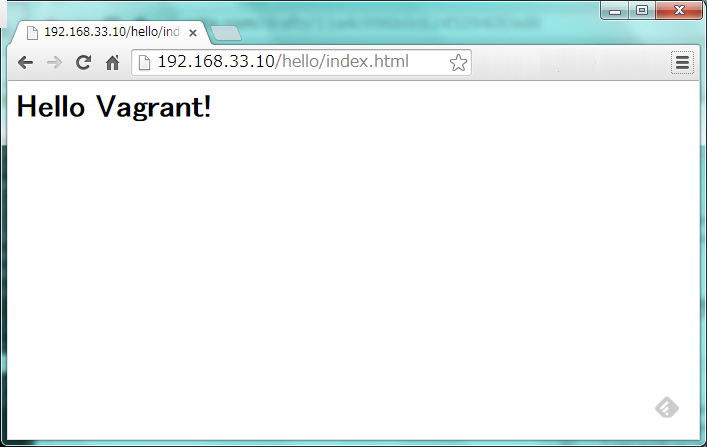
<h1>Hello Vagrant!</h1>
3-3. 設定の再読み込み
C:¥Users¥user¥centos> vagrant reload
CentOSは再起動される。
3-4. フォルダ共有の確認
CentOSにログインし、共有したフォルダが見えていることを確認する。
[vagrant@vagrant-centos65 ~]$ ls -l /var/www/html/hello
-rwxrwxrwx 1 vagrant vagrant 25 Dec 21 21:23 index.html
3-5. Webサーバの起動
CentOSにログインし、httpd(Apache)をインストール、起動する。
[vagrant@vagrant-centos65 ~]$ sudo yum -y install httpd
[vagrant@vagrant-centos65 ~]$ sudo chkconfig httpd on
[vagrant@vagrant-centos65 ~]$ sudo service httpd start
3-6. Web表示の確認
ブラウザより http://192.168.33.10/hello/index.html にアクセスし、作成したHTMLソースが正しく見えることを確認する。