TensorFlowをiOS用にビルドしてテストアプリ(Swiftプロジェクト)に実装してみたときのメモです。一応、前回の投稿の続きになっています。
TensorFlow & TensorSwiftを使ったiOSアプリの試作
http://qiita.com/hirokimu@github/items/61568d5ab84dc8b49f68
前回は、アプリに判定器を実装する部分でTensorSwiftを使いましたが、今回はiOS側でもTensorFlowを使います。部分的にC++で開発することになりますが、Pythonで構築した学習済みモデルをそのままiOSに読み込んで使えるのは大きな利点です。
実装手順
- 学習済みモデルを.pbファイルに書き出す
- ライブラリのビルド
- ライブラリのXcodeプロジェクトへの追加
- Objective C++部分の開発
1. 学習済みモデルを.pbファイルに書き出す
学習済みモデル全体(グラフと変数)をプロトコルバッファ形式のファイル(.pbファイル)に書き出します。このファイルをXcodeプロジェクトに追加して使うことになります。
筆者の場合は、訓練時に保存したcheckpointファイルを下記のようなコードでリストアし、.pbファイルに書き出しました。
モデル部分のコードは訓練時とほぼ同じですが、入力変数のプレースホルダと出力層にそれぞれ input, output と名前を付けています。この名前はC++側で指定する箇所が出てきます。
グラフに変数を含めるために、tf.Graph().as_default() の部分でスコープを作成し、スコープ内で変数を宣言します。グラフを書き出す際は変数を定数に置き換える必要があるので、convert_variables_to_constantsを使っています。
# coding: utf-8

import tensorflow as tf
from tensorflow.python.framework.graph_util import convert_variables_to_constants

def weight_variable(shape, name=None):
    initial = tf.truncated_normal(shape, stddev=0.1)
    return tf.Variable(initial, name=name)

def bias_variable(shape, name=None):
    initial = tf.constant(0.1, shape=shape)
    return tf.Variable(initial, name=name)

def conv2d(x, W):
    return tf.nn.conv2d(x, W, strides=[1, 1, 1, 1], padding="SAME")

def max_pool_2x2(x):
    return tf.nn.max_pool(x, ksize=[1, 2, 2, 1], strides=[1, 2, 2, 1], padding="SAME")

def restoreAndSaveGraph(checkPointFilePath, savePath):

    imageWidth = 116
    reducedImageWidth = 116 / 2 / 2
    channels = 3
    classes = 3

    with tf.Graph().as_default():

        sess = tf.InteractiveSession()

        x = tf.placeholder("float", shape=[None, imageWidth * imageWidth * channels], name="input")
        y_ = tf.placeholder("float", shape=[None, classes])

        x_image = tf.reshape(x, [-1, imageWidth, imageWidth, channels])

        W_conv1 = weight_variable([5, 5, channels, 32], "W_conv1")
        b_conv1 = bias_variable([32], "b_conv1")
        h_conv1 = tf.nn.relu(conv2d(x_image, W_conv1) + b_conv1)

        h_pool1 = max_pool_2x2(h_conv1)

        W_conv2 = weight_variable([5, 5, 32, 64], "W_conv2")
        b_conv2 = bias_variable([64], "b_conv2")
        h_conv2 = tf.nn.relu(conv2d(h_pool1, W_conv2) + b_conv2)

        h_pool2 = max_pool_2x2(h_conv2)

        W_fc1 = weight_variable([reducedImageWidth * reducedImageWidth * 64, 1024], "W_fc1")
        b_fc1 = bias_variable([1024], "b_fc1")

        h_pool2_flat = tf.reshape(h_pool2, [-1, reducedImageWidth * reducedImageWidth * 64])
        h_fc1 = tf.nn.relu(tf.matmul(h_pool2_flat, W_fc1) + b_fc1)

        W_fc2 = weight_variable([1024, classes], "W_fc2")
        b_fc2 = bias_variable([classes], "b_fc2")

        y_conv = tf.nn.softmax(tf.matmul(h_fc1, W_fc2) + b_fc2, name="output")

        # restore
        saver = tf.train.Saver()
        sess.run(tf.initialize_all_variables())
        saver.restore(sess, checkPointFilePath)

        # save graph
        constant_graph_def = convert_variables_to_constants(sess, sess.graph_def, ["output"])

        with tf.gfile.FastGFile(savePath, "wb") as f:
            f.write(constant_graph_def.SerializeToString())

        sess.close()

if __name__ == "__main__":
    restoreAndSaveGraph("test.ckpt", "test.pb")
2. ライブラリのビルド
こちらの手順通りに行います。ビルド実行から完了まで20分程度かかります。
筆者環境ではXcode 7.3を使用する必要があったので、xcode-selectで切り替えてから実行しました。
sudo xcode-select --switch /Applications/Xcode7.3.app/Contents/Developer
3. ライブラリのXcodeプロジェクトへの追加
Creating your Own Appの手順通りに行います。
Build Settingsの設定項目が多いので、TensorFlowのサンプルに含まれるCameraExampleアプリ(tensorflow/contrib/ios_examples/camera)のXcodeプロジェクトを参考にしてもよいと思います。
4. Objective C++部分の開発
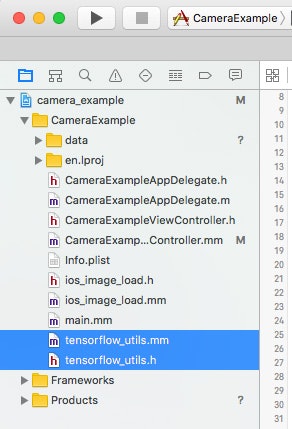
ユーティリティの追加
前述したサンプルのCameraExampleアプリに含まれている tensorflow_utils をテストアプリに追加して使いました。実装の手間を少し軽減できます。
クラスの実装
CameraExampleアプリのCameraExampleViewControllerを参考に実装しました。
LoadModel関数で.pbファイルを読み込んでsessionを作成しています。
runCNNOnFrameメソッドで画像判定を行っています。tf_session->Run の引数に渡している input_layer と output_layer に、.pbファイルの書き出し時に指定した入出力層の名前を指定しています。
# import "TFWrapper.h"
# import "tensorflow_utils.h"

@implementation TFWrapper {
    std::unique_ptr<tensorflow::Session> tf_session;
}

static TFWrapper *_instance = nil;

+ (instancetype)instance {
    static dispatch_once_t onceToken;
    dispatch_once(&onceToken, ^{
        _instance = [[TFWrapper alloc] init];
    });
    return _instance;
}

- (id)init {
    if (!(self = [super init])) return nil;
    tensorflow::Status load_status = LoadModel(@"test", @"pb", &tf_session);
    if (!load_status.ok()) {
        NSLog("Couldn't load model");
    }
    return self;
}

- (int)runCNNOnFrame:(const float[])rgb {

    const int wanted_width = 116;
    const int wanted_height = 116;
    const int wanted_channels = 3;

    tensorflow::Tensor image_tensor(tensorflow::DT_FLOAT,
                                    tensorflow::TensorShape({1,
                                                             wanted_height,
                                                             wanted_width,
                                                             wanted_channels}));

    auto image_tensor_mapped = image_tensor.tensor<float, 4>();
    float *out = image_tensor_mapped.data();
    int idx = 0;
    for (int y = 0; y < wanted_height; ++y) {
        float *out_row = out + (y * wanted_width * wanted_channels);
        for (int x = 0; x < wanted_width; ++x) {
            float *out_pixel = out_row + (x * wanted_channels);
            for (int c = 0; c < wanted_channels; ++c) {
                out_pixel[c] = rgb[idx];
                idx++;
            }
        }
    }

    if (tf_session.get()) {
        std::string input_layer = "input";
        std::string output_layer = "output";
        std::vector<tensorflow::Tensor> outputs;
        tensorflow::Status run_status = tf_session->Run({{input_layer, image_tensor}},
                                                        {output_layer},
                                                        {},
                                                        &outputs);
        if (!run_status.ok()) {
            NSLog("Running model failed")
        }
        else {
            tensorflow::Tensor *output = &outputs[0];
            auto predictions = output->flat<float>();

            int labelIndex = -1;
            float maxValue = 0;

            for (int index = 0; index < predictions.size(); index += 1) {
                const float predictionValue = predictions(index);
                if (predictionValue > maxValue) {
                    maxValue = predictionValue;
                    labelIndex = index % predictions.size();
                }
            }
            return labelIndex;
        }
    }
    return -1;
}
Bridging Headerへの追加
Swift側から使用できるよう、Bridging Headerを作成してヘッダを指定します。
@interface TFWrapper : NSObject

+ (instancetype)instance;
- (int)runCNNOnFrame:(const float[])rgb;

@end
# import "TFWrapper.h"
判定器へ画像を渡す
前回の投稿でTensorSwiftで作成した判定器を使っていた部分を、今回作成したTFWrapperクラスに置き換えます。
class TFDetector {

    static let instance = TFDetector()

    private init() {
    }

    func detectImage(image: UIImage, inputSize: Int) -> Int {

        var pixels = [UInt8](count: inputSize * inputSize * 4, repeatedValue: 0)

        let bitmapInfo = CGBitmapInfo(rawValue: CGBitmapInfo.ByteOrder32Big.rawValue | CGImageAlphaInfo.PremultipliedLast.rawValue)
        let context = CGBitmapContextCreate(&pixels, inputSize, inputSize, 8, inputSize * 4, CGColorSpaceCreateDeviceRGB(), bitmapInfo.rawValue)!
        let rect = CGRect(x: 0.0, y: 0.0, width: CGFloat(inputSize), height: CGFloat(inputSize))
        CGContextClearRect(context, rect)
        CGContextDrawImage(context, rect, image.CGImage!)

        let rgb = pixels.enumerate().filter { $0.0 % 4 != 3 }.map { Float($0.1) / 255.0 }

        return TFWrapper.instance().runCNNOnFrame(rgb!)
    }
}
参考資料
- TensorFlow C++ Session API reference documentation
https://www.tensorflow.org/versions/r0.11/api_docs/cc/index.html - Is there an example on how to generate protobuf files holding trained Tensorflow graphs
http://stackoverflow.com/questions/34343259/is-there-an-example-on-how-to-generate-protobuf-files-holding-trained-tensorflow