How to extend qcow2 disk image in use for windows 10 pro VM.
目的
- どうしても Windows を使わないといけないときように KVM 上に VM として Windows10 をインストールしてます。
- C ドライブ 60GB くらいで足りるだろうと思っていたのですが、じょじょに心もとなくなってきました
- おそらく無駄な領域を削除して空きを増やす手法もあると思うのですが Windows にあまり詳しくないので。。
注意
- 今回の作業対象が VM ということもあり拡張の足かせとなる Recovery Partition は削除してしまいます。
- 各自自己責任でお願いします。(スナップショット 取ることで代替とします)
前提
- Windows 10 Pro Insider Preview Build 16215.rs_prerelease.17063-1840
- qcow2
$ qemu-img info windows10-3.qcow2
image: windows10-3.qcow2
file format: qcow2
virtual size: 60G (64434601984 bytes)
disk size: 60G
cluster_size: 65536
Format specific information:
    compat: 1.1
    lazy refcounts: false
PS C:\Users\Hirofumi> Get-PSDrive C

Name           Used (GB)     Free (GB) Provider      Root
----           ---------     --------- --------      ----
C                  39.44         19.79 FileSystem    C:\
作業
1. VM Shutdown
2. チェック
$ sudo qemu-img check -f qcow2 -r all windows10-3.qcow2
[sudo] password for hirofumi:
No errors were found on the image.
977349/983194 = 99.41% allocated, 0.02% fragmented, 0.00% compressed clusters
Image end offset: 64061636608
3. リサイズ
$ sudo qemu-img resize windows10-3.qcow2 +10G
Image resized.
$ qemu-img info windows10-3.qcow2
image: windows10-3.qcow2
file format: qcow2
virtual size: 70G (75172020224 bytes)
disk size: 60G
cluster_size: 65536
Format specific information:
    compat: 1.1
    lazy refcounts: false
$ sudo qemu-img check -f qcow2 -r all windows10-3.qcow2
No errors were found on the image.
977349/1147034 = 85.21% allocated, 0.02% fragmented, 0.00% compressed clusters
Image end offset: 64061702144
4. VM PowerOn
$ virsh start windows10-3
Domain windows10-3 started
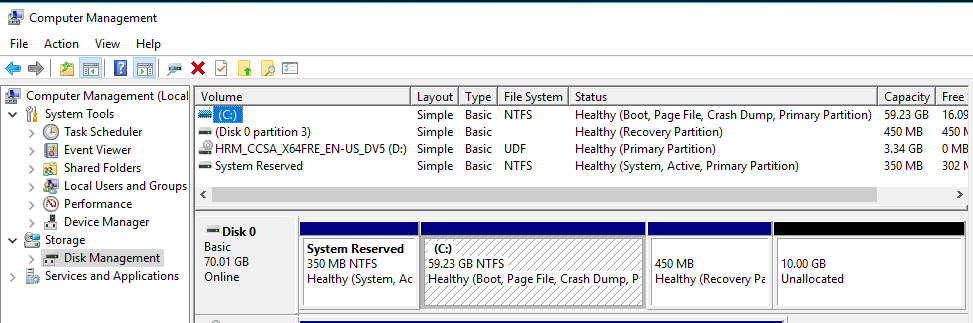
5. OS 上での状態を確認
- GUI
- CUI
DISKPART> list disk

  Disk ###  Status         Size     Free     Dyn  Gpt
  --------  -------------  -------  -------  ---  ---
  Disk 0    Online           70 GB    10 GB

DISKPART> exit
6. Recovery Partition の削除
ref. https://superuser.com/questions/1023765/how-to-delete-the-recovery-partition-in-windows-10
PS C:\WINDOWS\system32> diskpart
Microsoft DiskPart version 10.0.16215.1000
Copyright (C) Microsoft Corporation.
On computer: WINDOWS-PC
DISKPART> list disk
Disk ### Status Size Free Dyn Gpt
-------- ------------- ------- ------- --- ---
Disk 0 Online 70 GB 10 GB
DISKPART> select disk 0
Disk 0 is now the selected disk.
DISKPART> list partition
Partition ### Type Size Offset
------------- ---------------- ------- -------
Partition 1 Primary 350 MB 1024 KB
Partition 2 Primary 59 GB 351 MB
Partition 3 Recovery 450 MB 59 GB
DISKPART> select partition 3
Partition 3 is now the selected partition.
DISKPART> delete partition override
DiskPart successfully deleted the selected partition.
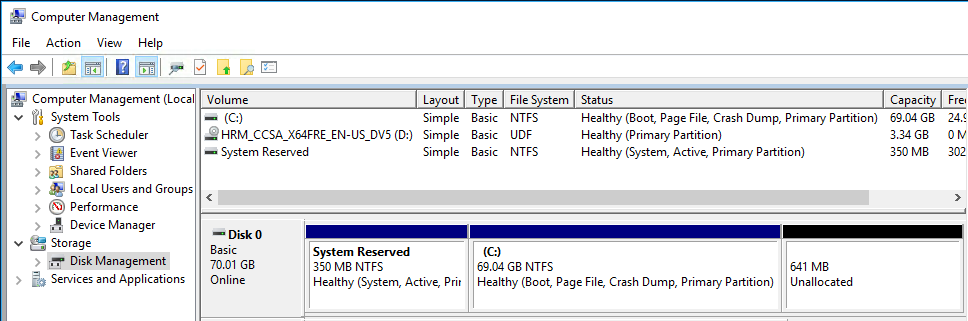
DISKPART> list partition
Partition ### Type Size Offset
------------- ---------------- ------- -------
Partition 1 Primary 350 MB 1024 KB
Partition 2 Primary 59 GB 351 MB
7. C ドライブの拡張
DISKPART> select disk 0

Disk 0 is now the selected disk.

DISKPART> list partition

  Partition ###  Type              Size     Offset
  -------------  ----------------  -------  -------
  Partition 1    Primary            350 MB  1024 KB
  Partition 2    Primary             59 GB   351 MB

DISKPART> list volume

  Volume ###  Ltr  Label        Fs     Type        Size     Status     Info
  ----------  ---  -----------  -----  ----------  -------  ---------  --------
  Volume 0     D   HRM_CCSA_X6  UDF    CD-ROM      3415 MB  Healthy
  Volume 1         System Rese  NTFS   Partition    350 MB  Healthy    System
  Volume 2     C                NTFS   Partition     59 GB  Healthy    Boot

DISKPART> select volume 2

Volume 2 is the selected volume.
- サイズ指定で拡張する場合
DISKPART> extend size=10000

DiskPart successfully extended the volume.

DISKPART> list volume

  Volume ###  Ltr  Label        Fs     Type        Size     Status     Info
  ----------  ---  -----------  -----  ----------  -------  ---------  --------
  Volume 0     D   HRM_CCSA_X6  UDF    CD-ROM      3415 MB  Healthy
  Volume 1         System Rese  NTFS   Partition    350 MB  Healthy    System
* Volume 2     C                NTFS   Partition     69 GB  Healthy    Boot

DISKPART> list partition

  Partition ###  Type              Size     Offset
  -------------  ----------------  -------  -------
  Partition 1    Primary            350 MB  1024 KB
* Partition 2    Primary             69 GB   351 MB
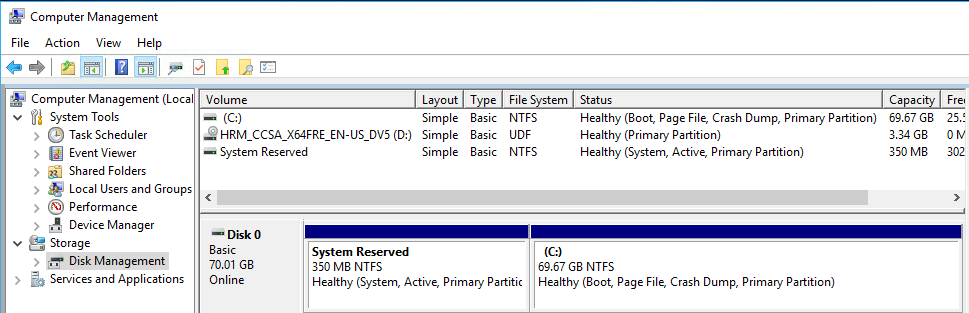
- 空き領域の最大で拡張する場合
DISKPART> extend

DiskPart successfully extended the volume.

DISKPART> list volume

  Volume ###  Ltr  Label        Fs     Type        Size     Status     Info
  ----------  ---  -----------  -----  ----------  -------  ---------  --------
  Volume 0     D   HRM_CCSA_X6  UDF    CD-ROM      3415 MB  Healthy
  Volume 1         System Rese  NTFS   Partition    350 MB  Healthy    System
* Volume 2     C                NTFS   Partition     69 GB  Healthy    Boot

DISKPART> list partition

  Partition ###  Type              Size     Offset
  -------------  ----------------  -------  -------
  Partition 1    Primary            350 MB  1024 KB
* Partition 2    Primary             69 GB   351 MB

DISKPART> exit

Leaving DiskPart...
8. スナップショット作成 (Cold Snapshot via qemu-img)
- VM をシャットダウンさせます
- スナップショットをとる
$ sudo qemu-img snapshot -c backup-snapshot windows10-3.qcow2

$ sudo qemu-img snapshot -l windows10-3.qcow2
Snapshot list:
ID        TAG                 VM SIZE                DATE       VM CLOCK
1         backup-snapshot           0 2017-06-29 22:43:18   00:00:00.000
- VM PowerON
$ virsh start windows10-3
Domain windows10-3 started
9. スナップショット作成 (Snapshot via Virsh)
- 以下の手順だと VM は Paused ステータスになります。
$ virsh snapshot-list windows10-3
 Name                 Creation Time             State
------------------------------------------------------------
$ sudo virsh snapshot-create-as --domain windows10-3 --name "2017-06-30-001" --description "After extend drive C"
Domain snapshot 2017-06-30-001 created
- スナップショット取得中のステータス
$ virsh list
 Id    Name                           State
----------------------------------------------------
 3     windows10-3                    paused
$ virsh snapshot-list windows10-3
 Name                 Creation Time             State
------------------------------------------------------------
 2017-06-30-001       2017-06-30 13:24:41 +0900 running
- スナップショット取得後のステータス
$ virsh list
 Id    Name                           State
----------------------------------------------------
 3     windows10-3                    running