バックアップ用のS3バケットを用意して、S3にDBをバックアップするようにしてみました
1. バックアップ用のS3バケット作成
1-1. バックアップ保存用のバケット作成
AWSマネージメントコンソールのS3メニューにアクセスして、「Create Bucket」を選択
Bucket Name: backup
Region: Tokyo
「Set Up Logging」を選択してログの設定
Enabled: チェックをonに
Target Buckt: backup
Target Prefix: log/    # log/以下にログが保存される
1-2. バックアップバケット用グループ作成
AWSマネージメントコンソールのIAMメニューにアクセスして、「Groups」、「Create New Group」を選択
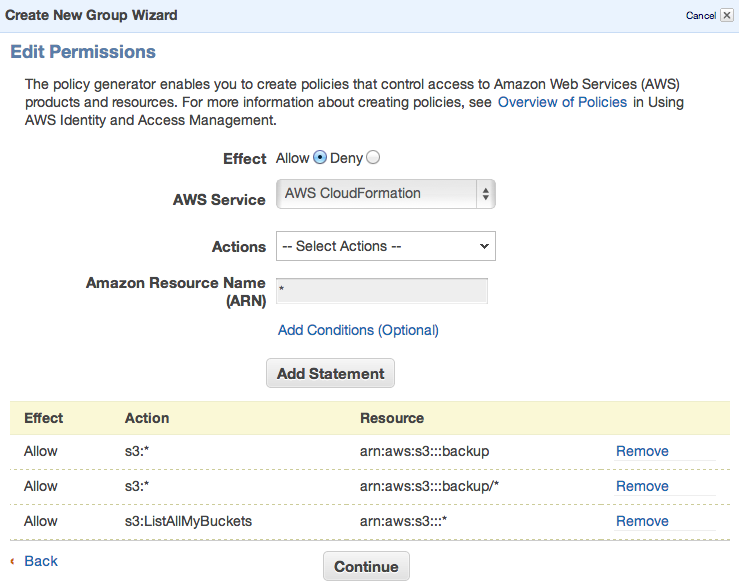
Set Permissionsの設定では作成したバックアップバケットに対してのみ全権限を持つbackupグループを追加します
「Policy Generator」を選択し、以下のように3つの権限を設定(下図参照)
# 1つ目
Effect: Allow
AWS Service: Amazon S3
Actions: All Actions Selected
Amazon Resource Name(ARN): arn:aws:s3:::backup

# 2つ目
Effect: Allow
AWS Service: Amazon S3
Actions: All Actions Selected
Amazon Resource Name(ARN): arn:aws:s3:::backup/*

# 3つ目
Effect: Allow
AWS Service: Amazon S3
Actions: ListAllMyBuckets
Amazon Resource Name(ARN): arn:aws:s3:::*
※ s3cmdを使用する場合は、全バケットに対してs3:ListAllMyBucketsを許可しておかないと初期設定時に失敗するので注意
1-3. バックアップS3バケット用ユーザ作成
IAMメニューにアクセスして「Users」、「Create New Users」を選択
Enter User Names: backup
ユーザ作成時に表示される Access Key ID と Secret Access Key をメモしておきます
ユーザ作成後、ユーザ名をクリックして詳細メニューを表示
タブメニューの「Groups」から、「Add User to Groups」を選択してユーザをbackupグループに割り当てます
2. s3cmd設定
2-1. s3cmdインストール
sudo yum --enablerepo=epel install s3cmd
---- 2014/10/26 追記 ----
[Errno 104] Connection reset by peer
が表示されてうまくアップロードできない場合、s3cmdを最新の1.5.0にアップデートすることでうまくアップロードできました。
sudo yum --enablerepo=epel-testing install s3cmd
---- 追記ここまで ----
2-2. アクセスキー、シークレットキー設定
s3cmd --configureを実行
基本はデフォルトでEnter
Use HTTPS protocolのみYesに
s3cmd --configure

Access Key: ユーザ作成時にメモしておいたAccess Key ID
Secret Key: ユーザ作成時にメモしておいたSecret Access Key

Encryption password: 何も入力せずにEnter
Path to GPG program [/usr/bin/gpg]:何も入力せずにEnter
Use HTTPS protocol [No]:Yes
HTTP proxy server name: 何も入力せずにEnter
Test access with supplied credentials? [Y/n] y
Save settings? [y/N] y
※ 1-2.で s3:ListAllMyBucketsを許可していない場合、以下のようにエラーになるので注意
Test access with supplied credentials? [Y/n] y
Please wait...
ERROR: Test failed: 403 (AccessDenied): Access Denied
2-3. サンプルをアップロードしてみる
vi sample.txt
s3cmd put sample.txt s3://backup/
上記コマンドを実行後、バケットを見るとsample.txtが追加されています
3. S3バックアップ設定
ec2-userで以下を実行
- バックアップ保存用ディレクトリの作成
mkdir -p ~/backup/sql
- バックアップ用のシェルスクリプト作成
7日間分のDBダンプを保持するようにします
# !/bin/bash
period=7
backupDir=$HOME/backup/sql
nowDate=`date '+%Y%m%d'`
oldfile=`date --date "$period days ago" +%Y%m%d`

/usr/bin/mysqldump -u{ユーザ名} -p{パスワード} {db_name} > $backupDir/$nowDate.sql
/usr/bin/zip $backupDir/$nowDate.sql.zip $backupDir/$nowDate.sql
rm -f $backupDir/$nowDate.sql
s3cmd put -rr $backupDir/$nowDate.sql.zip s3://backup/backup/sql/$nowDate.sql.zip

rm -f $backupDir/$oldfile.sql.zip
s3cmd del s3://backup/backup/sql/$oldfile.sql.zip
- cronから実行できるように権限追加
chmod 755 ~/backup/sqldump.sh
- cron設定
毎日午前3時に実行するように設定
crontab -e

0 3 * * * /home/ec2-user/backup/sqldump.sh
以上でEC2からS3にDBの自動バックアップができるようになります
