あけましておめでとうございます.
BotkitでSlash Commandを作れることに気付いたので試してみました.
(Slash Commandは /topic のようなメッセージのことです.)
- Slash Commands | Slack
- Using slash commands - Slack Help Center
- Outgoing Webhooks and Slash commands | Botkit
Slash Commandを作るには,ドメインか固定IPを持っている必要があります.
今回はお試しなので,HerokuのFree Planを使うことにしました.
Herokuでアプリを作る
事前にHerokuの登録と,Heroku Toolbeltのインストールが必要です.
今回は「与えられた選択肢からランダムに選ぶ」という /omikuji を作ってみます.
アプリ名は「omikuji-command」とします ![]()
$ mkdir botkit-omikuji-command
$ cd botkit-omikuji-command
$ heroku create --stack cedar omikuji-command
Creating omikuji-command... done, stack is cedar-14
https://omikuji-command.herokuapp.com/ | https://git.heroku.com/omikuji-command.git
Git remote heroku added
https://omikuji-command.herokuapp.com/ がアプリのURLです.
この後のSlack Appの登録で必要なので,メモしておいて下さい.
Slack Appを作る
これまでSlash CommandはIntegrationとして追加していました.
しかし,Botkitでは新しく登場したSlack Appを作成する必要があるようです.
Slack Appでは他にも,BotやCustom Integrationを定義することができます.
- Getting started with Slack apps | Slack
- SlackのスラッシュコマンドでLyftのタクシーを呼ぶなど他サービスが利用できるようになる | TechCrunch Japan
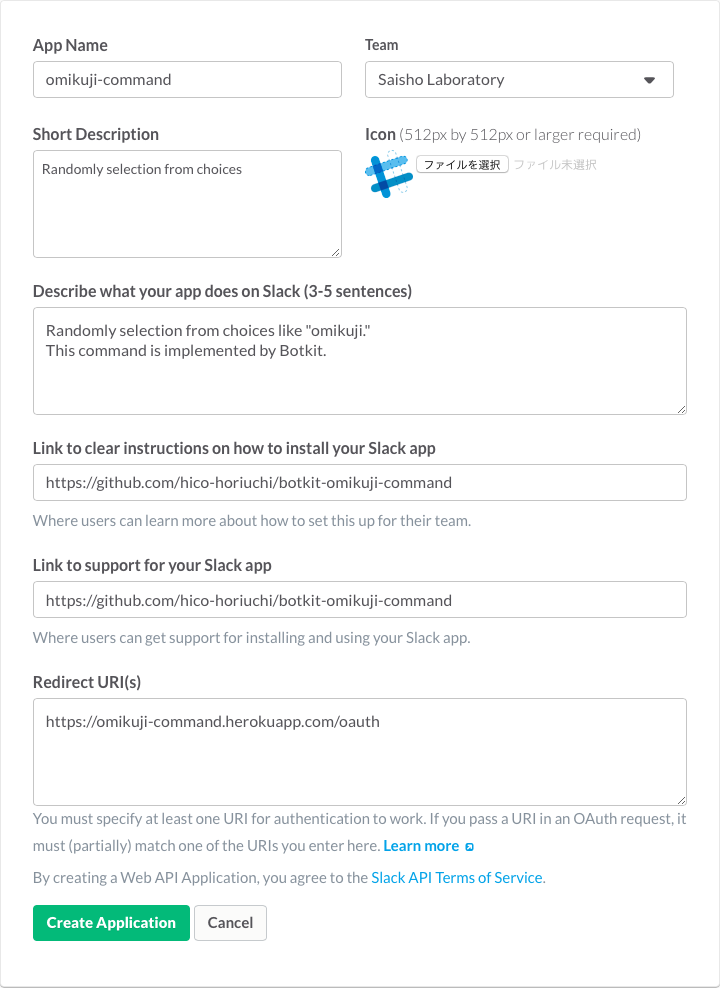
New Applicationから下記のようにSlack Appを作成します(まだSlash Commandの定義はしません).
リンク関係はGitHubのリポジトリを指定しました(READMEでも良いかも).
Redirect URIは,OAuthの認証に成功するとアクセスされます.
認証機能はBotkitが提供してくれるので(後述),先程のHerokuのURLに /oauth を追加します.
作成できたら「OAuth Information」の Client ID と Client Secret をメモして下さい.
Botkitで必要になるので,後程Herokuの環境変数として設定します.
BotkitでSlash Commandを作る
ここからが本題です.
実際にBotkitを使ってSlash Commandを作ってみます.
まず,最初に作成した botkit-omikuji-command ディレクトリに移って,必要なファイルを用意します.
package.json は必要なnpmを, Procfile はHerokuで実行するコマンドを指定しています.
{
  "dependencies": {
    "botkit": ">= 0.0.*"
  }
}
web: node bot.js
ここからがBotkitのコードですが,以外と少ないですね.
var botkit = require('botkit');

var controller = botkit.slackbot({
  debug: false,
  json_file_store: './simple_storage/'
}).configureSlackApp({
  clientId: process.env.BOTKIT_SLACK_CLIENT_ID,
  clientSecret: process.env.BOTKIT_SLACK_CLIENT_SECRET,
  scopes: ['commands']
});

controller.setupWebserver(process.env.PORT, function(err, webserver) {
  controller.createWebhookEndpoints(controller.webserver);
  controller.createOauthEndpoints(controller.webserver, function(err, req, res) {
    if (err) {
      res.status(500).send('Error: ' + JSON.stringify(err));
    } else {
      res.send('Success');
    }
  });
});

controller.on('slash_command', function(bot, message) {
  switch (message.command) {
  case '/omikuji':
    var choices = message.text.split(',');
    var choice = choices[Math.random() * choices.length | 0];
    bot.replyPrivate(message, '<@' + message.user + '> *' + choice + '*');
    break;
  }
});
幾つか重要なポイントがあるので,簡単に解説します.
json_file_store
Botkitでは,データを保存するためのストレージを使うことができます.
Slash Command(Slack App)では,OAuthのトークンを保存するために必要です
ただ,Herokuではファイルシステムに書き込むことができないので,無意味ですが….
(lib/storage/redis_storage.jsがあるけど,どうやって使うんだろう….)
controller.configureSlackApp
clientId と clientSecret を指定して,BotkitをSlack Appとして動作させます.
scopes ではSlack Appが必要な権限を指定します.
OAuth Scopesの通り,Slackでは大量のスコープが定義され,細かく設定することができます.
Slash Commandの場合は,Slack Buttonの commands を指定します.
controller.createWebhookEndpoints
SlackからのWebHookを受ける /slack/receive を追加します.
WebHookの種類によって slash_command または outgoing_webhook イベントを発火します.
controller.createOauthEndpoints
OAuthに必要な /login と /oauth を追加します.
/login は,Slack Appをチームに追加する(OAuthを認証する)場合にアクセスします.
その後 /oauth にリダイレクトされ,Botkitがトークンの受取と確認を行います.
bot.replyPrivate
Slash Commandを実行したユーザーだけに見えるように返信します.
全員に見られるようにするには bot.replyPublic を使います.
Slash Commandsによると,レスポンスは3000ms以内に返す必要があるようです.
時間がかかる場合は bot.replyPublicDelayed か bot.replyPrivateDelayed を使うようです.
また, message オブジェクトにはWebHookで与えられた下記のデータが格納されているようです.
token=gIkuvaNzQIHg97ATvDxqgjtO
team_id=T0001
team_domain=example
channel_id=C2147483705
channel_name=test
user_id=U2147483697
user_name=Steve
command=/weather
text=94070
response_url=https://hooks.slack.com/commands/1234/5678
Herokuにデプロイする
Herokuにデプロイして,動かしてみましょう.
リモートリポジトリは設定済なので,環境変数を設定してからpushします.
$ cd botkit-omikuji-command
$ git init
$ git add .
$ git commit -m 'first commit'
$ heroku config:set BOTKIT_SLACK_CLIENT_ID=01234567890.12345678901
$ heroku config:set BOTKIT_SLACK_CLIENT_SECRET=abcdefghijklmnopqrstuvwxyz012345
$ git push heroku master
Slash Commandを設定する
Applicationsにアクセスして,先程作成したSlack AppにSlash Commandを設定します.
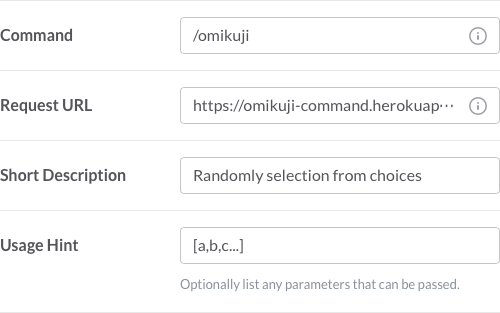
「Slash Commands」の Create new command を押して,下記のように設定します.
Request URLには,HerokuのURL + /slack/receive を指定します.
(また,HTTPSを要求されるため,個人ではハードルが高いですね….)
Save 実行時にRequest URLにアクセスされるようで,先にBotkitをデプロイする必要があります.
最後に,HerokuのURL + /login にアクセスしてSlack Appをチームに追加します.
Slackで Authorize した後に,リダイレクト先で Success と表示されれば完了です.
これでようやく,Slash Commandを使えるようになりました.
まとめ
Heroku,Slack App...と下準備が大変でしたが,Slash Commandを使えるようになりました.
しかし,BotkitがSlackに特化しているおかげで,実際のコード量は少なくて済みました.
公開サーバとSSL証明書を持っていれば,もっと簡単にできそうですね.
また,以前Hubot×ChatOps勉強会でこんな話が出ていました.
Bot(Hubot)ではコマンドの補完ができないのが不便だが,チャット側の対応も必要だよね.
Botをlash Commandに移行すれば,コマンドの補完が効くので良いかもしれません.
この場合は message.command で条件分岐させれば,複数のSlash Commandを1つのBotkitで扱うことができるハズです.
今回作成したSlack AppはGitHubで公開しています.


