iOS9から(3DTouch対応端末であれば)利用できるようになった、Peek&Popを理解するため「ViewControllerPreviews: Using the UIViewController previewing APIs Version 1.1, 2015-10-21」のコードを読んで理解を深めてみました。
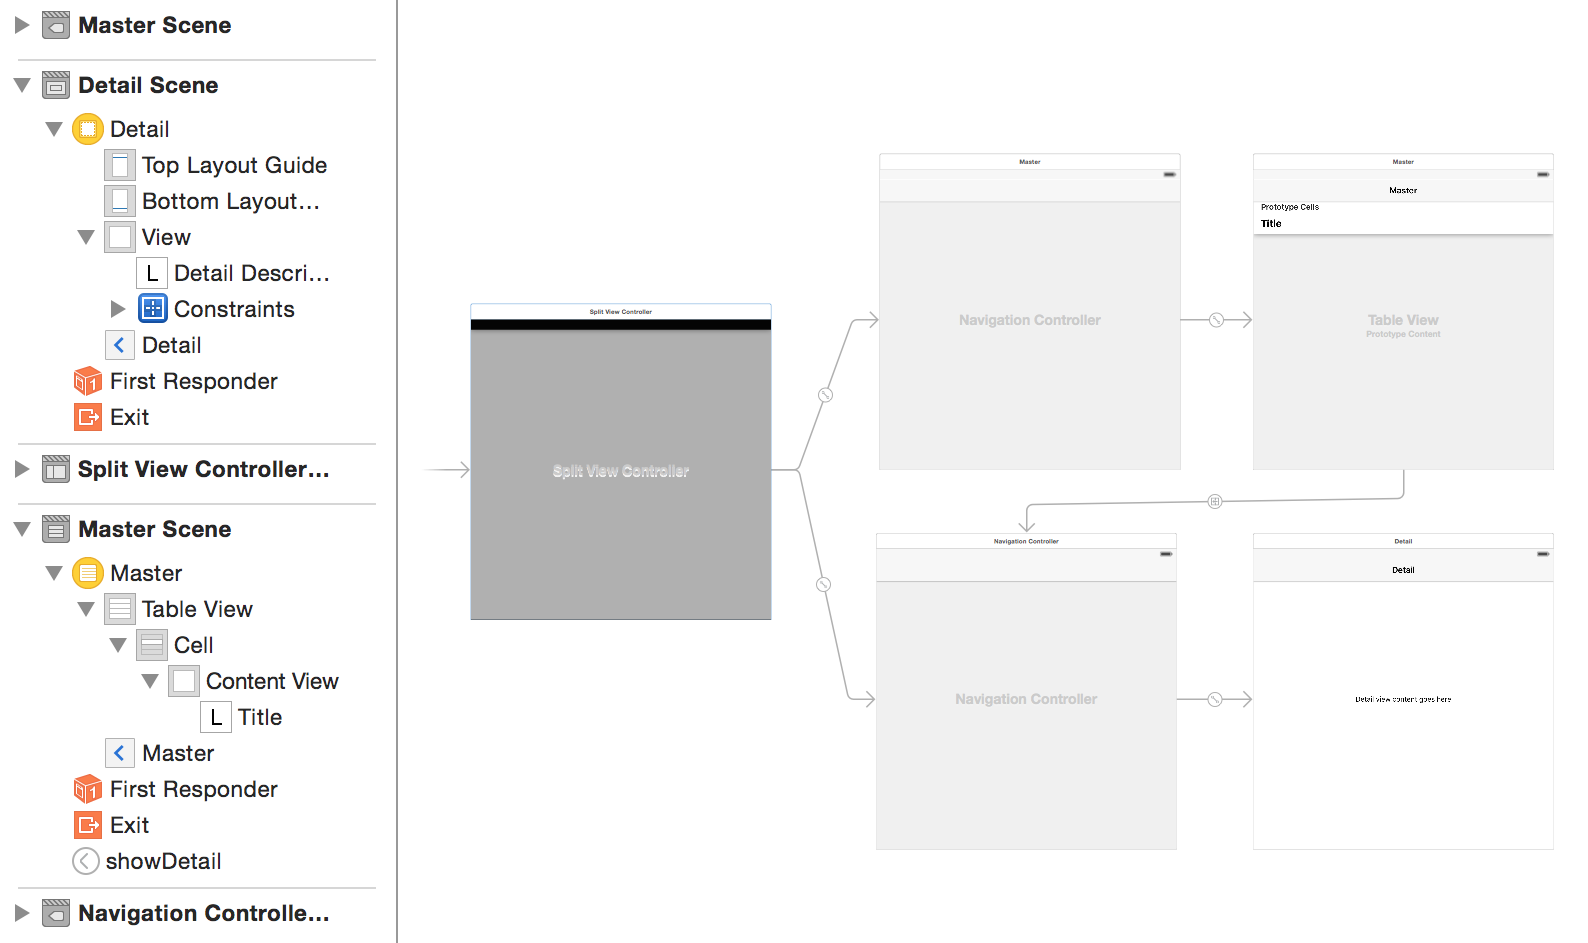
画面構成
Master Sceneにテーブルを表示し、そのセルをタップするとDetail Sceneで詳細を表示するという構成です。
ソースコード
MasterViewController
まず最初にセルに表示するタイトルとPeekした時の各プレビュー画面のサイズを宣言しています。
class MasterViewController: UITableViewController {

    struct PreviewDetail {
        let title: String
        let preferredHeight: Double
    }

    let sampleData = [
        PreviewDetail(title: "Small", preferredHeight: 160.0),
        PreviewDetail(title: "Medium", preferredHeight: 320.0),
        PreviewDetail(title: "Large", preferredHeight: 0.0) // 0.0 to get the default height.
    ]
UITableViewDataSourceプロトコルのメソッドです。Rowの数には上記のデータの個数、セルのラベルにタイトルを入れています。
override func tableView(tableView: UITableView, numberOfRowsInSection section: Int) -> Int {
        // Return the number of items in the sample data structure.
        return sampleData.count
    }

    override func tableView(tableView: UITableView, cellForRowAtIndexPath indexPath: NSIndexPath) -> UITableViewCell {
        let cell = tableView.dequeueReusableCellWithIdentifier("Cell", forIndexPath: indexPath)

        let previewDetail = sampleData[indexPath.row]
        cell.textLabel!.text = previewDetail.title

        return cell
    }
セルをタップした時の遷移をStoryBordで設定してあるので、prepareForSegueメソッドで詳細画面にタイトルを受け渡しています。
    override func prepareForSegue(segue: UIStoryboardSegue, sender: AnyObject?) {
        if segue.identifier == "showDetail", let indexPath = tableView.indexPathForSelectedRow {
            let previewDetail = sampleData[indexPath.row]

            let detailViewController = (segue.destinationViewController as! UINavigationController).topViewController as! DetailViewController

            // Pass the `title` to the `detailViewController`.
            detailViewController.detailItemTitle = previewDetail.title
        }
    }
Peekに対応させるビューの登録
フォースタッチが利用できるか判定し、可能な場合はPeekに対応させるビューを登録します。サンプルコードのようにテーブルビューのセルに対応させる場合は、このようにUITableViewのプロパティのviewを登録すれば各々のセルに登録できます。
※ 判定に使用しているforceTouchCapabilityはiOS9以上で利用可能なプロパティなので#available構文などを使用して弾く必要があります。
    override func viewDidLoad() {
        super.viewDidLoad()

        // Check for force touch feature, and add force touch/previewing capability.
        if traitCollection.forceTouchCapability == .Available {
            registerForPreviewingWithDelegate(self, sourceView: view)
        }
        else {
            // Create an alert to display to the user.
            alertController = UIAlertController(title: "3D Touch Not Available", message: "Unsupported device.", preferredStyle: .Alert)
        }
    }
MasterViewController+UIViewControllerPreviewing
ここではPeekとPopの操作をした時の動作を設定する為UIViewControllerPreviewingDelegateに準拠させています。MasterViewControllerをextensionして実装しています。デリゲートメソッドの実装はextentionを使うようにすれば、ViewControllerが肥大化しなくて済みますね。
Peek時のプレビュー画面
locationにはPeek操作をした時の位置が渡されます。それをindexPathForRowAtPointでNSIndexPathに変換してどのPeekされたセルを特定しています。
    func previewingContext(previewingContext: UIViewControllerPreviewing, viewControllerForLocation location: CGPoint) -> UIViewController? {
        // Obtain the index path and the cell that was pressed.
        guard let indexPath = tableView.indexPathForRowAtPoint(location),
                  cell = tableView.cellForRowAtIndexPath(indexPath) else { return nil }
次にPeekした時のプレビュー画面を生成しています。遷移先をプレビューさせる場合は基本的に通常の遷移時の実装と同じになります。preferredContentSizeを指定することでプレビュー画面のサイズを変更しています。
        // Create a detail view controller and set its properties.
        guard let detailViewController = storyboard?.instantiateViewControllerWithIdentifier("DetailViewController") as? DetailViewController else { return nil }

        let previewDetail = sampleData[indexPath.row]
        detailViewController.detailItemTitle = previewDetail.title
        detailViewController.preferredContentSize = CGSize(width: 0.0, height: previewDetail.preferredHeight)
previewingContext.sourceRectで指定した範囲以外の箇所がPeekする時にブラー処理が施されます。そして上記で生成したプレビュー画面であるdetailViewControllerを返しています。
        // Set the source rect to the cell frame, so surrounding elements are blurred.
        previewingContext.sourceRect = cell.frame

        return detailViewController
    }
Popした時の表示画面
さらにPopした時の処理をここに書きます。viewControllerToCommitにはPeekで使用したプレビュー画面が渡されるので、同じ画面に遷移させる場合はそのまま遷移メソッドに渡してしまします。
※ ここでプレビュー画面とは異なる画面を使用することができますが、Popした時のプレビュー画面が広がる様なアニメーションがなくなります。
    func previewingContext(previewingContext: UIViewControllerPreviewing, commitViewController viewControllerToCommit: UIViewController) {
        // Reuse the "Peek" view controller for presentation.
        showViewController(viewControllerToCommit, sender: self)
    }
DetailViewController
説明も必要ないと思いますが、詳細画面のラベルに遷移時に受け渡されたタイトルを入れています。
    override func viewDidLoad() {
        super.viewDidLoad()

        if let detail = detailItemTitle {
            detailDescriptionLabel.text = detail
        }

        navigationItem.leftBarButtonItem = splitViewController?.displayModeButtonItem()
        navigationItem.leftItemsSupplementBackButton = true
    }
プレビューアクションの登録
ここではPeekした時に上スワイプすると現れるアクションメニューの設定をしています。Swiftらしくlazyを使っています。これならiOS9未満の端末に対してはpreviewActionsが生成されることがないので安全ですね。
previewActionForTitleではUIPreviewActionのタイトルと表示スタイル、そして選択した時のハンドラを返しています。この場合どのプレビュー画面のどのアクションが選択されたかprintで表示されます。
    // Preview action items.
    lazy var previewActions: [UIPreviewActionItem] = {
        func previewActionForTitle(title: String, style: UIPreviewActionStyle = .Default) -> UIPreviewAction {
            return UIPreviewAction(title: title, style: style) { previewAction, viewController in
                guard let detailViewController = viewController as? DetailViewController,
                          item = detailViewController.detailItemTitle else { return }

                print("\(previewAction.title) triggered from `DetailViewController` for item: \(item)")
            }
        }
各アクションのタイトルを設定してpreviewActionsのクロージャにUIPreviewActionItemの配列として返しています。UIPreviewActionGroupでアクションをまとめることで階層的に選択させることもできます。
        let action1 = previewActionForTitle("Default Action")
        let action2 = previewActionForTitle("Destructive Action", style: .Destructive)

        let subAction1 = previewActionForTitle("Sub Action 1")
        let subAction2 = previewActionForTitle("Sub Action 2")
        let groupedActions = UIPreviewActionGroup(title: "Sub Actions…", style: .Default, actions: [subAction1, subAction2] )

        return [action1, action2, groupedActions]
    }()
上記の配列をpreviewActionItemsで返すことで、アクションメニューが表示されます。
    override func previewActionItems() -> [UIPreviewActionItem] {
        return previewActions
    }
感想
Peek&Popの利用率は端末依存もあるのでまだ低いと思いますが、今後の対応端末の増加と共に自然と増え、機能も追加されていくような気がします。
また比較的手軽に実装できる割に、遷移せずに遷移先の内容を確認できる機能というのはユーザにもたらすメリットは大きいです。
適切に実装することで、多くのユーザに豊かなUXを提供していきたいですね。