はじめに
AppKit系のクラスはUIKitのように簡単にカスタマイズできないので、さっさとできそうなものでも結構つまづきます。
以下、超簡単にできそうなNSButtonのカスタマイズ方法についてまとめました。
無駄にめんどくさいです。
要件
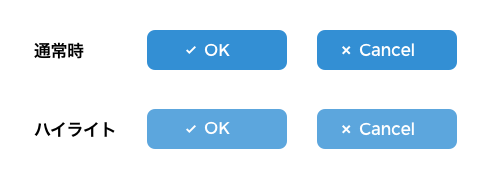
以下のようなボタンを作ります。
- サイズは120 x 40
- ボタンの中身は任意のテキストと画像
- テキストのカラーはホワイト
- テキストと画像の間のマージンは固定
- ハイライト時(ボタン押下時)は色を変える
これだけなのに、めんどくさいことしないといけないんだぜ...
(もっと手軽な方法ある場合は教えて欲しいです...)
実装
コーディング
NSButtonのサブクラスを作る
このクラスでやることは以下の通り。
- ボタンのコーナーを設定
- ボタンの文字色を変更
- ハイライト時にボタンの色を変更
MyButton.swift
import Cocoa

class MyButton: NSButton {

    var titleColor = NSColor.blackColor()                   // タイトルカラー
    var normalBackgroundColor = NSColor.darkGrayColor()     // 通常時のボタン背景色
    var highlightBackgroundColor = NSColor.grayColor()      // ハイライト時のボタン背景色

    override var wantsUpdateLayer: Bool {
        return true
    }

    override func awakeFromNib() {
        super.awakeFromNib()

        // ボタンのコーナー
        self.layer?.cornerRadius = 4

        // 文字を白にする
        let colorAttributeTitle = NSMutableAttributedString(attributedString: self.attributedTitle)
        let range = NSMakeRange(0, colorAttributeTitle.length)
        colorAttributeTitle.addAttribute(NSForegroundColorAttributeName, value: titleColor, range: range)
        self.attributedTitle = colorAttributeTitle
        self.cell?.drawingRectForBounds(self.bounds)

        // ボタンがハイライトになる時にimageの色が変わらせないようにする
        if let buttonCell = self.cell as? NSButtonCell {
            buttonCell.highlightsBy = NSCellStyleMask.NoCellMask
        }
    }

    override func updateLayer() {

        // ボタン背景色の設定
        if self.cell!.highlighted {
            // ボタンがハイライトした時
            self.layer?.backgroundColor = highlightBackgroundColor.CGColor
        } else {
            self.layer?.backgroundColor = normalBackgroundColor.CGColor
        }
    }
}
NSButtonCellのサブクラスを作る
このクラスでやることは以下の通り。
- 画像の位置を指定
MyButtonCell.swift
import Cocoa

class MyButtonCell: NSButtonCell {

    // imageの位置を指定
    override func imageRectForBounds(theRect: NSRect) -> NSRect {

        let imageSize = CGSizeMake(10, 10)                  // imageのサイズ
        let textsize = self.attributedTitle.size()          // テキストのサイズ

        // imageの位置計算
        let x = (theRect.width - textsize.width) / 2
        let y = (theRect.height - imageSize.height) / 2

        return NSMakeRect(x - imageSize.height, y + 2, imageSize.width, imageSize.height)
    }
}
Interface Builder
ボタン、ボタンのテキスト、画像の設定をします。
UIButtonの設定を見慣れてる人だと、なんか色々足りない気がすると思いますが、気のせいではありません。
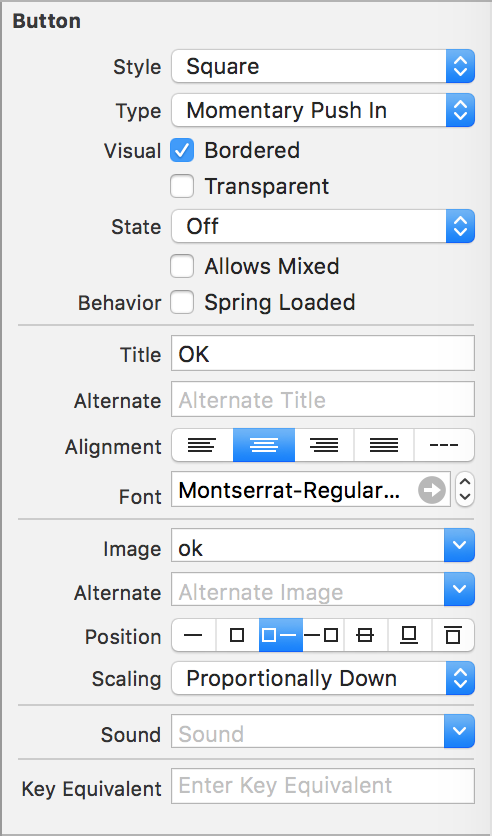
- ボタンの形がsquareなのは他のボタンタイプだとIB上で高さの設定ができないからです。
- imageのPositionは「□-」を選択します。
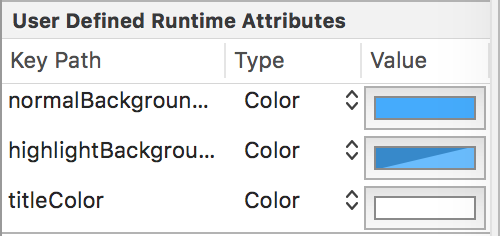
最後に User Defined Runtime Attributeをいじります。
結果
こんな感じでできました。
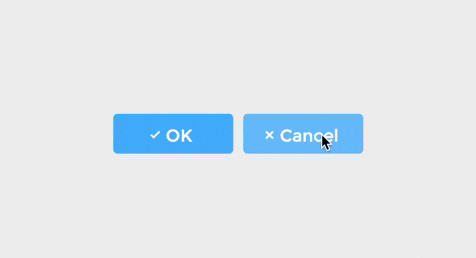
画像はともかく、色変えるだけなのにこんなにダルいってないよなあなど。