TensorFlowとは2015/11/9にオープンソース化されたGoogleの機械学習ライブラリです。この記事ではディープラーニングと言われる多層構造のニューラルネットワークをTensorFlowを利用して構築しています。
TensorFlowはPythonから操作できますがバックエンドではC++で高速に計算しています。macのPython2.7系環境でTensorFlowの上級者用チュートリアルを行い、手書き認識率99.2%の多層構造の畳み込みニューラルネットワークモデルの分類器を構築したときの作業メモです。特別な設定なしにCPU使用率270%メモリ600MByteとちゃんと並列計算してくれました。MNISTランキングを見ると認識率99.2%は上位のモデルとなるようです。
TensorFlowチュートリアル
TensorFlowの初心者用と上級者用チュートリアル2つに取り組んでみました。チュートリアルではMNISTと呼ばれる手書きデータセットを利用して、機械学習と学習データを用いた分類器を構築して手書き画像の認識を行います。初心者用チュートリアルでは精度90%前後の分類器を、上級者用では精度99.2%前後の分類器を構築します。上級者用チュートリアルではディープラーニングと言われる多層構造のニューラルネットワークを構築するチュートリアルとなっています。
MNIST For ML Beginners
Deep MNIST for Experts
■ 画像:今回試験に利用するMNIST手書きデータセットの一部
MNISTデータは28x28ピクセルの数字の手書きデータセットです。

セットアップ
環境はmacでpython 2.7系です。拙い翻訳ですが出来るだけコメントを残してみました。怪しいと思ったらチュートリアルの原文を読むことをオススメします。
# TensorFlowのインストール
pip install https://storage.googleapis.com/tensorflow/mac/tensorflow-0.5.0-py2-none-any.whl

# TensorFlowのインストールの確認
python
>>> import tensorflow as tf
>>> hello = tf.constant('Hello, TensorFlow!')
>>> sess = tf.Session()
>>> print sess.run(hello)
Hello, TensorFlow!
>>> a = tf.constant(10)
>>> b = tf.constant(32)
>>> print sess.run(a+b)
42

# MNIST手書きデータ展開用のディレクトリ作成
mkdir ~/tensorflow
cd ~/tensorflow

touch input_data.py
vi input_data.py
# こちらの内容をinput_data.pyにコピペ
# https://tensorflow.googlesource.com/tensorflow/+/master/tensorflow/g3doc/tutorials/mnist/input_data.py
# input_data.pyをimportすると内部でMNISTデータセットをダウンロードしてメモリ上に展開してくれます。

# input_data.pyの試験
python
>>>import input_data
>>>mnist = input_data.read_data_sets('MNIST_data', one_hot=True)
初心者用のMNISTチュートリアル
TensorFlowを利用して簡単なMNIST分類器を構築して、手書き文字の認識を行います。コピペしても動くように書いておきました。
参考:MNIST For ML Beginners
# -*- coding: utf-8 -*-
from __future__ import absolute_import, unicode_literals
import input_data
import tensorflow as tf
# mnistデータ読み込み
print "****MNISTデータ読み込み****"
mnist = input_data.read_data_sets("MNIST_data/", one_hot=True)

"""
TtensorFlowのチュートリアル開始
TtensorFlowのバックエンドではC++の高速なライブラリを使用しています。
ロジスティック回帰モデルを構築します。
"""
print "****Start Tutorial****"
x = tf.placeholder("float", [None, 784])
W = tf.Variable(tf.zeros([784, 10]))
b = tf.Variable(tf.zeros([10]))
y = tf.nn.softmax(tf.matmul(x, W) + b)
y_ = tf.placeholder("float", [None, 10])
cross_entropy = -tf.reduce_sum(y_ * tf.log(y))

# In this case, we ask TensorFlow to minimize cross_entropy
# using the gradient descent algorithm with a learning rate of 0.01.
train_step = tf.train.GradientDescentOptimizer(0.01).minimize(cross_entropy)

# 学習変数とセッションの初期化
print "****init****"
init = tf.initialize_all_variables()
sess = tf.Session()
sess.run(init)

# 1000回学習
print "****1000回学習と結果表示****"
for i in range(1000):
    batch_xs, batch_ys = mnist.train.next_batch(100)
    sess.run(train_step, feed_dict={x: batch_xs, y_: batch_ys})

# 結果表示
correct_prediction = tf.equal(tf.argmax(y, 1), tf.argmax(y_, 1))
accuracy = tf.reduce_mean(tf.cast(correct_prediction, "float"))
print sess.run(accuracy, feed_dict={x: mnist.test.images, y_: mnist.test.labels})
>>>python ./mnist_beginner.py
****MNISTデータ読み込み****
Extracting MNIST_data/train-images-idx3-ubyte.gz
Extracting MNIST_data/train-labels-idx1-ubyte.gz
Extracting MNIST_data/t10k-images-idx3-ubyte.gz
Extracting MNIST_data/t10k-labels-idx1-ubyte.gz
****Start Tutorial****
****init****
can't determine number of CPU cores: assuming 4
I tensorflow/core/common_runtime/local_device.cc:25] Local device intra op parallelism threads: 4
can't determine number of CPU cores: assuming 4
I tensorflow/core/common_runtime/local_session.cc:45] Local session inter op parallelism threads: 4
****1000回学習と結果表示****
0.9098
上級者用のMNISTチュートリアル
TensorFlowを利用して深層畳み込みニューラルネットワークMNIST分類器を構築して手書き文字を認識するチュートリアルです。コピペしても動くように書いておきました。
Deep MNIST for Experts
# -*- coding: utf-8 -*-
from __future__ import absolute_import, unicode_literals
import input_data
import tensorflow as tf

# mnistデータ読み込み
mnist = input_data.read_data_sets("MNIST_data/", one_hot=True)

# cross_entropyを実装
sess = tf.InteractiveSession()
x = tf.placeholder("float", shape=[None, 784])
y_ = tf.placeholder("float", shape=[None, 10])
W = tf.Variable(tf.zeros([784, 10]))
b = tf.Variable(tf.zeros([10]))
sess.run(tf.initialize_all_variables())
y = tf.nn.softmax(tf.matmul(x, W) + b)
cross_entropy = -tf.reduce_sum(y_ * tf.log(y))

# In this case, we ask TensorFlow to minimize cross_entropy
# using the gradient descent algorithm with a learning rate of 0.01.
train_step = tf.train.GradientDescentOptimizer(0.01).minimize(cross_entropy)

# 1000回学習
for i in range(1000):
    batch = mnist.train.next_batch(50)
    train_step.run(feed_dict={x: batch[0], y_: batch[1]})

# 結果表示
correct_prediction = tf.equal(tf.argmax(y, 1), tf.argmax(y_, 1))
accuracy = tf.reduce_mean(tf.cast(correct_prediction, "float"))
print accuracy.eval(feed_dict={x: mnist.test.images, y_: mnist.test.labels})
# 結果精度91%前後

##########################################
# 深層畳み込みニューラルネットワークを構築
# Build a Multilayer Convolutional Network
# 精度91%は悪いから深層畳み込みモデルを構築して99.2%を目指す
###########################################

"""
ちょっと理解できませんでした..
多層になると損失関数のパラメータ勾配が限りなくゼロに近づく勾配消失問題(Vanishing gradient problem)対策のために、少量のノイズで重みを初期化する関数みたいです。

Weight Initialization

To create this model, we're going to need to create a lot of weights and biases.
One should generally initialize weights with a small amount of noise for symmetry breaking,
and to prevent 0 gradients. Since we're using ReLU neurons, it is also good practice to initialize
them with a slightly positive initial bias to avoid "dead neurons." Instead of doing this repeatedly
while we build the model, let's create two handy functions to do it for us.
"""


def weight_variable(shape):
    initial = tf.truncated_normal(shape, stddev=0.1)
    return tf.Variable(initial)


def bias_variable(shape):
    initial = tf.constant(0.1, shape=shape)
    return tf.Variable(initial)

"""
Convolution and Pooling
TensorFlow also gives us a lot of flexibility in convolution and pooling operations.
How do we handle the boundaries? What is our stride size? In this example,
we're always going to choose the vanilla version. Our convolutions uses a stride of one
and are zero padded so that the output is the same size as the input. Our pooling is plain old
max pooling over 2x2 blocks. To keep our code cleaner, let's also abstract those operations into functions.
"""


def conv2d(x, W):
    return tf.nn.conv2d(x, W, strides=[1, 1, 1, 1], padding='SAME')


def max_pool_2x2(x):
    return tf.nn.max_pool(x, ksize=[1, 2, 2, 1],
                          strides=[1, 2, 2, 1], padding='SAME')
"""
第1レイヤー 5x5パッチで32の特徴を計算
[5, 5, 1, 32] は最初の5,5はパッチサイズ,1は入力チャンネル数,32は出力チャンネル数
"""
W_conv1 = weight_variable([5, 5, 1, 32])
b_conv1 = bias_variable([32])
x_image = tf.reshape(x, [-1, 28, 28, 1])
h_conv1 = tf.nn.relu(conv2d(x_image, W_conv1) + b_conv1)
h_pool1 = max_pool_2x2(h_conv1)

"""
第2レイヤー 5x5パッチで64の特徴を計算
"""
W_conv2 = weight_variable([5, 5, 32, 64])
b_conv2 = bias_variable([64])
h_conv2 = tf.nn.relu(conv2d(h_pool1, W_conv2) + b_conv2)
h_pool2 = max_pool_2x2(h_conv2)

"""
密集接続レイヤー

画像サイズ7x7に還元されているので、1024のニューロンと完全に接続する層(翻訳がかなり怪しいので原文読んでください)MNISTデータは28x28ピクセルなので1/16ずつ読むみたいです。

Densely Connected Layer

Now that the image size has been reduced to 7x7, we add a fully-connected layer with 1024 neurons to allow
processing on the entire image. We reshape the tensor from the pooling layer into a batch of vectors,
multiply by a weight matrix, add a bias, and apply a ReLU.
"""
W_fc1 = weight_variable([7 * 7 * 64, 1024])
b_fc1 = bias_variable([1024])
h_pool2_flat = tf.reshape(h_pool2, [-1, 7 * 7 * 64])
h_fc1 = tf.nn.relu(tf.matmul(h_pool2_flat, W_fc1) + b_fc1)

"""
過剰適合を排除する

Dropout

To reduce overfitting, we will apply dropout before the readout layer. We create a placeholder
for the probability that a neuron's output is kept during dropout. This allows us to turn dropout
on during training, and turn it off during testing. TensorFlow's tf.nn.dropout op automatically
handles scaling neuron outputs in addition to masking them, so dropout just works without any additional scaling.
"""
keep_prob = tf.placeholder("float")
h_fc1_drop = tf.nn.dropout(h_fc1, keep_prob)

"""
読み出し層
第1層のロジスティック回帰のように、ロジスティック回帰層を追加

Readout Layer
Finally, we add a softmax layer, just like for the one layer softmax regression above.
"""
W_fc2 = weight_variable([1024, 10])
b_fc2 = bias_variable([10])

y_conv = tf.nn.softmax(tf.matmul(h_fc1_drop, W_fc2) + b_fc2)

"""
モデルの学習と評価
TensorFlowを使用して、洗練された深い学習モデルの学習と評価を行います。
"""
cross_entropy = -tf.reduce_sum(y_ * tf.log(y_conv))
train_step = tf.train.AdamOptimizer(1e-4).minimize(cross_entropy)
correct_prediction = tf.equal(tf.argmax(y_conv, 1), tf.argmax(y_, 1))
accuracy = tf.reduce_mean(tf.cast(correct_prediction, "float"))
sess.run(tf.initialize_all_variables())
for i in range(20000):
    batch = mnist.train.next_batch(50)
    if i % 100 == 0:
        train_accuracy = accuracy.eval(feed_dict={
            x: batch[0], y_: batch[1], keep_prob: 1.0})
        print "step %d, training accuracy %g" % (i, train_accuracy)
    train_step.run(feed_dict={x: batch[0], y_: batch[1], keep_prob: 0.5})

# 結果表示
print "test accuracy %g" % accuracy.eval(feed_dict={
    x: mnist.test.images, y_: mnist.test.labels, keep_prob: 1.0})
>>>python ./mnist_expert.py
Extracting MNIST_data/train-images-idx3-ubyte.gz
Extracting MNIST_data/train-labels-idx1-ubyte.gz
Extracting MNIST_data/t10k-images-idx3-ubyte.gz
Extracting MNIST_data/t10k-labels-idx1-ubyte.gz
can't determine number of CPU cores: assuming 4
I tensorflow/core/common_runtime/local_device.cc:25] Local device intra op parallelism threads: 4
can't determine number of CPU cores: assuming 4
I tensorflow/core/common_runtime/local_session.cc:45] Local session inter op parallelism threads: 4
0.9092
step 0, training accuracy 0.06
step 100, training accuracy 0.68
step 200, training accuracy 0.9
step 300, training accuracy 0.98
step 400, training accuracy 0.9
step 500, training accuracy 0.94
step 600, training accuracy 0.92
step 700, training accuracy 0.84
step 800, training accuracy 0.92
step 900, training accuracy 0.94
step 1000, training accuracy 0.98
step 1100, training accuracy 0.96
step 1200, training accuracy 0.98
step 1300, training accuracy 0.96
step 1400, training accuracy 0.98
step 1500, training accuracy 0.98
step 1600, training accuracy 0.96
step 1700, training accuracy 0.96
step 1800, training accuracy 0.96
....
step 19600, training accuracy 1
step 19700, training accuracy 0.98
step 19800, training accuracy 1
step 19900, training accuracy 1
test accuracy 0.992
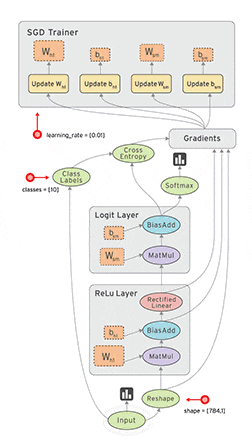
■ 画像:TensorFlowの動作フロー
上級チュートリアルが終わったあとこのgifを見直すと、少しだけ意味が理解できるようになりました。
参考
TensorFlow
MNIST For ML Beginners
Deep MNIST for Experts
import_data.py
MNIST手書きデータセット
Google、人工知能ライブラリ TensorFlow をオープンソース化。音声検索や写真認識、翻訳の基盤技術ディープラーニングを商利用可で解放