2016.04.01に公開 Pythonを利用した画像に文字データを隠蔽するライブラリです。
コマンドラインからも実行できます。Python2系で動作。
install
install
pip install steganography
データ埋め込み例

サンプルコード
sample-code
# -*- coding: utf-8 -*-
from __future__ import absolute_import, unicode_literals
from steganography.steganography import Steganography

# 画像にテキストを埋め込み
path = "/tmp/image/a.jpg"
output_path = "/tmp/image/b.jpg"
text = 'The quick brown fox jumps over the lazy dog.'
Steganography.encode(path, output_path, text)

# 画像に隠蔽されたテキストを読み込み
secret_text = Steganography.decode(output_path)
サンプルコマンド
# 画像にテキストを埋め込み
>>>steganography -e /tmp/image/a.jpg /tmp/image/b.jpg 'The quick brown fox jumps over the lazy dog.'

# 画像に隠蔽されたテキストを読み込み
>>>steganography -d /tmp/image/b.jpg
The quick brown fox jumps over the lazy dog.
1. 動作概要 - テキスト埋め込み
1-1. normalize
画像の全ピクセルをスキャンして、RGBそれぞれの値を8で割ったとき余が1となるピクセルを選択する。選択したピクセルの色を変更して余が1とならないように色を変更する。
■ normalize処理で色を変更したピクセル
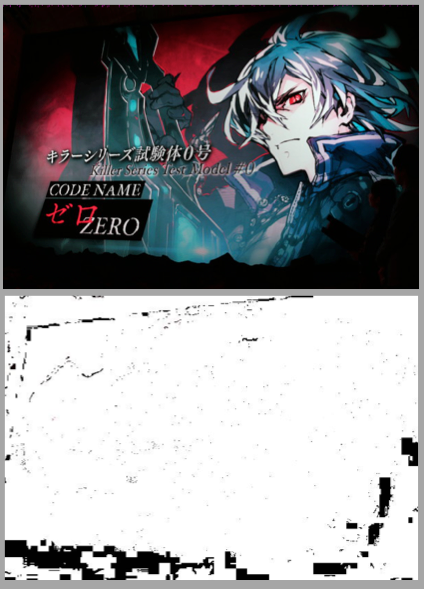
1-2. テキスト隠蔽
テキストを16進数に変換する。画像を16ピクセル毎に分割して該当箇所のピクセルの色をRGBそれぞれの値を8で割ったとき余が1となるように値を変更する。
2. 動作概要 - 画像に隠蔽されたテキスト読み込み
2-1. テキスト読み込み
テキストが隠蔽された画像を読み込み、画像を16ピクセル毎に分割してピクセルの色がRGBそれぞれの値を8で割ったとき余が1となるpointピクセルを特定する。pointピクセル位置から16進数の値を取得し16進数から文字列に変換して出力する。
3. 勉強用のサンプル実装コード
3-1. 画像をopenして1ピクセルずつ読むコード
pillowを利用すると簡単に画像操作が可能です。
open-image
# -*- coding: utf-8 -*-
from __future__ import absolute_import, unicode_literals
from PIL import Image

path = "/tmp/image/a.jpg"
img = Image.open(path)
img = img.convert('RGB')

for y in range(img.size[1]):
    for x in range(img.size[0]):
        r, g, b = img.getpixel((x, y))
        print(r, g, b)
output
>>> python sample.py
(44, 81, 110)
(75, 109, 137)
(85, 114, 144)
(69, 99, 127)
(68, 105, 131)
(52, 94, 116)
(65, 103, 124)
(108, 130, 154)
(149, 150, 181)
(164, 148, 184)
(152, 132, 169)
....
3-2. 特定条件のピクセル色を赤色に変更するコード
red
# -*- coding: utf-8 -*-
from __future__ import absolute_import, unicode_literals
from PIL import Image

path = "/tmp/image/a.jpg"
output_path = "/tmp/image/sample_red.png"
img = Image.open(path)
img = img.convert('RGB')


def matched_pixel(r, g, b):
    return r % 8 == g % 8 == b % 8 == 1


for y in range(img.size[1]):
    for x in range(img.size[0]):
        r, g, b = img.getpixel((x, y))
        if matched_pixel(r, g, b):
            # 指定座標を赤色に書き換える
            img.putpixel((x, y), (255, 0, 0))

img.save(output_path, "PNG", optimize=True)
3-3. str hex converter
str-hex-converter
# -*- coding: utf-8 -*-
from __future__ import absolute_import, unicode_literals


def to_hex(s):
    return s.encode("hex")


def to_str(s):
    return s.decode("hex")


base = "aiueo kakikukeko"
print(to_hex(base))
# >>> 616975656f206b616b696b756b656b6f

assert base == to_str(to_hex(base))
4. ソースコード
画像の読み書きにはpillowを利用しています。ライブラリのソースコードはgithubにて公開しています。
https://github.com/subc/steganography/blob/master/steganography/steganography.py