はじめに
特殊な画面遷移をしたい場合はUIViewControllerAnimatedTransitioningを使うのが定石ですよね
UIViewControllerAnimatedTransitioningとアニメーションを組み合わせると様々な画面遷移を実現することができます
今回、そのサンプルとして作ったSamuraiTransitonというものを紹介させていただきます
SamuraiTransition
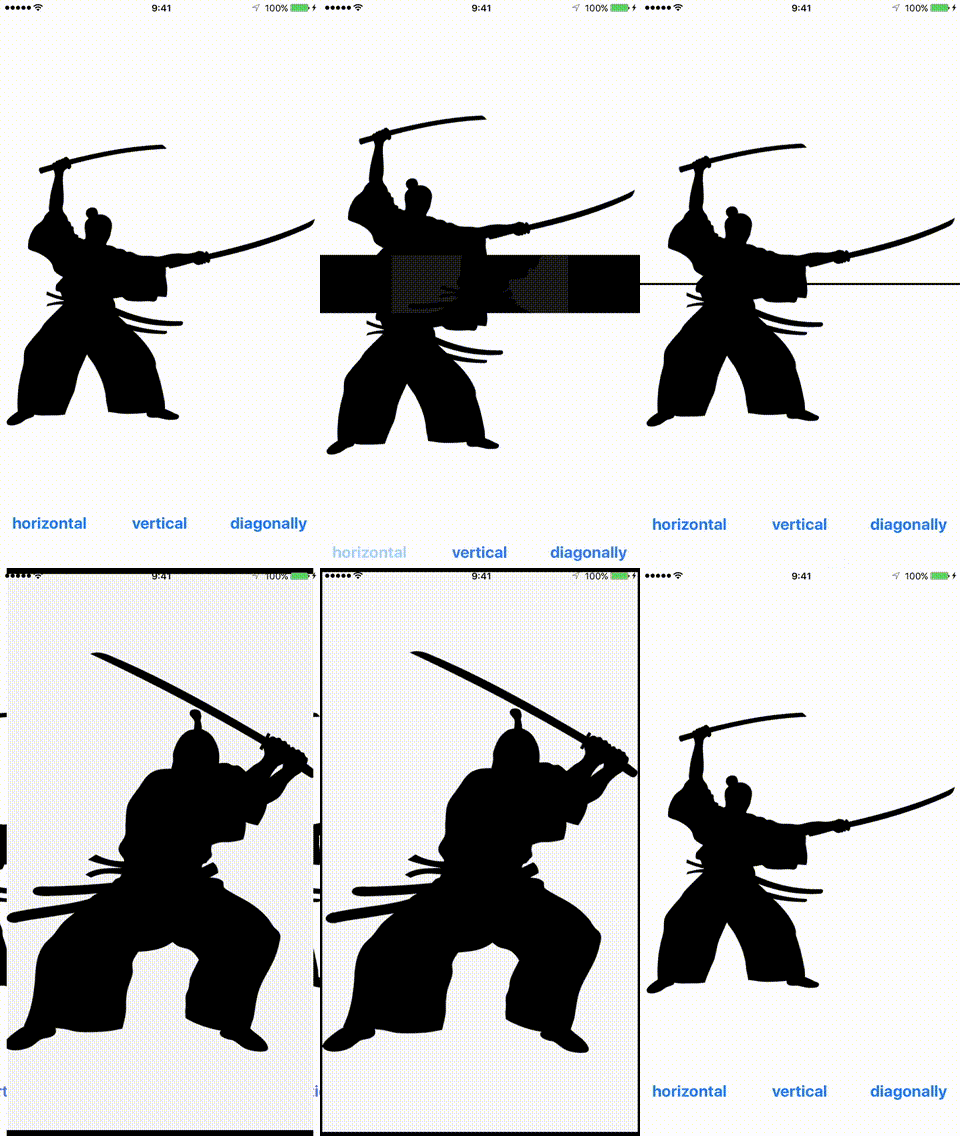
画面を2分割して遷移するOSSです
Swift3、iOS8以上で使えます
インストール
Cocoapodsでインストールしてください
pod 'SamuraiTransition'
使い方
このOSSは現在、モーダル表示の画面遷移時のみ使えます
一番簡単な使い方は、OSS内にSamuraiViewControllerというUIViewControllerを継承したクラスがいるので、このクラスをモーダル表示したいUIViewControllerに継承させてください
import SamuraiTransition

//モーダル表示したいクラス
class ModalViewController: SamuraiViewController {
    //...
}
遷移元のViewControllerクラスは、普段通りモーダル表示したい遷移先クラスのインスタンスを生成して、present(ViewController, animated: true, completion: nil)するだけです
(何も指定しない場合、デフォルトで真横に画面を斬るオプションが適用されます)
class ViewController: UIViewController {

    @IBAction func tappedModalButton(_ sender: Any) {
        let vc = UIStoryboard(name: "Main", bundle: nil).instantiateViewController(withIdentifier: "ModalViewController") as! ModalViewController
        present(vc, animated: true, completion: nil)
    }

}
設定できるオプション
UIViewControllerAnimatedTransitioningプロトコルに準拠したクラスであるSamuraiTransitionというクラスの中でこのアニメーションを実現しています
このSamuraiTransitionが公開している設定を変えることで動きを制御できます
設定値を変えることのできるプロパティは下記の通りです
| プロパティ名 (型) | 説明 | デフォルト値 |
|---|---|---|
| duration (TimeInterval) | 遷移時間 | 0.33 |
| presenting (Bool) | 出現時かどうか | true |
| zanAngle (ZanAngle) | 斬る角度 (水平か垂直か斜め) | .horizontal |
| isAffineTransform (Bool) | モーダル表示される画面が奥から出てくるようにするか | true |
| zanPoint (CGPoint?) | 刀の通過ポイント。水平に斬る場合、zanPoint.yの位置を水平に斬る。斜めの場合は右上からzanPointに向かって刀が通過する | nil |
| zanLineColor (UIColor) | 通過する線(刀)の色 | .black |
| zanLineWidth (CGFloat) | 通過する線(刀)の太さ | 1.0 |
デモ動画のボタンを押した時のそれぞれの挙動はzanAngleをボタンごとに変えていただけです
import SamuraiTransition

//モーダル表示したいクラス
class ModalViewController: SamuraiViewController {
    //...
}

class ViewController: UIViewController {

    @IBAction func horizontalZan(_ sender: Any) {
        let vc = UIStoryboard(name: "Main", bundle: nil).instantiateViewController(withIdentifier: "ModalViewController") as! ModalViewController
        // customization
        vc.samuraiTransition.zanAngle = .horizontal
        present(vc, animated: true, completion: nil)
    }

    @IBAction func verticalZan(_ sender: Any) {
        let vc = UIStoryboard(name: "Main", bundle: nil).instantiateViewController(withIdentifier: "ModalViewController") as! ModalViewController
        // customization
        vc.samuraiTransition.zanAngle = .vertical
        present(vc, animated: true, completion: nil)
    }

    @IBAction func diagonallyZan(_ sender: Any) {
        let vc = UIStoryboard(name: "Main", bundle: nil).instantiateViewController(withIdentifier: "ModalViewController") as! ModalViewController
        // customization
        vc.samuraiTransition.zanAngle = .diagonally
        present(vc, animated: true, completion: nil)
    }

}
SamuraiViewControllerがSamuraiTransitionのインスタンスをpublicで保持しているので、継承したモーダル表示の対象となるViewControllerからSamuraiTransitionを設定できます
また、SamuraiViewControllerは画面をタップすると閉じるように、UITapGestureRecognizerを設定したViewを引いています
open class SamuraiViewController: UIViewController {

   //...


  open override func viewDidLoad() {
        super.viewDidLoad()
        setupDismissView()
    }

    open func setupDismissView() {

        let dismissView = UIView()
        dismissView.translatesAutoresizingMaskIntoConstraints = false
        dismissView.backgroundColor = .clear
        view.insertSubview(dismissView, at: 0)
        view.addConstraints([NSLayoutAttribute.top, .left, .right, .bottom].map {
            NSLayoutConstraint(item: dismissView, attribute: $0, relatedBy: .equal, toItem: view, attribute: $0, multiplier: 1.0, constant: 0.0)
        })

        let tapRecognizer = UITapGestureRecognizer(target: self, action: #selector(tapDismissView))
        dismissView.addGestureRecognizer(tapRecognizer)
    }

    open func tapDismissView() {
        dismiss(animated: true, completion: nil)
    }

}
もし、この挙動が不都合である場合は、SamuraiViewControllerを継承したクラスでsetupDismissViewメソッドをから実装でオーバーライドなどしてください
そもそも、SamuraiViewControllerを継承したくない場合は下記のようにすれば使えます
(ここでのModalViewControllerはSamuraiViewControllerを継承していないクラスとします)
class ViewController: UIViewController {

    let transition = SamuraiTransition()

    override func viewDidLoad() {
        super.viewDidLoad()
        transition.duration = 1.0
        transition.zanAngle = ZanAngle.vertical
        transition.isAffineTransform = false
        transition.zanLineColor = .blue
        transition.zanLineWidth = 2.0
    }

    @IBAction func tapModalButton(_ sender: AnyObject) {
        let vc = UIStoryboard(name: "Main", bundle: nil).instantiateViewController(withIdentifier: "ModalViewController") as! ModalViewController
        let button = sender as! UIButton
        transition.zanPoint = CGPoint(x: button.center.x, y: button.center.y)
//        vc.transitioningDelegate = transition でもOK
        vc.transitioningDelegate = self
        present(vc, animated: true, completion: nil)
    }

}

extension ViewController: UIViewControllerTransitioningDelegate {

    func animationController(forPresented presented: UIViewController, presenting: UIViewController, source: UIViewController) -> UIViewControllerAnimatedTransitioning? {
        transition.presenting = true
        return transition
    }

    func animationController(forDismissed dismissed: UIViewController) -> UIViewControllerAnimatedTransitioning? {
        transition.presenting = false
        return transition
    }

}
これで問題なく動くはずです
SamuraiTransitionの実装のキモ
この画面遷移を実現する上でキモとなったのが、画面を2つに斬る部分です
これはどのようにしてやっているか雑に説明するとUIViewクラスの
open func resizableSnapshotView(from rect: CGRect, afterScreenUpdates afterUpdates: Bool, withCapInsets capInsets: UIEdgeInsets) -> UIView?
というメソッドを使ってます
これを使うと、引数で指定したCGRect範囲の呼び出し元のViewのスナップショットが取れるんですね
(もちろん呼び出し元のViewの参照ではなく別のViewとして)
なので水平斬り(horizontal)の場合は、上半分の領域のViewと下半分の領域のViewをそれぞれ取得して、最初はあたかも1つのViewかのようにくっつけて、遷移時にはそれぞれのViewを上と下に移動させてあげるだけなのです
垂直斬り(vertical)の場合は右半分と左半分になるだけで同じことしてます
斜め斬り(diagonally)の場合は、対象となるViewの全領域のViewを2つ取得して、それぞれのViewにマスク処理をかけて三角形になるようにしています
※UIViewControllerAnimatedTransitioningのデリゲート処理に関してはここでは割愛します
iPhone7のシュミレーターだとhorizontalとverticalが動かないのを発見しました
実機では正常に動いています
An empty snapshotView on iPhone 7/7plus
snapshotの取得の仕方を変える必要があるかも。。
SamuraiTransitionの名前の由来
ある日、ムシャクシャして画面を分割するような遷移をしたい気分だった
作って動かしたみたら、
**あれ?これ侍が斬ったみたいじゃね?**って思ったのがきっかけ
冷静になると名前負けしている感は否めない
最後に
UIViewControllerAnimatedTransitioningとアニメーションを組み合わせることで簡単にユニークな画面遷移を実現することができます
アイデアが思いついた方はやってみると楽しいと思います
もし良ければSamuraiTransitionを使ってみてください
