実用例
前回のSwift Bondの魅力 〜概念・仕組み編〜ではSwift Bondの概念や仕組みについて説明しました
本記事では実際にSwift Bondを使って便利になるであろう実用例を幾つか紹介します
今回紹介する実用例の全サンプルコードはBondTutorialにあります
新規登録画面
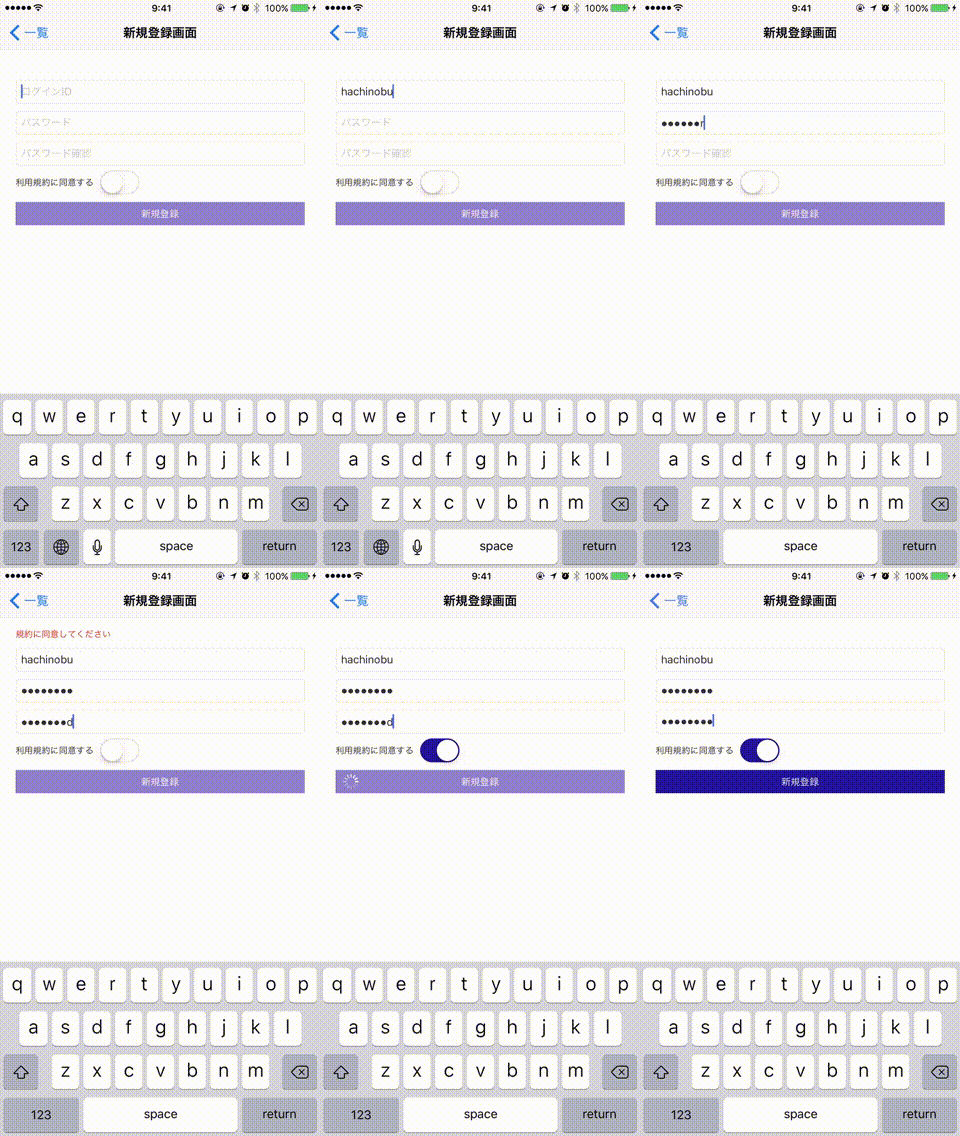
上記のような新規登録画面をSwift Bondを使ってつくってみようと思います
要件
- 全てのテキストフィールドが入力されており、パスワードとパスワード確認の内容が一致かつ、利用規約に同意している場合のみ新規登録ボタンがタップできる
- パスワードとパスワード確認の入力内容が一致しなければ警告文言を表示する
- 利用規約に同意していない場合はエラー文言を表示する
- 新規登録ボタンをタップしたら通信状態であることが分かるようにインジケーターを表示する
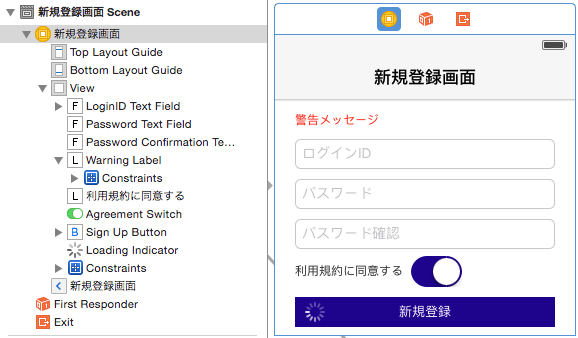
Viewの構成
動画の通り下記のView構成になる
- ログインID (UITextField)
- パスワード (UITextField)
- パスワード確認 (UITextField)
- 利用規約同意スイッチ (UISwitch)
- 新規登録ボタン (UIButton)
- 通信中インディケーター (UIActivityIndicatorView)
- 警告表示ラベル (UILabel)
実装
※ MVVMパターンを前提としてViewとBindingする対象をViewModelに定義します
まずはStoryboardでViewControllerにViewを配置します

次にViewとBindingする対象をもつSignUpVMクラスを実装していきます
まずは通信状態を表すRequestStateというenumを定義します
(サンプルコードでは実際に通信処理はしません。擬似的に通信中のように見せるだけです)
import Foundation
import Bond

class SignUpVM {

    enum RequestState {
        case None
        case Requesting
        case Finish
    }

}
状態の種類は下記3点です
| RequestState | 意味 |
|---|---|
| None | 通信状態でない(起動時) |
| Requesting | 通信中 |
| Finish | 通信完了 |
次にBindingの対象となる様々なEventProducer(Observable)クラスのプロパティを定義します
    let requestState = Observable<RequestState>(.None)
    let loginID = Observable<String?>("")
    let password = Observable<String?>("")
    let passwordConfirmation = Observable<String?>("")
    let isAgreement = Observable<Bool>(false)

    var isLoadingViewAnimate: EventProducer<Bool> {
        return requestState.map { $0 == .Requesting }
    }

    var isLoadingViewHidden: EventProducer<Bool> {
        return requestState.map { $0 != .Requesting }
    }

    var signUpViewStateInfo: EventProducer<(buttonEnabled: Bool, buttonAlpha: CGFloat, warningMessage: String)> {

        return combineLatest(requestState, loginID, password, passwordConfirmation, isAgreement).map { (reqState, loginID, password, passwordConfirmation, isAgreement) in

            guard let loginID = loginID, password = password, passwordConfirmation = passwordConfirmation where reqState != .Requesting else {
                return (false, 0.5, "")
            }

            if loginID.isEmpty || password.isEmpty || passwordConfirmation.isEmpty {
                return (false, 0.5, "")
            }

            guard password == passwordConfirmation else {
                return (false, 0.5, "パスワードと確認パスワードが一致していません")
            }

            guard isAgreement else {
                return (false, 0.5, "規約に同意してください")
            }

            return (true, 1.0, "")

        }

    }

    var finishSignUp: EventProducer<(email: String, password: String)?> {

        return requestState.map { [weak self] reqState in

            guard let email = self?.loginID.value, password = self?.password.value where reqState == .Finish else {
                return nil
            }

            return (email, password)

        }

    }
それぞれの契約内容や挙動を簡単に説明していきます
なお、ObservableクラスはEventProducerを継承していますので、ObservableとEventProducerが絡み合う箇所では、まとめてEventProducerと表現する箇所があります
requestStateプロパティ
先ほどの通信状態を表すRequestStateを保持するObservableクラスです
初期値は通信状態でないことを表す.Noneです
loginID, password, passwordConfirmationプロパティ
String?型の値を保持するObservableで、この3つのプロパティはUITextFieldとのBinding用です
初期値は空文字です
isAgreementプロパティ
Bool型の値を保持するObservableクラスで、UISwitchとのBinding用です
初期値はfalseです
isLoadingViewAnimateプロパティ
Bool型の値を保持するEventProducerの Computed Property です
通信中インディケーターのアニメーションの有無とのBinding用です
isLoadingViewAnimateの保持する値は、requestStateの保持する値が.Requestingに変化するごとにtrue、Requesting以外の値に変化するごとにfalseになります
requestStateの保持している値が変化するごとに
//$0は変化後のrequestStateの値
$0 == .Requesting
で評価した結果がisLoadingViewAnimateの保持する値になるということです
isLoadingViewHiddenプロパティ
Bool型の値を保持するEventProducerの Computed Property です
通信中インディケーターのhiddenとのBinding用です
isLoadingViewHiddenの保持する値は、requestStateの保持する値が.Requestingに変化するごとにfalse、.Requesting以外の値に変化するごとにtrueになります
isLoadingViewAnimateプロパティと逆ですね
signUpViewStateInfoプロパティ
Bool型,GGFloat型,String型のタプルを保持するEventProducerの Computed Property です
新規登録ボタン、エラーメッセージラベルとのBinding用です
signUpViewStateInfoの保持する値は、requestState,loginID,password,passwordConfirmation,isAgreementがそれぞれ保持している値が変化するごとに下記の処理の返り値に変化します
{ (reqState, loginID, password, passwordConfirmation, isAgreement) in

        //通信中の場合
        guard let loginID = loginID, password = password, passwordConfirmation = passwordConfirmation where reqState != .Requesting else {
            return (false, 0.5, "")
        }

        //3つのTextFieldがすべて埋まっていない場合
        if loginID.isEmpty || password.isEmpty || passwordConfirmation.isEmpty {
            return (false, 0.5, "")
        }

        //パスワードとパスワード確認が一致しない場合
        guard password == passwordConfirmation else {
            return (false, 0.5, "パスワードと確認パスワードが一致していません")
        }

        //規約に同意していない場合
        guard isAgreement else {
            return (false, 0.5, "規約に同意してください")
        }

        return (true, 1.0, "")

    }

}
finishSignUpプロパティ
2つのString型のタプルを保持するEventProducerの Computed Property です
通信成功後のアクションのトリガーとして使います
finishSignUpの保持する値は、requestStateの保持する値が変化するごとに下記処理の返り値に変化します
{ [weak self] reqState in

    guard let email = self?.loginID.value, password = self?.password.value where reqState == .Finish else {
        return nil
    }

    return (email, password)

}
次に擬似通信用のsignUpメソッドを実装します
    func signUp() {

        requestState.next(.Requesting)
        let delay = 1.0 * Double(NSEC_PER_SEC)
        let time  = dispatch_time(DISPATCH_TIME_NOW, Int64(delay))

        dispatch_after(time, dispatch_get_main_queue()) { [unowned self] in
            self.requestState.next(.Finish)
        }

    }
signUpメソッドではまず、requestStateプロパティの保持する値を.Requestingに変化させます
そして擬似通信として1秒経過後にrequestStateの保持する値を.Finishに変化させます
これだけしかやっていませんが、
requestStateの保持する値に変化を加えたことで、requestStateと契約を締結していたisLoadingViewAnimate、isLoadingViewAnimate、signUpViewStateInfo、finishSignUpプロパティの値にも変化が起きます
次にSignUpVMのプロパティとBindingするViewを持つSignUpViewControllerを実装していきます
まずは、最初にStoryboardで配置したViewをSignUpViewControllerと繋ぎます
先ほど実装したSignUpVMクラスのプロパティも定義します
import UIKit

class SignUpViewController: UIViewController {

    @IBOutlet weak var warningLabel: UILabel!
    @IBOutlet weak var loginIDTextField: UITextField!
    @IBOutlet weak var passwordTextField: UITextField!
    @IBOutlet weak var passwordConfirmationTextField: UITextField!
    @IBOutlet weak var agreementSwitch: UISwitch!
    @IBOutlet weak var signUpButton: UIButton!
    @IBOutlet weak var loadingIndicator: UIActivityIndicatorView!

    var signUpVM = SignUpVM()

}
次にSignUpVMクラスで定義したプロパティとSignUpViewControllerのViewをBindingするsetupBindメソッドを実装します
    private func setupBind() {

        signUpVM.loginID.bidirectionalBindTo(loginIDTextField.bnd_text)
        signUpVM.password.bidirectionalBindTo(passwordTextField.bnd_text)
        signUpVM.passwordConfirmation.bidirectionalBindTo(passwordConfirmationTextField.bnd_text)
        signUpVM.isAgreement.bidirectionalBindTo(agreementSwitch.bnd_on)

        signUpVM.signUpViewStateInfo.observe { [weak self] (buttonEnabled, buttonAlpha, warningMessage) -> Void in
            self?.warningLabel.text = warningMessage
            self?.signUpButton.enabled = buttonEnabled
            self?.signUpButton.alpha = buttonAlpha
        }

        signUpVM.isLoadingViewHidden.bindTo(loadingIndicator.bnd_hidden)
        signUpVM.isLoadingViewAnimate.bindTo(loadingIndicator.bnd_animating)

        signUpButton.bnd_controlEvent.filter { $0 == .TouchUpInside }.observe { [weak self] _ -> Void in
            self?.signUpVM.signUp()
        }

        signUpVM.finishSignUp.ignoreNil().observe { [weak self] (email, password) -> Void in
            let alertController = UIAlertController(title: "メッセージ", message: "loginID:\(email)\npassword:\(password)", preferredStyle: .Alert)
            let action = UIAlertAction(title: "OK", style: .Default, handler: nil)
            alertController.addAction(action)
            self?.navigationController?.presentViewController(alertController, animated: true, completion: nil)
        }

    }
setupBindメソッドについて説明すると
signUpVM.loginID.bidirectionalBindTo(loginIDTextField.bnd_text)
signUpVM.password.bidirectionalBindTo(passwordTextField.bnd_text)
signUpVM.passwordConfirmation.bidirectionalBindTo(passwordConfirmationTextField.bnd_text)
signUpVM.isAgreement.bidirectionalBindTo(agreementSwitch.bnd_on)
ここでは下記のBindingをしています
- loginIDTextFieldとSignUpVMのloginIDプロパティを双方向Binding
- passwordTextFieldとSignUpVMのpasswordプロパティを双方向Binding
- passwordConfirmationTextFieldとSignUpVMのpasswordConfirmationプロパティを双方向Binding
- agreementSwitchとSignUpVMのisAgreementプロパティを双方向Binding
双方向Bindingなので呼び出し側、引数側どちらかのEventProducerの保持する値が変化するごとに、もう一方の保持する値を同じ値で変化させます
ここで気になるのが、UITextFieldやUISwitchはそもそもEventProducerのプロパティなど定義していないのに何故Bindingできるのか
なぜならSwift BondはUIKitの各Viewにextensionでobjc_setAssociatedObjectを使ってEventProducerのbnd_xxxxプロパティを生やしているのでUIKitに対してBindingが可能になっています
また、bidirectionalBindToの呼び出し側はSignUpVMクラスのプロパティなので、UIKitのTextFieldなどの初期値がSignUpVMクラスのプロパティの初期値になります
次のコードに移ります
signUpVM.signUpViewStateInfo.observe { [weak self] (buttonEnabled, buttonAlpha, warningMessage) -> Void in
    self?.warningLabel.text = warningMessage
    self?.signUpButton.enabled = buttonEnabled
    self?.signUpButton.alpha = buttonAlpha
}
ここでは、SignUpVMクラスのsignUpViewStateInfoの保持している値が変化したら、新規登録ボタンのenableとalpha、警告表示ラベルを変化させます
observeメソッドの引数であるクロージャにはsignUpViewStateInfoの変化した値がそれぞれ引数で渡ってきます
signUpViewStateInfoプロパティの保持している値は(Bool, Bool, String)のキーワード付きタプルなので、このままでは型が合わないため、このままではbindToメソッドは使えません
signUpViewStateInfoに対してbindToメソッドを使いたい場合は下記のようにします
signUpVM.signUpViewStateInfo.map { $0.warningMessage }.bindTo(warningLabel.bnd_text)
signUpVM.signUpViewStateInfo.map { $0.buttonAlpha }.bindTo(signUpButton.bnd_alpha)
signUpVM.signUpViewStateInfo.map { $0.buttonEnabled }.bindTo(signUpButton.bnd_enabled)
共に意味は同じです
次のコードでは
signUpVM.isLoadingViewHidden.bindTo(loadingIndicator.bnd_hidden)
signUpVM.isLoadingViewAnimate.bindTo(loadingIndicator.bnd_animating)
- SignUpVMのisLoadingViewHiddenプロパティがloadingIndicator.bnd_hiddenに対して単方向Binding
- SignUpVMのisLoadingViewAnimateプロパティがloadingIndicator.bnd_animatingに対して単方向Binding
しています
signUpButton.bnd_controlEvent.filter { $0 == .TouchUpInside }.observe { [weak self] _ -> Void in
    self?.signUpVM.signUp()
}
ここは、新規登録ボタンがタップされるたびにSignUpVMクラスのsignUpメソッドを実行するという意味です
signUpVM.finishSignUp.ignoreNil().observe { [weak self] (email, password) -> Void in
    let alertController = UIAlertController(title: "メッセージ", message: "loginID:\(email)\npassword:\(password)", preferredStyle: .Alert)
    let action = UIAlertAction(title: "OK", style: .Default, handler: nil)
    alertController.addAction(action)
    self?.navigationController?.presentViewController(alertController, animated: true, completion: nil)
}
ここでは、SignUpVMクラスのfinishSignUpの保持する値がnil以外の値に変化したら、finishSignUpが保持するloginIdとpasswordの情報をUIAlertViewで表示するという意味です
これだけのコードで要件を満たす新規登録画面が完成してしまうのです
※ 今回は通信エラー処理時のコードは書いていませんがRequestStateに.Errorなどを定義して、通信が失敗した時はrequestState.next(.Error)として、requestStateがErrorだった場合の契約を書いてあげれば良いと思います
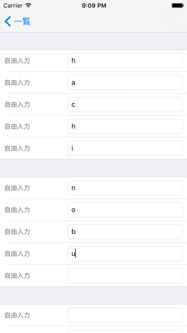
UITableViewCell上のUITextFieldの値を取得するパターン
上の画像のようにUITableViewCellにUITextFieldを載せている場合、ユーザーの操作によるテキストの変更をViewレイヤーであるUITableViewCell(もしくはViewController)で検知して、テキストの値をViewModelに渡したりすると思います
私は、この処理をちょっと面倒だなと思っていました
Swfit Bondを使ってBindingすれば少し楽になる気がします
まず、UITableViewCellです
import UIKit
import Bond

class TextInputTableCell: UITableViewCell {

    @IBOutlet weak var itemLabel: UILabel!
    @IBOutlet weak var itemTextField: UITextField!

    override func awakeFromNib() {
        super.awakeFromNib()
        // Initialization code
    }

    override func prepareForReuse() {
        super.prepareForReuse()
        bnd_bag.dispose()
    }

    override func setSelected(selected: Bool, animated: Bool) {
        super.setSelected(selected, animated: animated)
    }

}
次にTableViewCellとBindingする対象となるViewModel
import Foundation
import Bond

class TextInputTableCellVM {

    let itemLabelText = Observable<String?>("自由入力")
    let inputText = Observable<String?>("")

}
そしてViewとViewModelをBindingはcellForRowAtIndexPathで
func tableView(tableView: UITableView, cellForRowAtIndexPath indexPath: NSIndexPath) -> UITableViewCell {

    let vm = tableData[indexPath.section][indexPath.row]
    let cell = tableView.dequeueReusableCellWithIdentifier("TextInputCell", forIndexPath: indexPath) as! TextInputTableCell
    vm.itemLabelText.bindTo(cell.itemLabel.bnd_text).disposeIn(cell.bnd_bag)
    vm.inputText.bidirectionalBindTo(cell.itemTextField.bnd_text).disposeIn(cell.bnd_bag)

    return cell

}
とします
おなじみのcellForRowAtIndexPath:でBindingを実現するbindToメソッドやbidirectionalBindToメソッドを使っていることがわかります
今までと違うのはbindToやbidirectionalBindToメソッドの後の
.disposeIn(cell.bnd_bag)
です
これはbindToやbidirectionalBindToメソッドの返り値で発行された契約解除権(DisposableType)をcellのbnd_bagという袋に詰めています
(bnd_bagプロパティはSwift BondがNSObjectのextensionで定義しているDisposableTypeを複数溜めておけるDisposeBagクラスです)
そしてUITableViewCellクラスのCellが再利用される時に呼び出されるprepareForReuseメソッドで、袋に入っている契約解除権を全て解除します
override func prepareForReuse() {
    super.prepareForReuse()
    bnd_bag.dispose()
}
なぜ、このような処理をしているのかというと、
tableView.dequeueReusableCellWithIdentifierを使うとCellが再利用されますが、再利用されたCellに前回の契約内容が残ってしまっているためです
前回の契約が残っているCellに対して、新たに契約を締結すると、前回の契約内容が今回の契約内容よりも後に実行されてしまう可能性があり、Cellの値が予期せぬ値になったり、再利用するごとに新たな契約を締結するので、スクロールするごとにCellに沢山の契約が締結されてしまい動きがとても遅くなります
再利用されるCellとのBindingをする際には注意が必要です
とはいえ、この書き方をすればユーザーがテキストを編集すると、その値がViewModelのテキストフィールドにBindingしているプロパティの値になります
Delegateやコールバックを書かずに実現することができました
UITableViewとのBinding
Swift BondにはObservableArrayというクラスがあります
public final class ObservableArray<ElementType>: EventProducer<ObservableArrayEvent<Array<ElementType>>>, ObservableArrayType
Observableクラスと仕組みは同様でObservableArrayは配列内が変化するごとに契約を実行します
このObservableArrayクラスを使うとUITableViewのUITableViewDataSourceプロトコルを実装する必要がなくなります
やり方は、UITableViewの構造を表現すべく、SectionとRowのObservableArrayクラスの二次元配列を用意します
var sectionRowData = ObservableArray<ObservableArray<TextInputTableCellVM>>([[TextInputTableCellVM(), TextInputTableCellVM()], [TextInputTableCellVM()], [TextInputTableCellVM()]])
このsectionRowDataはTableViewの構造を表現していて、Sectionの数が3、第1SectionのRowが2、第2SectionのRowが1、第3SectionのRowが1です
ObservableArrayの二次元配列をUITableViewとBindingするには
public func bindTo(tableView: UITableView, proxyDataSource: BNDTableViewProxyDataSource? = nil, createCell: (NSIndexPath, ObservableArray<ObservableArray<ElementType>>, UITableView) -> UITableViewCell) -> DisposableType
メソッドを使います
先ほどのsectionRowDataをTableViewとBindingするbindTableViewメソッドを定義すると下記のようにします
private func bindTableView() {
    sectionRowData.bindTo(tableView, proxyDataSource: nil) { (indexPath, dataSource, tableView) -> UITableViewCell in
        let cell = tableView.dequeueReusableCellWithIdentifier("TextInputCell", forIndexPath: indexPath) as! TextInputTableCell
        let cellVM = dataSource[indexPath.section][indexPath.row]
        cellVM.itemLabelText.bindTo(cell.itemLabel.bnd_text).disposeIn(cell.bnd_bag)
        cellVM.inputText.bidirectionalBindTo(cell.itemTextField.bnd_text).disposeIn(cell.bnd_bag)
        return cell
    }
}
これだけでObservableArrayの二次元配列に沿ったデータ構造のUITableViewが表現できます
UITableViewDataSourceを実装する必要はありません
また、ObservableArrayの二次元配列が変化するごとにTableViewが自動で更新されます
明示的にreloadData()などTableViewの更新処理を書く必要がないのです
これはSwift BondがUITableViewのextensionを定義していて、その中でUITableViewDataSourceに準拠する実装をしたり、ObservableArrayの値が変化するごとにTableViewを更新するような実装をしているためです
なお、TableViewとのBindingのbindToメソッド
public func bindTo(tableView: UITableView, proxyDataSource: BNDTableViewProxyDataSource? = nil, createCell: (NSIndexPath, ObservableArray<ObservableArray<ElementType>>, UITableView) -> UITableViewCell) -> DisposableType
のproxyDataSource: BNDTableViewProxyDataSource?にselfを指定して、BNDTableViewProxyDataSourceプロトコルに準拠することで、ObservableArrayの二次元配列が変化するごとにTableViewが更新される挙動を変えることができます
Sectionが更新される際のアニメーション、Rowが更新される際のアニメーションを指定したり、TableViewのSectionHeaderタイトル、SectionFooterタイトル、セルを動かしたり編集できるようになります
shouldReloadInsteadOfUpdateTableViewメソッドでtrueを返すとObservableArrayの二次元配列が変化するごとにtableView.reloadData()が実行されるようになります
アニメーションを指定したい場合にはshouldReloadInsteadOfUpdateTableViewメソッドでfalseを返して、
func tableView(tableView: UITableView, animationForRowAtIndexPaths indexPaths: [NSIndexPath]) -> UITableViewRowAnimation
でRowが更新される際のアニメーションを指定でき、
func tableView(tableView: UITableView, animationForRowInSections sections: Set<Int>) -> UITableViewRowAnimation
でSectionが更新された際のアニメーションを指定できます
extension ViewController: BNDTableViewProxyDataSource {

    func shouldReloadInsteadOfUpdateTableView(tableView: UITableView) -> Bool {
        return false
    }

    func tableView(tableView: UITableView, animationForRowAtIndexPaths indexPaths: [NSIndexPath]) -> UITableViewRowAnimation {
        return .Fade
    }

    func tableView(tableView: UITableView, animationForRowInSections sections: Set<Int>) -> UITableViewRowAnimation {
        return .Bottom
    }

}
BNDTableViewProxyDataSourceにnilを指定した場合など、
デフォルトではshouldReloadInsteadOfUpdateTableViewはfalseと同じ挙動をします
shouldReloadInsteadOfUpdateTableViewでtrueを返すとObservableArrayの二次元配列が変化するごとにtableView.reloadData()が実行されるようになりますが、下記のようにObservableArrayの二次元配列に3回変更を加えると、3回tableView.reloadData()が実行されてしまいます
sectionRowData[0].append(TextInputTableCellVM())
sectionRowData[0].append(TextInputTableCellVM())
sectionRowData[0].insert(TextInputTableCellVM(), atIndex: 3)
これをsectionRowDataの全ての更新が終わってからtableView.reloadData()を実行したい場合はObservableArrayクラスのperformBatchUpdatesメソッドを使います
public func performBatchUpdates(@noescape update: ObservableArray<ElementType> -> Void)
performBatchUpdatesメソッドを使って下記のように実装すればsectionRowDataの同配列内での全ての変化が終わってからtableView.reloadData()が実行されます
sectionRowData[0].performBatchUpdates { (rowDataList) -> Void in
    rowDataList.append(TextInputTableCellVM())
    rowDataList.append(TextInputTableCellVM())
    rowDataList.insert(TextInputTableCellVM(), atIndex: 3)
}
Swift BondのUITableView操作のバグ?
現在、ObservableArrayの二次元配列データを変更した際にtableView.reloadData()をしない設定で、セルを動かした際の挙動をBNDTableViewProxyDataSourceプロトコルのメソッドを実装して実際にセルを何回か移動させているとクラッシュしてしまいます
//ObservableArrayの二次元配列データを変更した際にtableView.reloadData()をしない設定
func shouldReloadInsteadOfUpdateTableView(tableView: UITableView) -> Bool {
    return false
}

override func tableView(tableView: UITableView, moveRowAtIndexPath sourceIndexPath: NSIndexPath, toIndexPath destinationIndexPath: NSIndexPath) {
    //セルの移動処理を実装
    let data = sectionRowData[sourceIndexPath.section].removeAtIndex(sourceIndexPath.row)
    sectionRowData[destinationIndexPath.section].insert(data, atIndex: destinationIndexPath.row)
}
これは、shouldReloadInsteadOfUpdateTableViewメソッドでfalseを返した場合、ObservableArrayの二次元配列データの変更内容によって更新の方法が変わります
セル追加系の操作(append,insert)をすると
tableView.insertRowsAtIndexPaths(indexPaths: [NSIndexPath], withRowAnimation animation: UITableViewRowAnimation)
セル削除系の操作(remove)をすると
tableView.deleteRowsAtIndexPaths(indexPaths: [NSIndexPath], withRowAnimation animation: UITableViewRowAnimation)
でTableViewが更新されるのですが、セルをユーザーが動かした時に、既にセルの実体がinsertRowsAtIndexPathsやdeleteRowsAtIndexPathsで指定したNSIndexPathの場所に存在しないため、TableViewとObservableArrayの二次元配列データで不整合が生じているためと思われます
*** Terminating app due to uncaught exception 'NSInternalInconsistencyException'エラー
下記のようにデータに変化があった場合、tableView.reloadData()で更新するように設定すれば、セルの移動の処理を実装してもクラッシュしません
func shouldReloadInsteadOfUpdateTableView(tableView: UITableView) -> Bool {
    return true
}
念のため、PR出しましたが未だ取り込まれずです
私の理解が間違っていて、shouldReloadInsteadOfUpdateTableViewメソッドの返り値をfalseで、セルの移動処理の実装を書いてもクラッシュしないやり方などを知っている方はご教授ください
最後に
いかがだったでしょうか?
Swift Bondを使うことによってコールバックやイベント処理のDelegateを書かずに済むので、様々な箇所にイベント処理が散らばらないというメリット、契約締結の宣言部分を見るだけで、状態が変化した際の挙動を理解することができるので可読性も上がるのではないかと思います
本記事を読んだことで少しでもSwift Bondに興味をもってくれる方が増えれば幸いです
とても長くなってしまったので、ここまで読んで頂きありがとうございました
次はまともに触ったことないのでRx触って、まとめ記事書けたらと思います

