環境構築手順
- IntelliJ IDEA 13 Community Editionをインストールする
- App Engine SDK for Goをインストールする
- IntelliJにgolangプラグインをインストールする
IntelliJ IDEA 13 Community Editionをインストールする
http://www.jetbrains.com/idea/download/
IntelliJ IDEAは有償エディションもあるがGAE/Goで使うには無償のCommunity Editionでおk
App Engine SDK for Goをインストールする
Google公式でGoogle Cloud SDKという管理ツールを出している。App Engine SDK for Goはこのツールでインストールできるので先にインストールしよう。Google Cloud SDKのセットアップが終われば、gcloud components update gae-goを実行することでApp Engine SDK for Goがインストールできる。
IntelliJにgolangプラグインをインストールする
今回はGithubで開発中の最新のgolangプラグインを使うので、自分でビルドするかここからダウンロードしてくる。どちらの場合でもjarファイルを入手したらIntelliJを開き、Preference -> Plugins上でInstall plugin from disk…を選択し入手したjarを指定する。これでインストールできる。
インストールに成功するとIntelliJの右上に「GOROOTとGOPATHを設定しろ」と表示される。ここに解決策が載っているが、Linuxなら/etc/environment、OSXなら/etc/launchd.confでGOROOTとGOPATHを定義し、OSを再起動すればおk。
このとき指定するGOROOTは僕の場合、/Users/grapswiz/google-cloud-sdk/platform/google_appengine/gorootだった。
もし既にシェルの設定ファイル(.bashrcや.zshrc)で設定した場合でも見つからないと表示されることがある。これはOSXやLinuxではIntelliJがシェル上の環境変数を受け継げないことが要因だ。
新しいGoogle App Engine/Goプロジェクトを作ってみる
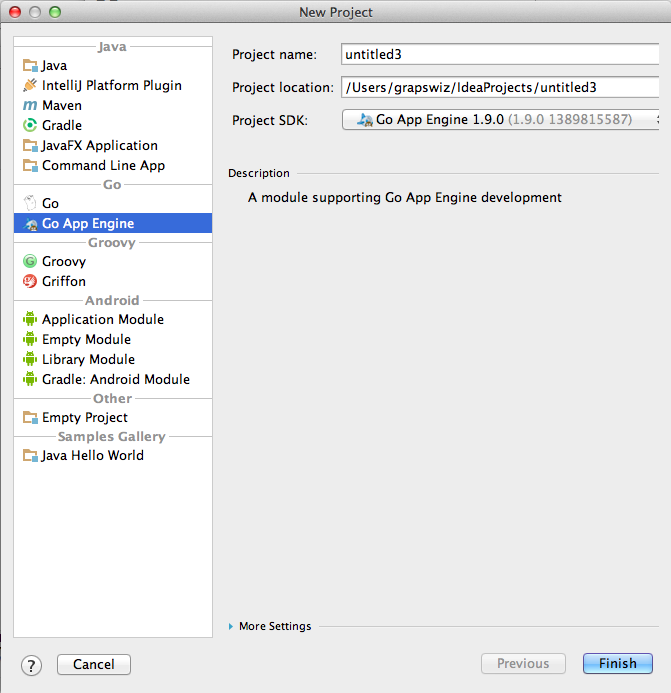
File -> New ProjectでGo App Engineを選択する。Project SDKには{google cloud sdkをインストールしたディレクトリ}/google_appengineを指定する。僕の場合は/Users/grapswiz/google-cloud-sdk/platform/google_appengineだった。下記画像のようにGo App Engine x.x.x(xは変わる可能性あり)と表示されていれば設定成功だ。Finishをクリックすればソースコードを書き始められる。
