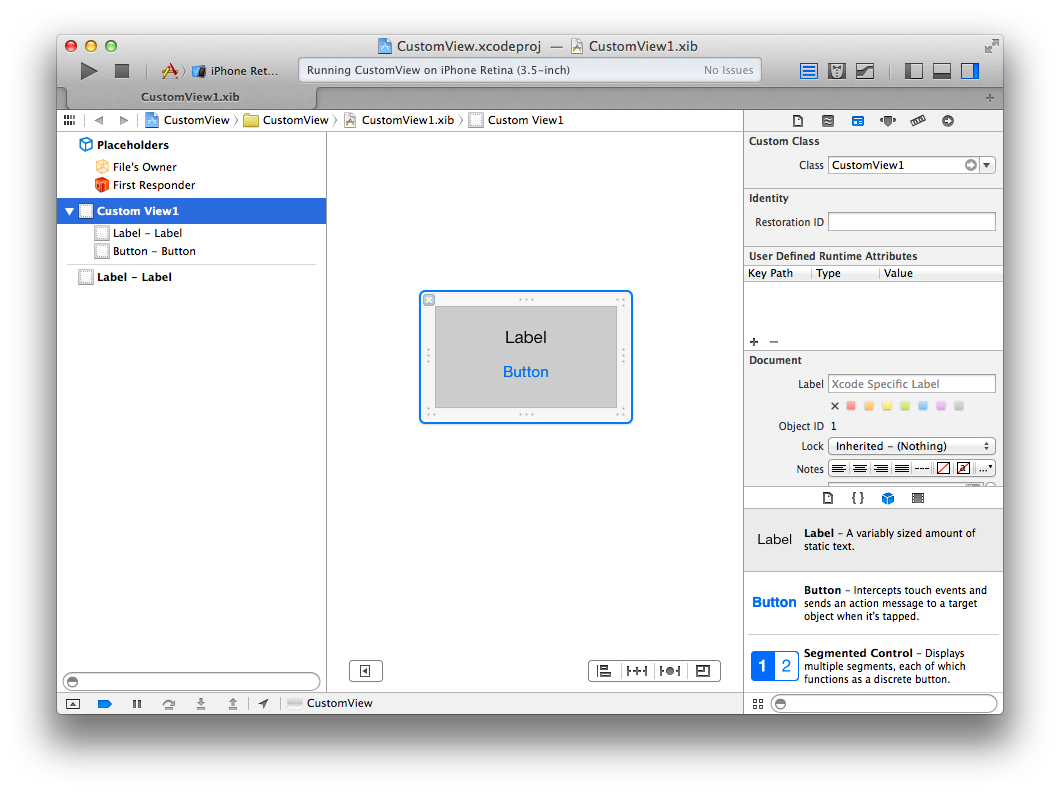
再利用可能なカスタムビュークラスを、Nib(xibファイル)を使って作る方法を考えます。例としてViewの上にLabelとButtonがひとつずつ乗っているカスタムビューを作ります。
サンプルコードがこちらにあります。
ルートのViewにカスタムクラスを指定する方法
- CustomView1.h, CustomView1.m, CustomView1.xibを作る
- Interface Builderで図のようにView, Label, Buttonを配置する
- ルートのViewのClassを
CustomView1にする - File's Ownerはなし
- LabelのoutletとButtonのactionをソースコード側とつなぐ
ソースコードは以下のように実装します。
// CustomView1.h

@interface CustomView1 : UIView
@property (weak, nonatomic) IBOutlet UILabel *label;
+ (instancetype)view;
@end
// CustomView1.m

# import "CustomView1.h"

@implementation CustomView1

- (id)initWithCoder:(NSCoder *)aDecoder
{
    self = [super initWithCoder:aDecoder];
    if (self) {

    }
    return self;
}

- (void)awakeFromNib
{
    [super awakeFromNib];

    // 初期化
    self.label.text = NSStringFromClass([self class]);
}

+ (instancetype)view
{
    NSString *className = NSStringFromClass([self class]);
    return [[[NSBundle mainBundle] loadNibNamed:className owner:nil options:0] firstObject];
}

- (IBAction)buttonTapped:(id)sender
{
    NSLog(@"tapped.");
}
使う側のクラスでは以下のようにします。
CustomView1 *cv1 = [CustomView1 view];
[self.view addSubview:cv1];
-[NSBundle loadNibNamed:owner:options]を呼ぶとinitWithCoder:とawakeFromNibが呼ばれます。初期化の処理はoutlet等がインスタンス化された後に呼ばれるawakeFromNibの中でやるのが良いでしょう。
[[CustomView1 alloc] init]のように使いたい場合は指定イニシャライザのinitWithFrame:をオーバーライドする必要があります。
- (id)initWithFrame:(CGRect)frame
{
    self = [[self class] view];
    return self;
}
この方法はNibから直接欲しいカスタムビュークラスをインスタンス化していてわかりやすいですが、カスタムビューを使う側はコードで書かなければならず、他のNib内で使う事ができません。
File's Ownerにカスタムクラスを指定する方法
- CustomView2.h, CustomView2.m, CustomView2.xibを作る
- CustomView1と同様にInterface BuilderでView, Label, Buttonを配置する
- File's OwnerにCustomView2を指定する
- IB上のViewはCustomView2の
contentViewというoutletにつなぐ - Label, ButtonはCustomView1と同様につなぐ
ソースコードは以下のように実装します。
// CustomView2.h

@interface CustomView2 : UIView
@property (weak, nonatomic) IBOutlet UIView *contentView;
@property (weak, nonatomic) IBOutlet UILabel *label;
@end
// CustomView2.m

# import "CustomView2.h"

@implementation CustomView2

- (id)initWithFrame:(CGRect)frame
{
    self = [super initWithFrame:frame];
    if (self) {
        [self p_commonInit];
    }
    return self;
}

- (id)initWithCoder:(NSCoder *)aDecoder
{
    self = [super initWithCoder:aDecoder];
    if (self) {
        [self p_commonInit];
    }
    return self;
}

- (void)p_commonInit
{
    NSString *className = NSStringFromClass([self class]);
    [[NSBundle mainBundle] loadNibNamed:className owner:self options:0];

    self.contentView.frame = self.bounds;
    [self addSubview:self.contentView];

    self.label.text = className;
}

- (IBAction)buttonTapped:(id)sender
{
    NSLog(@"tapped.");
}
Nibからインスタンス化したViewをselfにaddSubviewしているので、よけいなviewの階層がひとつ増えてしまいます。
しかし使う側は[[CustomView alloc] init]のようにコードから使う事もできますし、Interface Builderで配置したViewのクラスにCustomeView2を指定して利用する事もできます。前者の場合initWithFrame:が、後者の場合initWithCoder:が呼ばれるので、必要な処理は共通の初期化メソッドの中に書きます。
