TL;DR
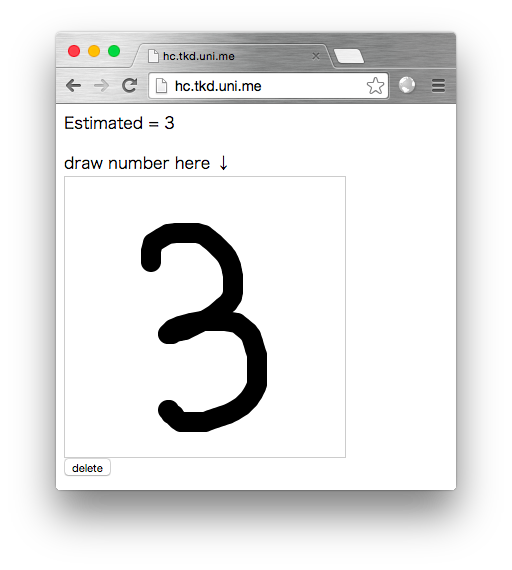
このページで試せます。http://handwritten-classifier.app.ginrou.com/
ソースコードはここにあります。https://github.com/ginrou/handwritten_classifier
全体の構成
入力された画像をニューラルネットワークにかけて、どの数字が入力されたかを出力するアプリケーションです。
ソースコードはこれをベースにしています。handwritten_classifier
- ニューラルネットワークによる認識とパラメータの学習を行うバックエンド
- ニューラルネットワークを使うWebフロントエンド
- Python3.x, numpyとflaskに依存
ニューラルネットワークのソースコードが見たい、Webアプリからサクッと使いたい、という方にとって参考になるかもしれません。
ニューラルネットワークの実装
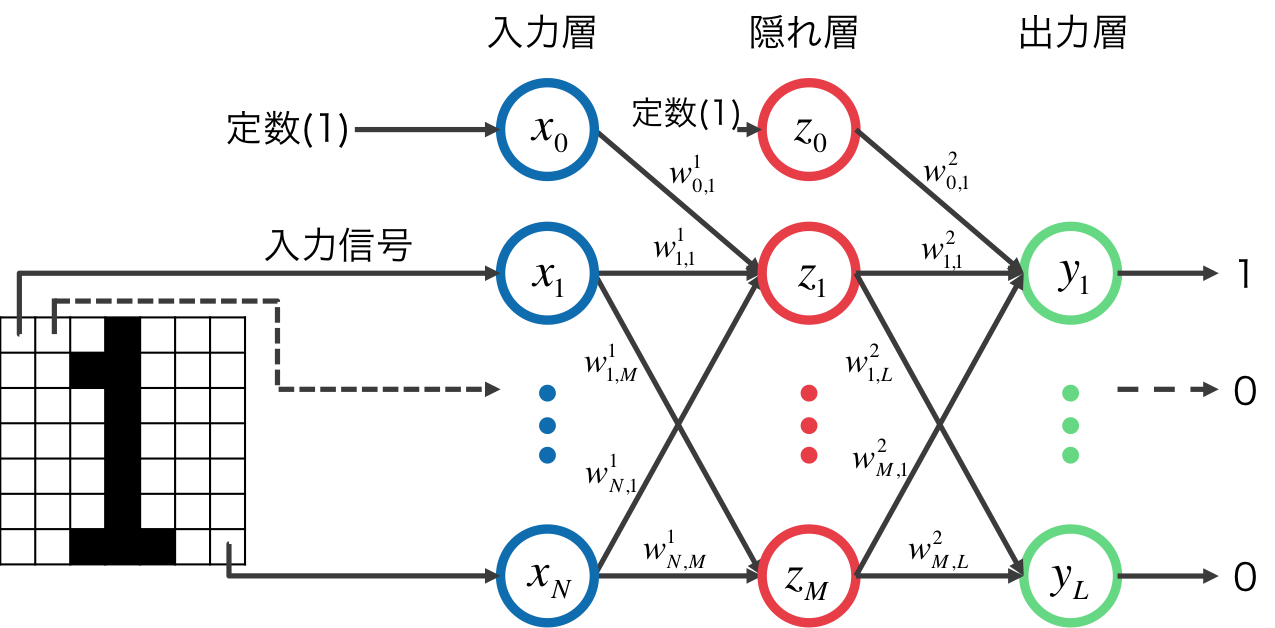
入力層-隠れ層-出力層 からなる一般的な3層パーセプトロンです。ディープラーニングは取り扱っていません。活性化関数にはシグモイド関数を用いています。
アルゴリズムの詳細などは以下が参考になります。
画像の(0,0)から順に(W,H)までを1次元のベクトルにし、定数項を加えて入力信号${\bf x}$とします。
${\bf x}$ に重み $w^1_{i,j}$ を乗じて隠れ層への入力 $z_{in,i}$ とします。
これにシグモイド関数をかけたものが隠れ層の出力となります。
z_{in,i} = \sum_{j=0}^{N} w^1_{i,j} x_j \\
z_{out,i} = sigmoid(z_{in,i})
さらに隠れ層の出力 $z_{out,i}$ に重み $w^2_{i,j}$ を乗じたものが出力層への入力 $y_{in,i}$ となり, シグモイド関数をかけたものが最終的な出力 $y_{out,i}$となります。
y_{in,i} = \sum_{j=0}^{N} w^2_{i,j} z_{out,j} \\
y_{out,i} = sigmoid(y_{in,i})
出力される{\bf y}は10次元のベクトルになります。この中で最も出力値が大きいものが推定結果となります。
ニューラルネットワークの変数は重み ${\bf w^1},{\bf w^2}$ です。その値を学習します。
まとめて以下のようになります。学習したパラメータの書き込み/読み込みも追加しています。
# !/usr/bin/env python

from math import exp
import numpy

def sigmoid(x):
    return 1.0 / (1.0 + exp(-x))

def sigmoid_a(array):
    return numpy.vectorize(sigmoid)(array)

class NeuralNetwork:
    def __init__(self, in_size, hidden_size, out_size):
        self.hidden_weight = 0.1 * (numpy.random.random_sample((hidden_size, in_size+1)) - 0.5)
        self.output_weight = 0.1 * (numpy.random.random_sample((out_size, hidden_size+1)) - 0.5)

    def fit(self, x, t, update_ratio = 0.1):
        z, y = self.fire(x)
        dy = ( y - t ) *y * ( 1 - y )
        dz = (self.output_weight.T.dot(dy))[1:] * z * ( 1- z )

        output_input = numpy.r_[ numpy.array([1]), z ]
        self.output_weight -= update_ratio * dy.reshape(-1,1) * output_input

        hidden_input = numpy.r_[ numpy.array([1]), x ]
        self.hidden_weight -= update_ratio * dz.reshape(-1,1) * hidden_input

    def fire(self, x):
        z = sigmoid_a(self.hidden_weight.dot(numpy.r_[ numpy.array([1]), x ]))
        y = sigmoid_a(self.output_weight.dot(numpy.r_[ numpy.array([1]), z ]))
        return (z, y)

    def predicate(self, x):
        z, y = self.fire(x)
        return numpy.array(y).argmax()

    def save(self, filepath):
        numpy.savez(filepath, hidden = self.hidden_weight, output = self.output_weight)

    def load(self, filepath):
        npzfiles = numpy.load(filepath)
        self.hidden_weight = npzfiles['hidden']
        self.output_weight = npzfiles['output']
学習
このニューラルネットワークの学習を行います。
データセットはMNISTのデータセットを利用しました。生のデータセットをパースするのが面倒なので http://deeplearning.net/tutorial/gettingstarted.html にPickleフォーマットにしてあるものがあるのでこれを利用しました。
このデータセットの入力画像のサイズは 28x28 なので、入力層のサイズは784次元、出力層は0~9の数字を認識するので10次元、中間層は適当に300次元としました。
リポジトリに含まれているhandwritten_classifier.pyで実行できます。
MNISTのデータセット50000点の学習におよそ2~3分、精度は92.52%でした。
Webアプリから使う
このニューラルネットワークを用いた数字認識システムをブラウザから使います。
アイデアは
- canvasに数字描く
- canvasを画像に変換して輝度値を得る
- 輝度値をajaxで送って認識する
という仕組みです。
handwritten_classifierではFlaskを使ってWebのフロントエンドを作っています。
JSでcanvasから画像の輝度値を得て送信するのはこんな感じです。
var estimate = function(context) {
   var img_buf = getImageBuffer(context, 28, 28);
    $.ajax({
        type:"post",
        url:"/estimate",
        data: JSON.stringify({"input": img_buf}),
        contentType: 'application/json',
        success: function(result) {
            $("#estimated").text("Estimated = " + result.estimated);
        }
    });
};

var getImageBuffer = function(context, width, height) {
    var tmpCanvas = $('<canvas>').get(0);
    tmpCanvas.width = width;
    tmpCanvas.height = height;
    var tmpContext = tmpCanvas.getContext('2d');
    tmpContext.drawImage(context.canvas, 0, 0, width, height);
    var image = tmpContext.getImageData(0,0,width,height);
    var buffer = []
    for( var i = 0; i < image.data.length; i += 4 ) {
        var sum = image.data[i+0] + image.data[i+1] + image.data[i+2] + image.data[i+3];
        buffer.push(Math.min(sum,255));
    }
    return buffer;
};
キャンバスのサイズが28x28だと小さすぎるので、大きめのキャンバスにブラウザ上では描画し、
その後縮小します。
送信されるjsonは
{"input":[0,0,255,255,,,,255]}
こんな感じ。
Flaskで受けるのはこういう感じです
@app.route("/estimate", methods = ["POST"])
def estimate():
    try:
        x = numpy.array(request.json["input"]) / 255.0
        y = int(nn.predicate(x))
        return jsonify({"estimated":y})
    except Exception as e:
        print(e)
        return jsonify({"error":e})
先程のリポジトリで
$ python app.py
みたいにすると、http://localhost:5000 で試せます。
Docker
ノリでDocker対応しているので
https://registry.hub.docker.com/u/ginrou/handwritten-classifier/
で使えます。さくっと試したい場合はherokuとかにdeployするといいかもしれません。
雑感
Pythonで書くとこんなに短く書ける!
Webアプリ、意外に認識精度悪い

