1. はじめに
先日下記のようにContainerViewとStoryboardを活用して、複雑なUIを作成するためのTIPSを投稿しました。おかげさまで結構ストックを頂くことができて本当に嬉しく思うと同時にこれほどの反響を頂き感謝しております。
ただ上記の記事を書いた次の日にXCode(Ver8.0)がアップデートされたので、Swift2.3とSwift3.0にしてConverterで変換を行ったところ、Swift2.3はほぼそのままイケる感じだったんですが、Swift3はエラー地獄状態になりエラいこっちゃとなりました。このままではさすがに不親切だと感じたので、今回はSwift3.0でのコンバーター変換した際のエラーを修正と併せて、Swift3.0の書き方とSwift2.x系書き方とどのくらい違っているかというところを自分なりではありますが備忘録としてまとめようと思った次第です。
取り急ぎはきちんと実機で動けばOKというところまで持っていくことにしましたので、是非XCode8にアップデートした方はお試し頂ければと思います。
(Swift3.0へ書き直しの際サンプル)
下記のコマンドでプロジェクトでクローンした後にSwift3実装のブランチ(feature/swift3)をチェックアウトしていただきますよう宜しくお願い致します。
$ git clone git@github.com:fumiyasac/FundamentalContainerView.git
$ git checkout feature/swift3
(こちらのサンプルに関して)
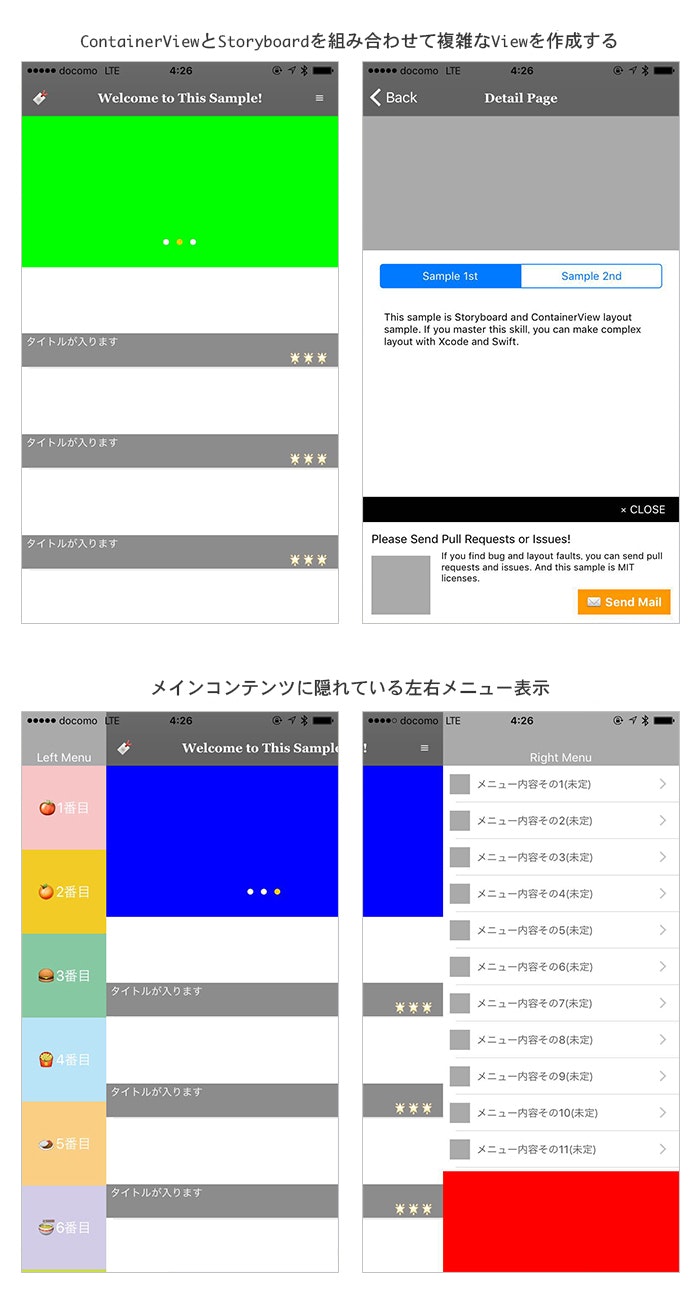
- ※1 UIの見た目や動き方に関しては 「以前の記事で紹介させて頂きましたサンプルと同じもの」 になります。
- ※2 こちらのサンプルはPullRequestやIssue等はお気軽にどうぞ!
- ※3 まだまだSwift3.0の書き方が甘い部分も多々あるかと思いますがその際もご指摘をお待ちしております。
(Swift3へ書き直しの際の参考資料)
今回のサンプルはSwift3.0で以前のサンプルを書き直した形でレイアウトは特にそのままです。(純粋にコードだけを直した感じです)
- SwiftでContainerViewとStoryboardをフル活用して複雑なUIを実現する際の実装ポイントまとめ
- [iOS][Swift]Swift 3.0の変更点まとめ
- [Swift 3.0]標準ライブラリがAPIガイドラインに適用された話
2. Swift3.0とSwift2.2での実装の違いとポイントを解説(その1:基本的なUIパーツやAppDelegate)
自分自身もXCode8のバージョンアップしてコンバーターをかけた際に、いろんなファイルからエラーが出まくり状態で相当驚いてしまいました。
XCodeのエラーヒントと上記等の参考資料やリファレンス等を参考に直してみました。
今回のサンプルでは一応基本的なUIパーツについては使用しているサンプルにはなるので、もしSwift2系からの移行時の修正のヒントになれば幸いに思います。
☆2-1. AppDelegate.swiftの変更点
AppDelegate.swiftに関する変更点は下記になります。こちらは新規プロジェクトを作成した際のそれぞれのファイルになります。
Swift2.2:
import UIKit

@UIApplicationMain
class AppDelegate: UIResponder, UIApplicationDelegate {

    var window: UIWindow?


    func application(application: UIApplication, didFinishLaunchingWithOptions launchOptions: [NSObject: AnyObject]?) -> Bool {
        // Override point for customization after application launch.
        return true
    }

    func applicationWillResignActive(application: UIApplication) {
        // Sent when the application is about to move from active to inactive state. This can occur for certain types of temporary interruptions (such as an incoming phone call or SMS message) or when the user quits the application and it begins the transition to the background state.
        // Use this method to pause ongoing tasks, disable timers, and throttle down OpenGL ES frame rates. Games should use this method to pause the game.
    }

    func applicationDidEnterBackground(application: UIApplication) {
        // Use this method to release shared resources, save user data, invalidate timers, and store enough application state information to restore your application to its current state in case it is terminated later.
        // If your application supports background execution, this method is called instead of applicationWillTerminate: when the user quits.
    }

    func applicationWillEnterForeground(application: UIApplication) {
        // Called as part of the transition from the background to the inactive state; here you can undo many of the changes made on entering the background.
    }

    func applicationDidBecomeActive(application: UIApplication) {
        // Restart any tasks that were paused (or not yet started) while the application was inactive. If the application was previously in the background, optionally refresh the user interface.
    }

    func applicationWillTerminate(application: UIApplication) {
        // Called when the application is about to terminate. Save data if appropriate. See also applicationDidEnterBackground:.
    }

}
Swift3.0:
import UIKit

@UIApplicationMain
class AppDelegate: UIResponder, UIApplicationDelegate {

    var window: UIWindow?

    func application(_ application: UIApplication, didFinishLaunchingWithOptions launchOptions: [UIApplicationLaunchOptionsKey: Any]?) -> Bool {
        // Override point for customization after application launch.
        return true
    }

    func applicationWillResignActive(_ application: UIApplication) {
        // Sent when the application is about to move from active to inactive state. This can occur for certain types of temporary interruptions (such as an incoming phone call or SMS message) or when the user quits the application and it begins the transition to the background state.
        // Use this method to pause ongoing tasks, disable timers, and invalidate graphics rendering callbacks. Games should use this method to pause the game.
    }

    func applicationDidEnterBackground(_ application: UIApplication) {
        // Use this method to release shared resources, save user data, invalidate timers, and store enough application state information to restore your application to its current state in case it is terminated later.
        // If your application supports background execution, this method is called instead of applicationWillTerminate: when the user quits.
    }

    func applicationWillEnterForeground(_ application: UIApplication) {
        // Called as part of the transition from the background to the active state; here you can undo many of the changes made on entering the background.
    }

    func applicationDidBecomeActive(_ application: UIApplication) {
        // Restart any tasks that were paused (or not yet started) while the application was inactive. If the application was previously in the background, optionally refresh the user interface.
    }

    func applicationWillTerminate(_ application: UIApplication) {
        // Called when the application is about to terminate. Save data if appropriate. See also applicationDidEnterBackground:.
    }

}
大きな変更点としてましては、それぞれのメソッドの先頭に_(アンダーバー)が付いている点とdidFinishLaunchingWithOptionsの部分の引数が、
- Swift2.2 → `[NSObject: AnyObject]?``
- Swift3.0 →
[UIApplicationLaunchOptionsKey: Any]?
と型がそもそも変わっています。AnyObject型からAny型への変更は、今回のサンプルではさほど影響はありませんでしたが、サーバーサイドへ通信をして取得したJSONやXMLをパースして表示するような処理の場合にはかなり大きな影響を受けてしまうので注意が必要ですね。
☆2-2. IBActionの変更点
Storyboardに配置されたパーツとアクションを紐付ける際のメソッドに関しても下記のような変更点がありました。こちらはViewController.swiftの中に実装されているコンテンツを制御する透明ボタンに紐付けられたボタンアクションの例です。
Swift2.2:
//透明ボタンのアクション(コンテンツ表示状態に戻す)
 @IBAction func slideContentClose(sender: AnyObject) {
     handleMainContentsContainerState(MainContentsStatus.ContentsDisplay)
 }
Swift3.0:
//透明ボタンのアクション(コンテンツ表示状態に戻す)
@IBAction func slideContentClose(_ sender: Any) {
    handleMainContentsContainerState(status: MainContentsStatus.ContentsDisplay)
}
アクションを紐付けた際にできたメソッドの引数の先頭に_(アンダーバー)が付いている点と型がAnyObjectからAnyに変更されています。Storyboardに配置されている部品をそのままでコードだけを修正する際は少し気をつけないといけないかもしれません。またこのアクション内にあるhandleMainContentsContainerStateメソッドについてもSwift3からは第1引数は引数名を書かなければいけなくなった点にも注意が必要です。
☆2-3. UIColorクラスで色をつける際の変更点
UIColorクラスで文字やUIパーツで色をつける際の処理に関しては、Swift3からは下記のように結構シンプルに設定することができるようになっています。
Swift2.2:
leftMenuButtonScrollSet.backgroundColor = UIColor.lightGrayColor()
Swift3.0:
leftMenuButtonScrollSet.backgroundColor = UIColor.lightGray
この部分は以前よりも記述がシンプルになるので結構嬉しい変更ですね。
☆2-4. UIScrollViewのプロパティ名の変更点
こちらもそんなに大きくない変更点ではありますが、UIScrollViewの設定を行うプロパティでもプロパティ名の変更がありました。各プロパティの設定に関しては、
- ページングの有無
- スクロールの有無
- 斜めにスクロールの許可
を設定する部分になります。今回のサンプルで使用している部分は左メニューで配置しているUIScrollViewの初期設定を行う部分を抜粋しました。
Swift2.2:
//Menu用のUIScrollViewの初期化を行う
private func initMenuScrollViewDefinition() {

    leftMenuButtonScrollSet.pagingEnabled = false
    leftMenuButtonScrollSet.scrollEnabled = true
    leftMenuButtonScrollSet.directionalLockEnabled = false
    ・・・(省略)・・・
}
Swift3.0:
//Menu用のUIScrollViewの初期化を行う
private func initMenuScrollViewDefinition() {

    leftMenuButtonScrollSet.isPagingEnabled = false
    leftMenuButtonScrollSet.isScrollEnabled = true
    leftMenuButtonScrollSet.isDirectionalLockEnabled = false
    ・・・(省略)・・・
}
この部分はプロパティ名がちょっとだけ?わかりやすくなったような気がしますね。
☆2-5. CGRectMake・CGSizeMakeメソッドに関する変更点
現在ではAutoLayoutによるUIパーツの配置がメインストリームになっていますが、場合によってはパーツを決めうちで配置せざるをえない局面もあると思います。
Swift3.0ではCGRectMake・CGSizeMake・CGPointMakeメソッドが廃止されて代わりにCGRect・CGSize・CGPointメソッドを使用するようになりました。(実はこの部分が今回の修正で地味にきつかった...)
CGRect・CGSize・CGPointメソッドに変更にはなっても引数の数に関しては変わりませんが、下記のように実装が変わります(※引数の型には注意!)。
その1. CGRectメソッドについて
下記はそれぞれのバージョンでの実装の違いになります。ここではメインコンテンツの位置を決めうちして再配置させる部分を抜粋しています。
Swift2.2:
//レイアウト処理が完了した際の処理
override func viewDidLayoutSubviews() {
    super.viewDidLayoutSubviews()

    ・・・(省略)・・・

    //初期状態の制約(上下左右:0)
    mainContents.frame = CGRectMake(
        CGFloat(mainContents.frame.origin.x),
        CGFloat(mainContents.frame.origin.y),
        CGFloat(mainContents.frame.width),
        CGFloat(mainContents.frame.height)
    )
}
Swift3.0:
//レイアウト処理が完了した際の処理
override func viewDidLayoutSubviews() {
    super.viewDidLayoutSubviews()

    ・・・(省略)・・・

    //初期状態の制約(上下左右:0)
    mainContents.frame = CGRect(
        x: mainContents.frame.origin.x,
        y: mainContents.frame.origin.y,
        width: mainContents.frame.width,
        height: mainContents.frame.height
    )
}
その2. CGSizeメソッドについて
下記はそれぞれのバージョンでの実装の違いになります。TableViewのヘッダー部分に別のContainerViewを差し込んで別ViewControllerにてヘッダー部分に独自処理を入れる部分を抜粋しました。
ここではUIScrollView内のサイズを設定しています。
Swift2.2:
//スクロールビュー内のサイズを決定する
tableViewHeaderScrollView.contentSize = CGSizeMake(
    CGFloat(Int(DeviceSize.screenWidth()) * 3),
    CGFloat(180)
)
Swift3.0:
//スクロールビュー内のサイズを決定する
tableViewHeaderScrollView.contentSize = CGSize(
    width: Int(DeviceSize.screenWidth()) * 3, height: 180
)
その3. CGPointメソッドについて
下記はそれぞれのバージョンでの実装の違いになります。TableViewのヘッダー部分に別のContainerViewを差し込んで別ViewControllerにてヘッダー部分に独自処理を入れる部分を抜粋しています。
ここではUIScrollViewの中心位置を設定しています。
Swift2.2:
tableViewHeaderPageControl.center = CGPointMake(
    CGFloat(Int(DeviceSize.screenWidth() / 2)),
    CGFloat(150)
)
Swift3.0:
tableViewHeaderPageControl.center = CGPoint(
    x: Int(DeviceSize.screenWidth() / 2), y: 150
)
この部分は、動的にUIパーツを作成ししたのちにviewDidLayoutSubviewsメソッド等で絶対位置を再配置するような場合やUIScrollViewの中のコンテンツ領域を設定する処理を行う局面は実際のアプリ開発でもあると思いますので何気に侮れない変更になると思います。
- 参考1:CGRectMake , CGPointMake, CGSizeMake, CGRectZero, CGPointZero is unavailable in Swift
- 参考2:Converting to swift 3 difficulties
☆2-6. コードで動的に配置したボタンにaddTargetをする処理に関する変更点
この部分に関しては、以前にSwift2.1からSwift2.2にバージョンアップしたタイミングでも変更があった部分でした。
今回は一連の流れの比較になりますが、主な変更点としては
- addTargetメソッドの第2引数:actionの記載方法
- addTargetメソッド及びsetTitleメソッドの第2引数:forに設定するenumの指定の先頭が小文字
となる2点です。今回は左メニューのUIScrollView内にボタンを配置して、そのボタンが押された際のアクションを設定する部分を抜粋しています。
Swift2.2:
//スクロールビューの中にボタンを縦一列に並べて配置する
for i in 0...(LeftButtonSetting.buttonSettingList.count - 1) {

    //メニュー用のスクロールビューにボタンを配置
    let buttonElement: UIButton! = UIButton()
    self.leftMenuButtonScrollSet.addSubview(buttonElement)

    buttonElement.frame = CGRectMake(
        CGFloat(0),
        CGFloat(100 * i),
        CGFloat(100),
        CGFloat(100)
    )
    buttonElement.backgroundColor = ColorConverter.colorWithHexString(LeftButtonSetting.colorSettingList[i])
    buttonElement.setTitle(LeftButtonSetting.buttonSettingList[i], forState: .Normal)
    buttonElement.titleLabel!.font = UIFont(name: "Bold", size: CGFloat(16))
    buttonElement.tag = i
    buttonElement.addTarget(self, action: #selector(LeftMenuViewController.scrollViewButtonTapped(_:)), forControlEvents: .TouchUpInside)
}

・・・(省略)・・・

//スクロールビューに配置されたボタンをタップした際に行われる処理
func scrollViewButtonTapped(button: UIButton) {

    //押されたボタンのタグを取得
    let buttonNumber: Int = button.tag
    print("\(buttonNumber)番目のボタンが押されました")
}
Swift3.0:
//スクロールビューの中にボタンを縦一列に並べて配置する
for i in 0...(LeftButtonSetting.buttonSettingList.count - 1) {

    //メニュー用のスクロールビューにボタンを配置
    let buttonElement: UIButton! = UIButton()
    self.leftMenuButtonScrollSet.addSubview(buttonElement)

    buttonElement.frame = CGRect(
        x: 0, y: (100 * i), width: 100, height: 100
    )
    buttonElement.backgroundColor = ColorConverter.colorWithHexString(hex: LeftButtonSetting.colorSettingList[i])
    buttonElement.setTitle(LeftButtonSetting.buttonSettingList[i], for: .normal)
    buttonElement.titleLabel!.font = UIFont(name: "Bold", size: CGFloat(16))
    buttonElement.tag = i
    buttonElement.addTarget(self, action: #selector(LeftMenuViewController.scrollViewButtonTapped(button:)), for: .touchUpInside)
}

・・・(省略)・・・

//スクロールビューに配置されたボタンをタップした際に行われる処理
func scrollViewButtonTapped(button: UIButton) {

    //押されたボタンのタグを取得
    let buttonNumber: Int = button.tag
    print("\(buttonNumber)番目のボタンが押されました")
}
特にaddTargetメソッド部分の記載方法に関してはメジャーバージョンアップでなくとも記載が変わりやすい部分なのでしっかりと押さえておくと良いと思います。
☆2-7. タイマー処理に関する変更点
この部分に関しても変更がありました。主な変更点としては
- 型はNSTimer型からTimer型へ変更
-
scheduledTimerWithTimeIntervalメソッドからscheduledTimerメソッドへの変更
となる2点です。ただ幸いにも指定する引数に変更は特になさげな感じです。今回は左メニューのUIScrollView内にボタンを配置して、TableHeaderViewController内のUIScrollViewに配置した画像が行って時間経過するとスライドする処理にてタイマー設定を行う部分を抜粋しています。
Swift2.2:
var timer: NSTimer!

override func viewDidLoad() {
    super.viewDidLoad()

    ・・・(省略)・・・

    //バナー画像のローテーション処理
    timer = NSTimer.scheduledTimerWithTimeInterval(18.0, target: self, selector: #selector(TableHeaderViewController.bannerViewAnimate), userInfo: nil, repeats: true)
}
Swift3.0:
var timer: Timer!

override func viewDidLoad() {
    super.viewDidLoad()

    ・・・(省略)・・・

    //バナー画像のローテーション処理
    timer = Timer.scheduledTimer(timeInterval: 18.0, target: self, selector: #selector(TableHeaderViewController.bannerViewAnimate), userInfo: nil, repeats: true)
}
こちらは2-6. コードで動的に配置したボタンにaddTargetをする処理に関する変更点とは異なり、型名やメソッド名が変わってしまうものの引数の指定方法はSwift2.2の時と全く同じなので、まだ安心できる感じがします。
☆2-8. アニメーション処理に関する変更点
この部分に関しては本当に劇的な変更があった部分の一つです(今年のWWDCでもピックアップされていた部分でしたね)。iOS10からは動的なアニメーションを実装できるようになりより柔軟にアニメーション処理に工夫を凝らすことができるようになったのは嬉しい点ですね。
ただ今回は上記の新機能はつかわないでSwift3.0でのアニメーションの実装に関する変更点を追っていきます。従来通りのアニメーション処理に関しての具体的な変更としては
-
UIView.animateWithDurationメソッドからUIView.animateメソッドへの名前変更 - 第3引数の:options部分の書き方の変更
の2点です。ただこちらも従来通りのアニメーション処理の際にはそれほど大きな変化はない感じです。今回は詳細画面内に配置してあるContainerViewに貼られているAutoLayoutの制約変更をアニメーションをするメソッドのクロージャー内で実行してContainerViewを隠す処理を行う部分を抜粋しています。
Swift2.2:
//ボトムのポップアップを開く
func openBottomPopup() {
    topPopupConstraint.constant = 17
    bottomPopupConstraint.constant = 0
    UIView.animateWithDuration(0.26, delay: 0, options: UIViewAnimationOptions.CurveEaseOut, animations:

        //変更したAutoLayoutのConstant値を適用する
        {
            self.view.layoutIfNeeded()
        }, completion: { finished in
        }
    )
}

//ボトムのポップアップを閉じる
func closeBottomPopup() {
    topPopupConstraint.constant = 137
    bottomPopupConstraint.constant = -120
    UIView.animateWithDuration(0.26, delay: 0, options: UIViewAnimationOptions.CurveEaseOut, animations:

        //変更したAutoLayoutのConstant値を適用する
        {
            self.view.layoutIfNeeded()
        }, completion: { finished in
        }
    )
}
Swift3.0:
//ボトムのポップアップを開く
func openBottomPopup() {
    topPopupConstraint.constant = 17
    bottomPopupConstraint.constant = 0
    UIView.animate(withDuration: 0.26, delay: 0, options: UIViewAnimationOptions.curveEaseOut, animations:

        //変更したAutoLayoutのConstant値を適用する
        {
            self.view.layoutIfNeeded()
        }, completion: { finished in
        }
    )
}

//ボトムのポップアップを閉じる
func closeBottomPopup() {
    topPopupConstraint.constant = 137
    bottomPopupConstraint.constant = -120
    UIView.animate(withDuration: 0.26, delay: 0, options: UIViewAnimationOptions.curveEaseOut, animations:

        //変更したAutoLayoutのConstant値を適用する
        {
            self.view.layoutIfNeeded()
        }, completion: { finished in
        }
    )
}
こちらはSwift2.2の時に比べてメソッド名が短くなったので、よりわかりやすい感じになっていました。またiOS10からよりパワーアップしたアニメーション表現にの新機能も是非是非試してみたいです!
☆2-9. ContainerViewで配置したViewController(子)から配置されているViewController(親)のメソッドを呼び出す処理に関する変更点
この部分に関しては、Swift3.0での変更とは直接関係ない部分にはなりますが、このサンプルの根幹部分を担うところになります。子のViewControllerから親のViewControllerのメソッドを実行する際は親から子へViewControllerをだどっていく時の書き方に若干の変更があります。
今回は大もとのコンテンツ表示用・左メニュー表示用・右メニュー表示用のContainerViewを配置しているViewControllerの処理を、コンテンツ表示用のContainerViewで表示している子のViewControllerから呼び出す部分を抜粋しています。
(親のViewControllerから子のViewControllerのメソッドを実行する際は従来通りです。)
Swift2.2:
//左メニューボタンを押した際のアクション
func leftMenuButtonTapped(sender: UIBarButtonItem) {

    /**
     * 親コントローラーのメソッドを呼び出して左コンテンツを開く
     * このコントローラーはUINavigationControllerDelegateを使っているので、
     * 「ViewController(親) → NavigationController(子) → ContentListViewController(孫)」
     * という図式になります。
     *
     */
    let viewController = self.parentViewController?.parentViewController as! ViewController
    viewController.handleMainContentsContainerState(MainContentsStatus.LeftMenuOpened)
}

//右メニューボタンを押した際のアクション
func rightMenuButtonTapped(sender: UIBarButtonItem) {

    /**
     * 親コントローラーのメソッドを呼び出して右コンテンツを開く
     * このコントローラーはUINavigationControllerDelegateを使っているので、
     * 「ViewController(親) → NavigationController(子) → ContentListViewController(孫)」
     * という図式になります。
     *
     */
    let viewController = self.parentViewController?.parentViewController as! ViewController
    viewController.handleMainContentsContainerState(MainContentsStatus.RightMenuOpened)
}
Swift3.0:
//左メニューボタンを押した際のアクション
func leftMenuButtonTapped(sender: UIBarButtonItem) {

    /**
     * 親コントローラーのメソッドを呼び出して左コンテンツを開く
     * このコントローラーはUINavigationControllerDelegateを使っているので、
     * 「ViewController(親) → NavigationController(子) → ContentListViewController(孫)」
     * という図式になります。
     *
     */
    let viewController = self.parent?.parent as! ViewController
    viewController.handleMainContentsContainerState(status: MainContentsStatus.LeftMenuOpened)
}

//右メニューボタンを押した際のアクション
func rightMenuButtonTapped(sender: UIBarButtonItem) {

    /**
     * 親コントローラーのメソッドを呼び出して右コンテンツを開く
     * このコントローラーはUINavigationControllerDelegateを使っているので、
     * 「ViewController(親) → NavigationController(子) → ContentListViewController(孫)」
     * という図式になります。
     *
     */
    let viewController = self.parent?.parent as! ViewController
    viewController.handleMainContentsContainerState(status: MainContentsStatus.RightMenuOpened)
}
こちらは親のViewControllerへアクセスする時のプロパティが変更されたことと子のメソッドを呼び出す際にも第1引数の引数名が必要という部分が変更点ですね。
☆2-10. UIBarButtonItemの設定(UINavigationControllerDelegate)に関する変更点
こちらも色の設定を行う場合は2-3. UIColorクラスで色をつける際の変更点を参考にして設定する形になりますが、UIBarButtonItemの設定に関しては、引数の値に若干の変更がある感じになります。イメージとしては2-6. コードで動的に配置したボタンにaddTargetをする処理に関する変更点に近い感じではあります。今回はコンテンツ表示のViewControllerのviewDidLoadメソッド内でのnavigationBarの設定部分を抜粋しています。
Swift2.2:
override func viewDidLoad() {
    super.viewDidLoad()

    //UINavigationControllerのデリゲート
    self.navigationController?.delegate = self

    //ナビゲーションと色設定
    self.navigationController?.navigationBar.barTintColor = UIColor.darkGrayColor()

    //タイトル用の色および書式の設定
    let attrsMainTitle = [
        NSForegroundColorAttributeName : UIColor.whiteColor(),
        NSFontAttributeName : UIFont(name: "Georgia-Bold", size: 15)!
    ]
    self.navigationItem.title = "Welcome to This Sample!"
    self.navigationController?.navigationBar.titleTextAttributes = attrsMainTitle

    //ナビゲーション用の色および書式の設定
    let attrsBarButton = [
        NSFontAttributeName : UIFont(name: "Georgia-Bold", size: 16)!
    ]

    ・・・(ここまでは全く同じでOK)・・・

    //左メニューボタンの配置
    leftMenuButton = UIBarButtonItem(title: "🔖", style: .Plain, target: self, action: #selector(ContentListViewController.leftMenuButtonTapped(_:)))
    leftMenuButton.setTitleTextAttributes(attrsBarButton, forState: .Normal)
    self.navigationItem.leftBarButtonItem = leftMenuButton

    //右メニューボタンの配置
    rightMenuButton = UIBarButtonItem(title: "≡", style: .Plain, target: self, action: #selector(ContentListViewController.rightMenuButtonTapped(_:)))
    rightMenuButton.setTitleTextAttributes(attrsBarButton, forState: .Normal)
    self.navigationItem.rightBarButtonItem = rightMenuButton

    ・・・(省略)・・・
}

//左メニューボタンを押した際のアクション
func leftMenuButtonTapped(sender: UIBarButtonItem) {
    ・・・(省略)・・・
}

//右メニューボタンを押した際のアクション
func rightMenuButtonTapped(sender: UIBarButtonItem) {
    ・・・(省略)・・・
}
Swift3.0:
override func viewDidLoad() {
    super.viewDidLoad()

    //UINavigationControllerのデリゲート
    self.navigationController?.delegate = self

    //ナビゲーションと色設定
    self.navigationController?.navigationBar.barTintColor = UIColor.darkGray

    //タイトル用の色および書式の設定
    let attrsMainTitle = [
        NSForegroundColorAttributeName : UIColor.white,
        NSFontAttributeName : UIFont(name: "Georgia-Bold", size: 15)!
    ]
    self.navigationItem.title = "Welcome to This Sample!"
    self.navigationController?.navigationBar.titleTextAttributes = attrsMainTitle

    //ナビゲーション用の色および書式の設定
    let attrsBarButton = [
        NSFontAttributeName : UIFont(name: "Georgia-Bold", size: 16)!
    ]

    ・・・(ここまでは全く同じでOK)・・・

    //左メニューボタンの配置
    leftMenuButton = UIBarButtonItem(title: "🔖", style: .plain, target: self, action: #selector(ContentListViewController.leftMenuButtonTapped(sender:)))
    leftMenuButton.setTitleTextAttributes(attrsBarButton, for: .normal)
    self.navigationItem.leftBarButtonItem = leftMenuButton

    //右メニューボタンの配置
    rightMenuButton = UIBarButtonItem(title: "≡", style: .plain, target: self, action: #selector(ContentListViewController.rightMenuButtonTapped(sender:)))
    rightMenuButton.setTitleTextAttributes(attrsBarButton, for: .normal)
    self.navigationItem.rightBarButtonItem = rightMenuButton

    ・・・(省略)・・・
}

//左メニューボタンを押した際のアクション
func leftMenuButtonTapped(sender: UIBarButtonItem) {
    ・・・(省略)・・・
}

//右メニューボタンを押した際のアクション
func rightMenuButtonTapped(sender: UIBarButtonItem) {
    ・・・(省略)・・・
}
タイトル文字色やフォントの書式指定の流れ自体はSwift2.2の際と同じではありますが、UIBarButtonItemのインスタンスを作成する場合のaction:の記述方法やstyle:のenumが先頭が大文字から小文字になる部分は書き直しを行う際には注意すると良いと思います。
☆2-11. その他の気になった主なSwift3.0での変更点ピックアップ
私自身もSwift3での記述の変更点に関しては完璧に把握できているわけではありませんが、今回は作成したUIパーツに関するサンプルに関わる変更の他にも下記にその他の大きな変更に関する資料をピックアップしましたので、参考にして頂ければ幸いに思います。
今回ピックアップした以外の部分に関する参考資料:
- 参考1:Swift3.0のRangeまとめ
- 参考2:Swift3.0でC言語スタイルのforループが廃止されるので、その書き換え方法のまとめ
- 参考3:【Swift】エラーハンドリングを学び直す!Swift2.2からSwift3.0での変更点まで
- 参考4:SwiftyJSONをSwift3で使う
3. Swift3.0とSwift2.2での実装の違いとポイントを解説(その2:色変更・デバイスサイズ取得処理に関する部分)
今回のサンプルの中には、各ViewControllerファイルとは別に要所で使用すると便利な構造体を定義しています。具体的には、
- 現在表示しているデバイスのサイズを返す構造体(DeviceSize.swift)
- WebのカラーコードをiOS用のものに変換する構造体(ColorConverter.swift)
の2ファイルになります。まあこの部分もSwift3では変更ががっちり加えられていた部分ではありましたので、簡単ではありますが触れていきたいと思います。
☆3-1. 現在表示しているデバイスのサイズを返す構造体(DeviceSize.swift)
こちらは現在のデバイスの幅と高さを取得するだけのものになります。
Swift2.2:
import UIKit

//現在表示しているデバイスのサイズを返す構造体
struct DeviceSize {

    //デバイスのCGRectを取得
    static func bounds() -> CGRect {
        return UIScreen.mainScreen().bounds
    }

    //デバイスの画面の横サイズを取得
    static func screenWidth() -> Int {
        return Int(UIScreen.mainScreen().bounds.size.width)
    }

    //デバイスの画面の縦サイズを取得
    static func screenHeight() -> Int {
        return Int(UIScreen.mainScreen().bounds.size.height)
    }

}
Swift3.0:
import UIKit

//現在表示しているデバイスのサイズを返す構造体
struct DeviceSize {

    //デバイスのCGRectを取得
    static func bounds() -> CGRect {
        return UIScreen.main.bounds
    }

    //デバイスの画面の横サイズを取得
    static func screenWidth() -> Int {
        return Int(UIScreen.main.bounds.size.width)
    }

    //デバイスの画面の縦サイズを取得
    static func screenHeight() -> Int {
        return Int(UIScreen.main.bounds.size.height)
    }

}
この部分の変更点は、mainScreen()となっていた部分がmainに変わっただけなので単純なのですが色変換の部分はかなり変わっています。
☆3-2. WebのカラーコードをiOS用のものに変換する構造体(ColorConverter.swift)
こちらは引数でWebのカラーコード(例:赤色の場合「#FF0000」の形式)をiOSのUIColor型の値に変換をかけてくれる便利メソッドになります。自分も元はWebや紙のデザイナーからエンジニアになったので従来のWebのカラーコードの方が先に頭で思いつくのでこのような形に構造体に切り出して色設定をしています。
Swift2.2:
import UIKit

//WebのカラーコードをiOS用のものに変換する構造体
struct ColorConverter {

    //16進数のカラーコードをiOSの設定に変換するメソッド
    static func colorWithHexString (hex:String) -> UIColor {

        //受け取った値を大文字に変換する
        var cString:String = hex.stringByTrimmingCharactersInSet(NSCharacterSet.whitespaceAndNewlineCharacterSet()).uppercaseString

        //#があれば取り除く
        if cString.hasPrefix("#") {
            cString = (cString as NSString).substringFromIndex(1)
        }

        //コードの設定に間違っている(正しい16進数表記ではない)場合はグレーカラーにする
        if cString.characters.count != 6 {
            return UIColor.grayColor()
        }

        //各々のコード部分を抜き出して変換を行う
        let rString = (cString as NSString).substringToIndex(2)
        let gString = ((cString as NSString).substringFromIndex(2) as NSString).substringToIndex(2)
        let bString = ((cString as NSString).substringFromIndex(4) as NSString).substringToIndex(2)

        //RGBの形式に直してUIColorクラスに渡す
        var r:CUnsignedInt = 0, g:CUnsignedInt = 0, b:CUnsignedInt = 0
        NSScanner(string: rString).scanHexInt(&r)
        NSScanner(string: gString).scanHexInt(&g)
        NSScanner(string: bString).scanHexInt(&b)

        return UIColor(red: CGFloat(r) / 255.0, green: CGFloat(g) / 255.0, blue: CGFloat(b) / 255.0, alpha: CGFloat(1))
    }

}
Swift3.0:
import UIKit

//WebのカラーコードをiOS用のものに変換する構造体
struct ColorConverter {

    //16進数のカラーコードをiOSの設定に変換するメソッド
    static func colorWithHexString (hex: String) -> UIColor {

        //受け取った値を大文字に変換する
        var cString:String = hex.trimmingCharacters(in: CharacterSet.whitespacesAndNewlines).uppercased()

        //#があれば取り除く
        if cString.hasPrefix("#") {
            cString = (cString as NSString).substring(from: 1)
        }

        //コードの設定に間違っている(正しい16進数表記ではない)場合はグレーカラーにする
        if cString.characters.count != 6 {
            return UIColor.gray
        }

        //各々のコード部分を抜き出して変換を行う
        let rString = (cString as NSString).substring(to: 2)
        let gString = ((cString as NSString).substring(from: 2) as NSString).substring(to: 2)
        let bString = ((cString as NSString).substring(from: 4) as NSString).substring(to: 2)

        //RGBの形式に直してUIColorクラスに渡す
        var r:CUnsignedInt = 0, g:CUnsignedInt = 0, b:CUnsignedInt = 0
        Scanner(string: rString).scanHexInt32(&r)
        Scanner(string: gString).scanHexInt32(&g)
        Scanner(string: bString).scanHexInt32(&b)

        return UIColor(red: CGFloat(r) / 255.0, green: CGFloat(g) / 255.0, blue: CGFloat(b) / 255.0, alpha: CGFloat(1))
    }

}
この部分の変更点をまとめると、
-
substringFromIndex(1)となっていた部分がsubstring(from: 1)に変更 -
substringFromIndex(2)となっていた部分がsubstring(to: 2)に変更 -
NSScanner(string: bString).scanHexInt(&b)となっていた部分がScanner(string: bString).scanHexInt32(&b)に変更 - 受け取った値を大文字に変換する処理の部分がそもそも違う
という4点になります。また大文字を小文字へ変換する処理の書き方に関しては下記を参考にしました。
このようにSwift2.2では結構当たり前?な感じで使用していたクラスやプロパティ、メソッド等が廃止されていたり書き換えられていたりする場合が結構あるかもしれないので、特にガラッと変更があったクラスに関しては一度Appleの公式ドキュメント等で確認しておくと良いでしょう。
4. Swift3.0とSwift2.2での実装の違いとポイントを解説(その3:UITableViewに関する部分)
UITableViewは実際のアプリを作成する際に、UI的にも処理的にも使わない時がないんじゃないか?って程かなり重要なものです。もちろん今回のサンプルでも右メニューの部分やコンテンツの一覧表示部分に使用しています。この部分に関してもコンバーターでSwift3に変換した際にかなりエラーが出た&書き方がドラスティックに変わっていた部分でしたので、Swift2.2からSwift3.0での記述の変更点の方をまとめてみました。
※今回のサンプルではUITableViewとUITableViewCellを分割しています。
☆4-1. テーブルビュー用セルのXibとそれに紐づくUITableViewCellクラスに関する変更点(ListTableViewCell.swift)
XCodeで「New File」からUITableViewCellのクラスを作成する(Xibも一緒に作成するかのチェックボックスにチェックを入れた状態にする)際の変更点は、ぶっちゃけほとんどありません。
Swift2.2とSwift3.0の違いはsetSelectedメソッドの先頭に_(アンダーバー)があるかないかだけです。
Swift2.2:
class ListTableViewCell: UITableViewCell {

    ・・・(省略)・・・

    override func setSelected(selected: Bool, animated: Bool) {
        super.setSelected(selected, animated: animated)
    }
}
Swift3.0:
class ListTableViewCell: UITableViewCell {

    ・・・(省略)・・・

    override func setSelected(_ selected: Bool, animated: Bool) {
        super.setSelected(selected, animated: animated)
    }
}
本当にびっくりするほどに変わっているのはここではありません。UITableView関連の部分はここからが本番なのです。
☆4-2. メインコンテンツ用のViewController内に記載したUITableViewに関する処理(ColorConverter.swift)
UITableViewDelegateやUITableViewDataSourceに関する処理はまるで面影がないんではないか?と思う程に劇的に変わっています。
viewDidLoad内で、読み込ませるUITableViewCellクラスのXibを指定する処理に関しては、Swift2.2ではregisterNibメソッドになっていた部分がSwift3.0ではregisterメソッドに変わっているだけで引数の書き方や引数名も同じです。
下記の差分を読み比べてみるとわかるようにUITableViewDelegate及びUITableViewDataSourceで用意されているメソッドに関しては、戻り値の型は同じなのですが、メソッドの書き方がガラリと変わっています。
※今回は両方の比較がしやすいようにUITableViewDelegateやUITableViewDataSourceの拡張に関してはextensionで切り出して記述しています。
Swift2.2:
class ContentListViewController: UIViewController, UINavigationControllerDelegate {

    ・・・(省略)・・・

    override func viewDidLoad() {
        super.viewDidLoad()

        ・・・(省略)・・・

        //UITableViewControllerのデリゲート
        listTableView.delegate = self
        listTableView.dataSource = self

        //Xibのクラスを読み込む宣言を行う
        let nibDefault: UINib = UINib(nibName: "ListTableViewCell", bundle: nil)
        listTableView.registerNib(nibDefault, forCellReuseIdentifier: "ListTableViewCell")
    }

    ・・・(省略)・・・
}

extension ContentListViewController: UITableViewDelegate {

    //テーブルのセル高さ ※任意
    func tableView(tableView: UITableView, heightForRowAtIndexPath indexPath: NSIndexPath) -> CGFloat {
        return 120
    }

    //テーブルヘッダに関する処理 ※任意
    func tableView(tableView: UITableView, viewForHeaderInSection section: Int) -> UIView? {

        //ヘッダーが必要な物はここにaddSubView → Header用のContainerを突っ込む
        let headerViewBase = UIView()
        headerViewBase.frame = CGRectMake(
            CGFloat(0),
            CGFloat(0),
            CGFloat(DeviceSize.screenWidth()),
            CGFloat(180)
        )
        headerViewBase.backgroundColor = UIColor.redColor()
        headerViewBase.addSubview(listTableHeader)
        headerViewBase.multipleTouchEnabled = true
        listTableHeader.multipleTouchEnabled = true
        return headerViewBase
    }

    //セクションヘッダー高さ ※任意
    func tableView(tableView: UITableView, heightForHeaderInSection section: Int) -> CGFloat {
        return CGFloat(180)
    }

}

extension ContentListViewController: UITableViewDataSource {

    //テーブルの要素数を設定する ※必須
    func numberOfSectionsInTableView(tableView: UITableView) -> Int {
        return 1
    }

    //テーブルの行数を設定する ※必須
    func tableView(tableView: UITableView, numberOfRowsInSection section: Int) -> Int {
        return 10
    }

    //表示するセルの中身を設定する ※必須
    func tableView(tableView: UITableView, cellForRowAtIndexPath indexPath: NSIndexPath) -> UITableViewCell {
        let cell = tableView.dequeueReusableCellWithIdentifier("ListTableViewCell") as? ListTableViewCell

        cell!.listTitleLabel.text = "タイトルが入ります"
        cell!.accessoryType = UITableViewCellAccessoryType.None
        cell!.selectionStyle = UITableViewCellSelectionStyle.None
        return cell!
    }

    //セルをタップした時に呼び出される
    func tableView(tableView: UITableView, didSelectRowAtIndexPath indexPath: NSIndexPath) {
        performSegueWithIdentifier("goContentDetail", sender: nil)
    }

}
Swift3.0:
class ContentListViewController: UIViewController, UINavigationControllerDelegate {

    ・・・(省略)・・・

    override func viewDidLoad() {
        super.viewDidLoad()

        ・・・(省略)・・・

        //UITableViewControllerのデリゲート
        listTableView.delegate = self
        listTableView.dataSource = self

        //Xibのクラスを読み込む宣言を行う
        let nibDefault: UINib = UINib(nibName: "ListTableViewCell", bundle: nil)
        listTableView.register(nibDefault, forCellReuseIdentifier: "ListTableViewCell")
    }

    ・・・(省略)・・・
}

extension ContentListViewController: UITableViewDelegate {

    //テーブルのセル高さ ※任意
    func tableView(_ tableView: UITableView, heightForRowAt indexPath: IndexPath) -> CGFloat {
        return 120
    }

    //テーブルヘッダに関する処理 ※任意
    func tableView(_ tableView: UITableView, viewForHeaderInSection section: Int) -> UIView? {

        //ヘッダーが必要な物はここにaddSubView → Header用のContainerを突っ込む
        let headerViewBase = UIView()
        headerViewBase.frame = CGRect(
            x: 0, y: 0, width: DeviceSize.screenWidth(), height: 180
        )
        headerViewBase.backgroundColor = UIColor.red
        headerViewBase.addSubview(listTableHeader)
        headerViewBase.isMultipleTouchEnabled = true
        listTableHeader.isMultipleTouchEnabled = true
        return headerViewBase
    }

    //セクションヘッダー高さ ※任意
    func tableView(_ tableView: UITableView, heightForHeaderInSection section: Int) -> CGFloat {
        return CGFloat(180)
    }

}

extension ContentListViewController: UITableViewDataSource {

    //テーブルの要素数を設定する ※必須
    private func numberOfSectionsInTableView(tableView: UITableView) -> Int {
        return 1
    }

    //テーブルの行数を設定する ※必須
    func tableView(_ tableView: UITableView, numberOfRowsInSection section: Int) -> Int {
        return 10
    }

    //表示するセルの中身を設定する ※必須
    func tableView(_ tableView: UITableView, cellForRowAt indexPath: IndexPath) -> UITableViewCell {
        let cell = tableView.dequeueReusableCell(withIdentifier: "ListTableViewCell") as? ListTableViewCell

        cell!.listTitleLabel.text = "タイトルが入ります"
        cell!.accessoryType = UITableViewCellAccessoryType.none
        cell!.selectionStyle = UITableViewCellSelectionStyle.none
        return cell!
    }

    //セルをタップした時に呼び出される
    @objc(tableView:didSelectRowAtIndexPath:) func tableView(_ tableView: UITableView, didSelectRowAt indexPath: IndexPath) {
        performSegue(withIdentifier: "goContentDetail", sender: nil)
    }

}
メソッドの処理の中身に関してはenumでの書き方などの細かな違いはあれど大筋では一緒なのですが、例えば表示するセルの中身に関する処理を行う部分を見てみましょう。
用意されているメソッドの記述方法がSwift2.2ではtableView(tableView: UITableView, cellForRowAtIndexPath indexPath: NSIndexPath) -> UITableViewCellと書かれていたものが、Swift3.0ではtableView(_ tableView: UITableView, cellForRowAt indexPath: IndexPath) -> UITableViewCellのように若干英語の文章を意識したような書き方になっている感じがします。
今回ピックアップしたものはUITableViewだけなので、まだほんの一部分にすぎないと思いますが他のデリゲートで提供されているメソッド等でも引数や戻り値はSwift2.2の際と同じではあるけれども、よく使うものなのに、書き方がガラリと変わってしまうもの(例.UICollectionViewDelegateとかUICollectionViewDataSource等)もあるかと思いますので、この部分はしっかりと確認しておきたいところですね。
また、なぜこのような書き方をしているのかという部分やSwift3.0の書き方に関するお作法やAPIのガイドライン・基本原則に関することは、こちらの資料がとても参考になりました!
(資料がとても丁寧にまとめられており本当にいつも参考にさせて頂いております&ありがとうございますm(_ _)m)
※ 未だに未解決な部分としてはセルをタップした際に呼ばれるメソッドは上記の状態だと正しく動作はするものの、XCode上では警告が出た状態になります。現在も色々その理由に関しては調査中です。
補足. XCode8にバージョンアップした際に遭遇した困ったことと解決方法
ここからはちょっとXCode8のお話になります。XCode8をダウンロードをして先日のサンプルをSwift3に書き直してエミュレーターで無事動作したので、これから実機でもやるぞーという機運の時に下記のキャプチャのようなエラーに遭遇しました。
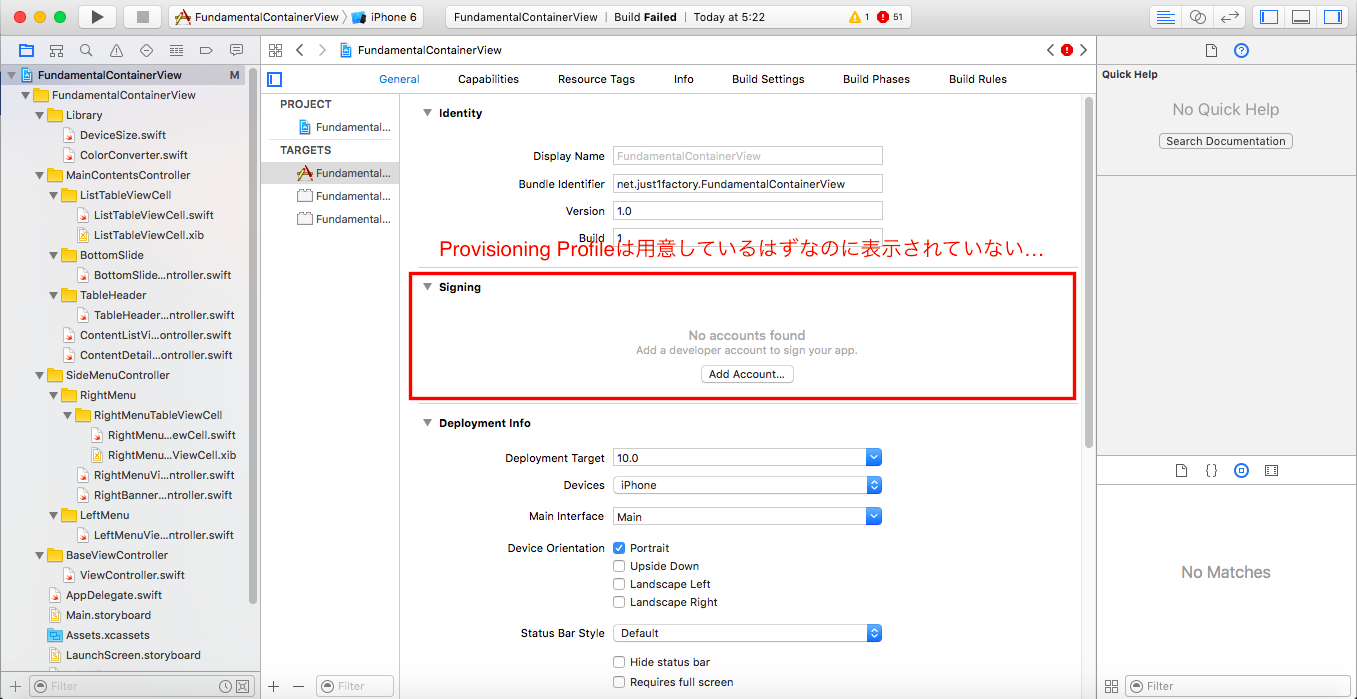
そもそもこの部分が表示されていないので、Debug時とRelease時のProvisioning Profileが設定できないので「これは困った!」と思い「iOS Developers JAPAN」のコミュニティで聞いてみることにしました。その際に試した解決策は下記の通りです。
(Issueその1)Signingの部分が何も表示されない:
- (解決法)Macを再起動して再度XCodeを立ち上げる
ただ僕のマシンがMac Book Airの11インチで既にストレージがパンパン状態だったので1回目はうまくいかなかったのですが、帰宅後に数回試してみた後にようやくうまくいきました。
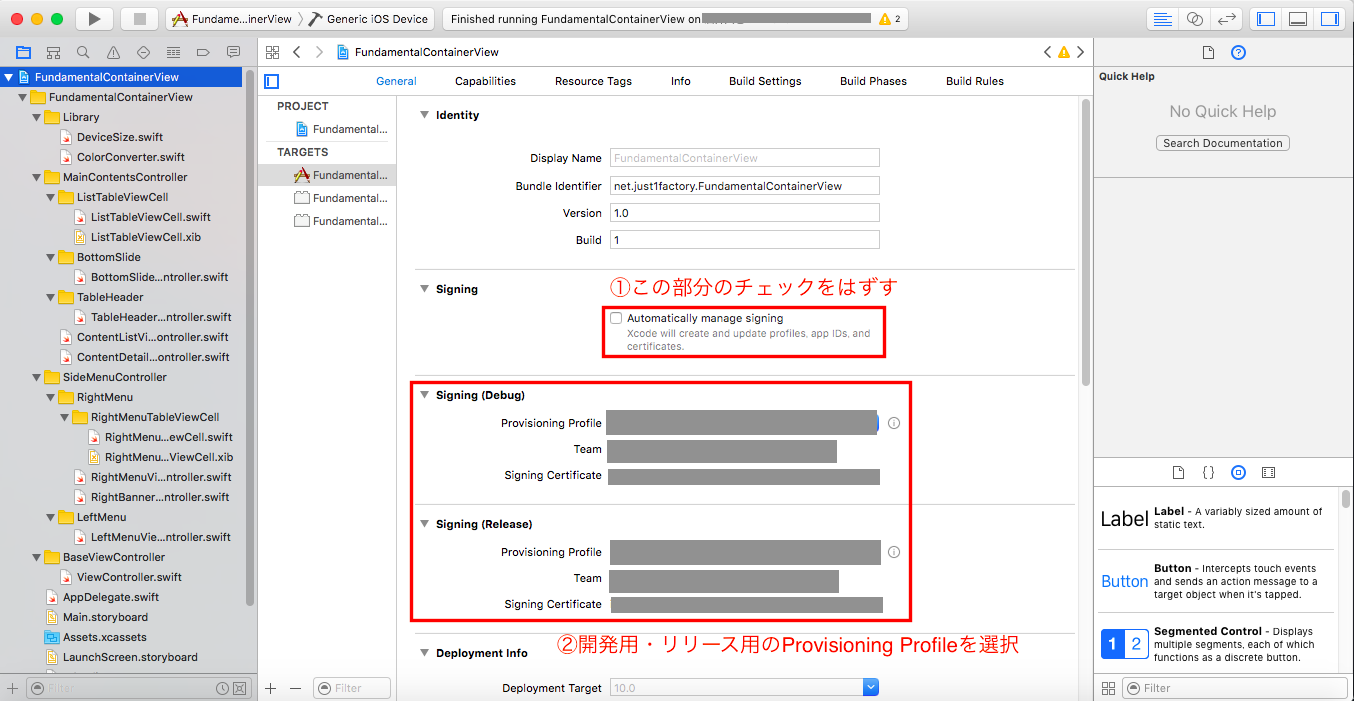
そしてめでたくこれで実機検証ができると思った矢先またもやエラーが...
開発用のプロビジョニングプロファイルで下記のstackoverflowで挙げられていた現象と全く同じ状態になりました。
簡単に言っちゃうと実機でビルドした際に「今選択しているProvisioning ProfileにはAppleWatchが含まれていない」というエラーが出たということです。
(Issueその2)今選択しているProvisioning ProfileにはAppleWatchが含まれていない:
- (解決法)Provisioning Profileを作成する時に自分の実機とペアリングしているAppleWatchを選択してProvisioning Profileを再度作成して適用する
こちらを試したところ、実機でビルドした際に特にエラーも発生せずSwift3で書き直した今回のプロジェクトのビルドが通るようになりました。
※ただ、実際のところは「開発しているMacで持っているプロビジョニングファイルとCertificates, Identifiers & Profilesで作成済みのプロビジョニングファイルの同期がとれていなかっただけ」という可能性も高いので上記の方法が完璧な回答なのかはちょっとわかりません。。
早朝のとんでもない時間に投稿したにも関わらずコミュニティで回答やヘルプをしてくださった皆様本当にありがとうございました!
あとがき
Swift1系から2系へのバージョンアップの際もなかなか大変でしたが、今回のアップデートはXCodeの中の変化はもちろんなのですが、Swift3系に関してはSwift2系からかなりドラスティックな変更になっていたので、今まで慣れていた書き方がまったく通用しなくなったりと最初はかなり驚いてしまいました。(Objective-Cに関してはさほどでもなかったという噂も...)
またCocoaPods等のライブラリを活用しているアプリに関しても、現在は順次キャッチアップしているという感じでしたので、もしこれからCocoaPods等のライブラリを活用したアプリを公開ないしはアップデートをする際は、「しばらくは2.3 → 時がきたら3.0」の方針も致し方なしかなと感じています。
これから自分のgithubにて公開しているサンプルやライブラリに関しても順次Swift3系へのバージョンアップを進めていきますので、何卒宜しくお願い致します。
※もともとゴツめのサンプルだったので記事もかなりゴツくなってしまい恐縮ですm(_ _)m