Espresso
Espresso は Android用のUIテスト自動化フレームワークとなります。
https://google.github.io/android-testing-support-library/docs/espresso/
導入手順
テスト端末環境セットアップ
設定メニューから開発者向けオプションを開き、以下の設定をオフにする
- ウィンドウアニメ
- トランジションアニメ
- Animator再生時間
Espresso のダウンロード
- 最新版 Android Support Repository をインストールしておく (see instructions)
- アプリケーションの build.gradle を開く
- dependencies に以下を追加
androidTestCompile 'com.android.support.test.espresso:espresso-core:2.2.2'
androidTestCompile 'com.android.support.test:runner:0.5'
Instrumentation Runner セット
- android.defaultConfig に以下を追加
testInstrumentationRunner "android.support.test.runner.AndroidJUnitRunner"
記述例 :
apply plugin: 'com.android.application'

android {
    compileSdkVersion 24
    buildToolsVersion "24.0.1"

    defaultConfig {
        applicationId "[パッケージ名]"
        minSdkVersion 16
        targetSdkVersion 24
        versionCode 1
        versionName "1.0"

        // Instrumentation Runner
        testInstrumentationRunner "android.support.test.runner.AndroidJUnitRunner"
    }
    buildTypes {
        release {
            minifyEnabled false
            proguardFiles getDefaultProguardFile('proguard-android.txt'), 'proguard-rules.pro'
        }
    }
}

dependencies {
    compile fileTree(dir: 'libs', include: ['*.jar'])
    testCompile 'junit:junit:4.12'
    compile 'com.android.support:appcompat-v7:24.1.1'

    // コンフリクト回避
    androidTestCompile 'com.android.support:support-annotations:24.1.1'

    // Espresso
    androidTestCompile 'com.android.support.test.espresso:espresso-core:2.2.2'
    androidTestCompile 'com.android.support.test:runner:0.5'
}
※コンフリクト回避用に以下の記載が必要
androidTestCompile 'com.android.support:support-annotations:24.1.1'
テスト実施
テストケース作成
サンプルのテストケースを作成します。
ここでは一例として、MainActivity.java に文字列"Hello World!" がセットされた TextView が正常に表示されているかをチェックするテストケースを作成します。
- MainActivity.java に 文字列"Hello World!" をセットした TextView を追加します。
- 以下の内容を記述した HelloWorldEspressoTest.java ファイルを src/androidTest/java/[パッケージ名]/ 直下に作成します。
package [パッケージ名];

import android.support.test.rule.ActivityTestRule;
import android.support.test.runner.AndroidJUnit4;
import android.test.suitebuilder.annotation.LargeTest;

import org.junit.Rule;
import org.junit.Test;
import org.junit.runner.RunWith;

import static android.support.test.espresso.Espresso.onView;
import static android.support.test.espresso.assertion.ViewAssertions.matches;
import static android.support.test.espresso.matcher.ViewMatchers.isDisplayed;
import static android.support.test.espresso.matcher.ViewMatchers.withText;

@RunWith(AndroidJUnit4.class)
@LargeTest
public class HelloWorldEspressoTest {
    @Rule
    public ActivityTestRule<MainActivity> mActivityRule = new ActivityTestRule(MainActivity.class);

    @Test
    public void listGoesOverTheFold() {
        onView(withText("Hello World!")).check(matches(isDisplayed()));
    }
}
テスト実行
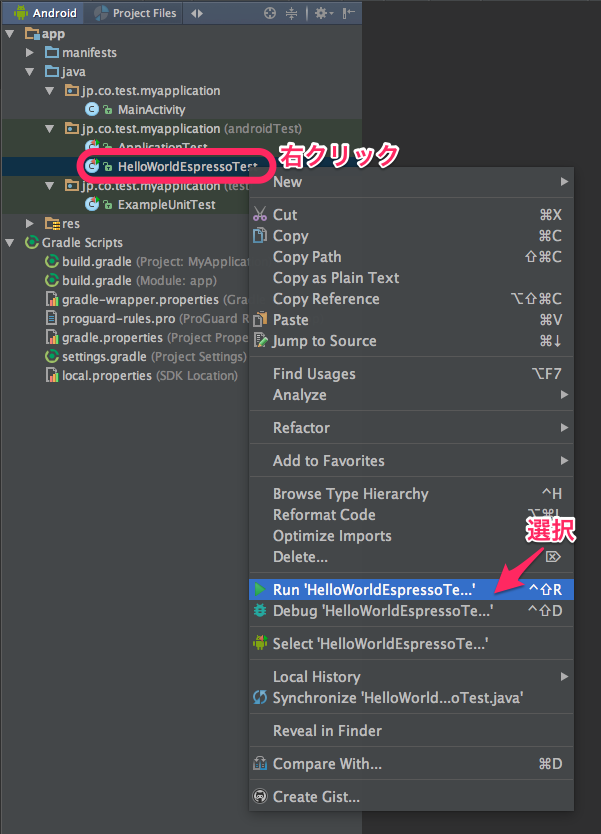
先ほど作成したテストクラス上で右クリックを押し、メニューから Run 'HelloWorldEspressoTest' を選択しテスト実行する。
※実行するテスト端末、又はエミュレータが必要となる。
テスト結果確認
表示が緑色になっていれば成功、表示が赤色となっている場合は失敗となる。
Espresso テストコード記述例
テストは、以下のような形で 検索→アクション実行→チェック を行います。
onView(ViewMatcher) // View の検索
 .perform(ViewAction) // アクション実行
 .check(ViewAssertion); // チェック
検索
ViewMatcher に条件を指定して検索を行います。
例)
- リソースIDからViewを探す
onView(withId(R.id.my_view))
- テキストプロパティ値からTextViewを探す
onView(withText("Hello World!"))
アクション実行
ViewAction にアクションを指定します。
例)
- View へ文字列を入力後、ソフトキーボードを閉じる
onView(withId(R.id.my_view)).perform(typeText("こんにちは"), closeSoftKeyboard());
- View をクリックする
onView(withId(R.id.my_view)).perform(click());
チェック
ViewAssertion に条件を指定してチェックを行います。
(matches の引数は ViewMatcher、戻り値は ViewAssertion)
例)
- ユーザーのスクリーンに現在表示されているかをチェック
onView(withId(R.id.my_view)).check(matches(isDisplayed()));
- ユーザーのスクリーンに現在表示されていない事をチェック
onView(withId(R.id.my_view)).check(matches(not(isDisplayed())));
- TextView のテキストプロパティ値をチェック
onView(withId(R.id.my_view)).check(matches(withText("チェックする文字列"));
- View が見つからない事をチェック
onView(withId(R.id.my_view)).check(doesNotExist());
- View が画面内に全て表示されているかをチェック
onView(withId(R.id.my_view)).check(matches(isCompletelyDisplayed()));
サンプル
実際のサンプルテストコードについては、テストバリエーションに応じて
Googleのサンプルプロジェクトが GitHub に登録されているので参考にして下さい。
| サンプル名 | 内容 |
|---|---|
| BasicSample | Basic Espresso sample |
| CustomMatcherSample | Shows how to extend Espresso to match the hint property of an EditText |
| DataAdapterSample | Showcases the onData() entry point for Espresso, for lists and AdapterViews |
| IntentsBasicSample | Basic usage of intended() and intending() |
| IntentsAdvancedSample | Simulates a user fetching a bitmap using the camera |
| MultiWindowSample | Shows how to point Espresso to different windows |
| WebBasicSample | Use Espresso-web to interact with WebViews. |
| BasicSampleBundled | Basic sample for Eclipse and other IDEs |
Link
Espresso ドキュメント
https://google.github.io/android-testing-support-library/docs/espresso/index.html
Espresso cheat sheet
https://google.github.io/android-testing-support-library/docs/espresso/cheatsheet/index.html

