UiAutomator
UiAutomator は Android用のUIテスト自動化フレームワークとなります。
他アプリを経由するようなテストや他アプリのテストも実行出来ます。
https://developer.android.com/training/testing/ui-testing/uiautomator-testing.html
導入手順
UiAutomator のダウンロード
- 最新版 Android Support Repository をインストールしておく (see instructions)
- アプリケーションの build.gradle を開く
- dependencies に以下を追加
androidTestCompile 'com.android.support.test:runner:0.5'
androidTestCompile 'com.android.support.test.uiautomator:uiautomator-v18:2.1.2'
Instrumentation Runner セット
- android.defaultConfig に以下を追加
testInstrumentationRunner "android.support.test.runner.AndroidJUnitRunner"
記述例 :
apply plugin: 'com.android.application'

android {
    compileSdkVersion 24
    buildToolsVersion "24.0.3"

    defaultConfig {
        applicationId "[パッケージ名]"
        minSdkVersion 18 // Android 4.3 (API level 18) 以上が必要
        targetSdkVersion 24
        versionCode 1
        versionName "1.0"

        testInstrumentationRunner "android.support.test.runner.AndroidJUnitRunner"
    }
    buildTypes {
        release {
            minifyEnabled false
            proguardFiles getDefaultProguardFile('proguard-android.txt'), 'proguard-rules.pro'
        }
    }
}

dependencies {
    compile fileTree(dir: 'libs', include: ['*.jar'])
    testCompile 'junit:junit:4.12'
    compile 'com.android.support:appcompat-v7:24.2.1'

    // コンフリクト回避
    androidTestCompile 'com.android.support:support-annotations:24.2.1'

    androidTestCompile 'com.android.support.test:runner:0.5'
    androidTestCompile 'com.android.support.test.uiautomator:uiautomator-v18:2.1.2'

}
※コンフリクト回避用に以下の記載が必要
androidTestCompile 'com.android.support:support-annotations:24.2.1'
テスト実施
テストケース作成
サンプルのテストケースを作成します。
ここでは一例として、対象アプリを起動後、テキストエディターへ任意の文字を入力し、
入力された内容が正常に表示されているかをチェックするテストケースを作成します。
※対象アプリを com.example.android.testing.uiautomator.BasicSample としています。
- GitHubより BasicSample をクローンします。
- 以下の内容を記述した SampleTest.java ファイルを src/androidTest/java/[パッケージ名]/ 直下に作成します。
package com.example.android.testing.uiautomator.BasicSample;

import android.content.Context;
import android.content.Intent;
import android.content.pm.PackageManager;
import android.content.pm.ResolveInfo;
import android.support.test.InstrumentationRegistry;
import android.support.test.filters.SdkSuppress;
import android.support.test.runner.AndroidJUnit4;
import android.support.test.uiautomator.By;
import android.support.test.uiautomator.UiDevice;
import android.support.test.uiautomator.UiObject2;
import android.support.test.uiautomator.Until;

import org.junit.Before;
import org.junit.Test;
import org.junit.runner.RunWith;

import static org.hamcrest.CoreMatchers.equalTo;
import static org.hamcrest.CoreMatchers.is;
import static org.hamcrest.CoreMatchers.notNullValue;
import static org.junit.Assert.assertThat;

/**
 * Basic sample for unbundled UiAutomator.
 */
@RunWith(AndroidJUnit4.class)
@SdkSuppress(minSdkVersion = 18)
public class SampleTest {

    private static final String BASIC_SAMPLE_PACKAGE
            = "com.example.android.testing.uiautomator.BasicSample";

    private static final int LAUNCH_TIMEOUT = 5000;

    private static final String STRING_TO_BE_TYPED = "UiAutomator";

    private UiDevice mDevice;

    @Before
    public void startMainActivityFromHomeScreen() {
        // 初期化
        mDevice = UiDevice.getInstance(InstrumentationRegistry.getInstrumentation());

        // ホームボタン押下
        mDevice.pressHome();

        // ランチャーアプリ起動後、5秒間待機
        final String launcherPackage = getLauncherPackageName();
        assertThat(launcherPackage, notNullValue());
        mDevice.wait(Until.hasObject(By.pkg(launcherPackage).depth(0)), LAUNCH_TIMEOUT);

        // BasicSampleアプリ起動
        Context context = InstrumentationRegistry.getContext();
        final Intent intent = context.getPackageManager()
                .getLaunchIntentForPackage(BASIC_SAMPLE_PACKAGE);
        intent.addFlags(Intent.FLAG_ACTIVITY_CLEAR_TASK);
        context.startActivity(intent);

        // 5秒間待機
        mDevice.wait(Until.hasObject(By.pkg(BASIC_SAMPLE_PACKAGE).depth(0)), LAUNCH_TIMEOUT);
    }

    @Test
    public void testChangeText() {
        // テキストエディタに文字を入力
        mDevice.findObject(By.res(BASIC_SAMPLE_PACKAGE, "editTextUserInput"))
                .setText(STRING_TO_BE_TYPED);
        // ボタンをクリック
        mDevice.findObject(By.res(BASIC_SAMPLE_PACKAGE, "changeTextBt"))
                .click();

        // 入力された内容を表示する TextView の UiObject2 を取得
        UiObject2 changedText = mDevice
                .wait(Until.findObject(By.res(BASIC_SAMPLE_PACKAGE, "textToBeChanged")),
                        500 /* wait 500ms */);
        // 入力された内容が反映されているかを判定
        assertThat(changedText.getText(), is(equalTo(STRING_TO_BE_TYPED)));
    }

    /**
     * ランチャーアプリのパッケージ名取得
     */
    private String getLauncherPackageName() {
        // Create launcher Intent
        final Intent intent = new Intent(Intent.ACTION_MAIN);
        intent.addCategory(Intent.CATEGORY_HOME);

        // Use PackageManager to get the launcher package name
        PackageManager pm = InstrumentationRegistry.getContext().getPackageManager();
        ResolveInfo resolveInfo = pm.resolveActivity(intent, PackageManager.MATCH_DEFAULT_ONLY);
        return resolveInfo.activityInfo.packageName;
    }
}
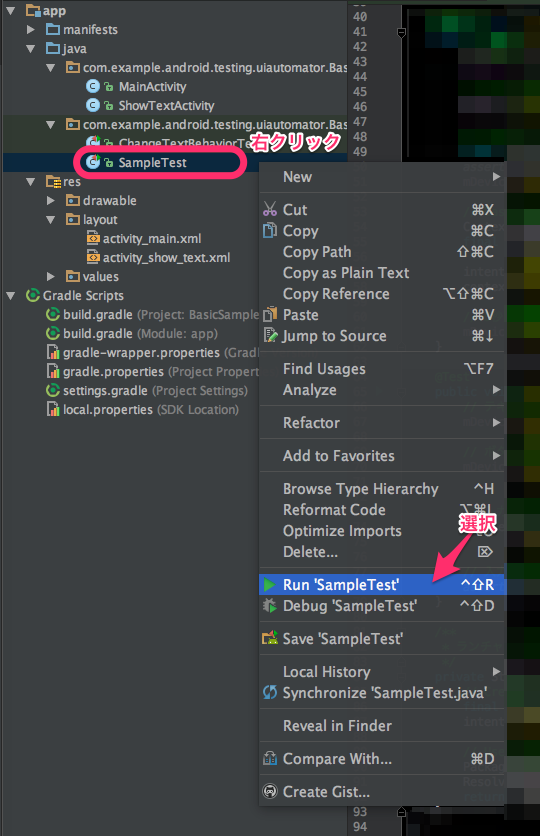
テスト実行
先ほど作成したテストクラス上で右クリックを押し、メニューから Run 'SampleTest' を選択しテスト実行する。
※実行するテスト端末、又はエミュレータが必要となる。
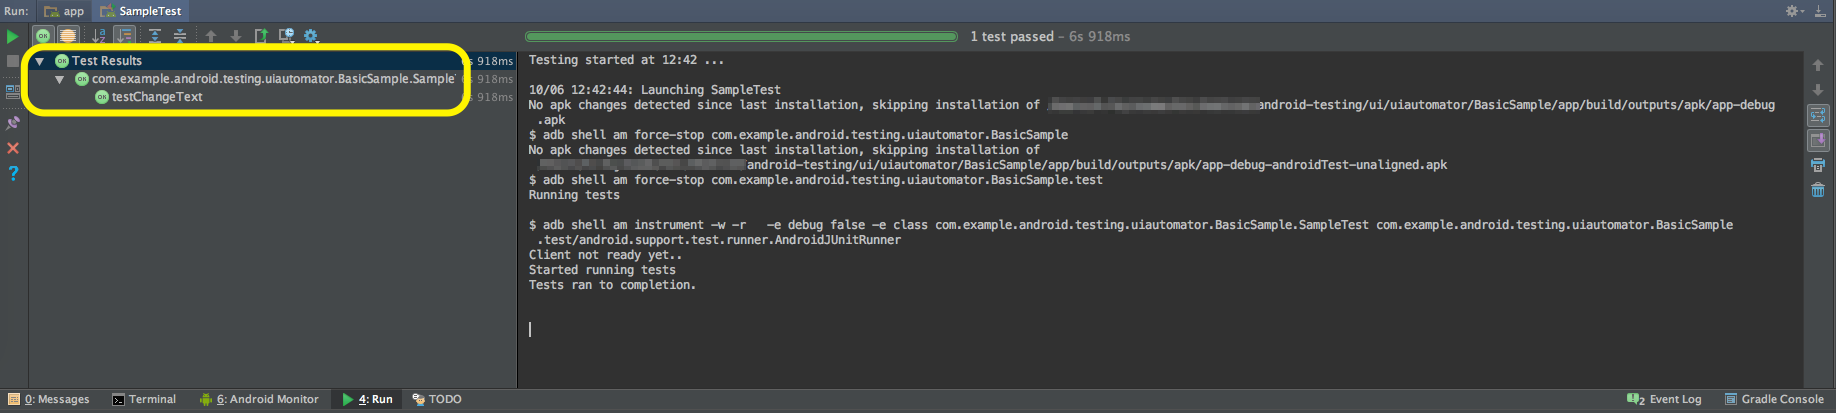
テスト結果確認
表示が緑色になっていれば成功、表示が赤色となっている場合は失敗となる。
UiAutomator テストコード記述
テストは、次の順序で記述していきます。
1. 対象アプリ起動
2. 検索
3. アクション実行
4. チェック
1. 対象アプリ起動
対象アプリを起動するには、前述の SampleTest.java 内に記述されている startMainActivityFromHomeScreen() の処理を実行する事で可能となります。
また、上記メソッドで使用される UiDeviceクラスの詳細について記載します。
UiDevice
デバイスについての状態情報へのアクセスを提供するクラス。
デバイス上でのホームやメニューボタン操作といったユーザー操作をシミュレートする事が可能です。
操作可能な内容の一部を以下に記載いたします。
- 初期化
UiDevice mDevice = UiDevice.getInstance(InstrumentationRegistry.getInstrumentation());
- HOMEボタン押下
mDevice.pressHome();
- BACKボタン押下
mDevice.pressBack();
- MENUボタン押下
mDevice.pressMenu();
- 3秒間待機
mDevice.wait(Until.hasObject(By.pkg("対象パッケージ名")), 3000);
- スクリーンOFF
mDevice.sleep();
- スクリーンON
mDevice.wakeUp();
- 座標(X,Y) = (100,900) から (100,500) へ 100ms(20x5ms) でスワイプ
mDevice.swipe(100, 900, 100, 500, 20);
- 座標(X,Y) = (500,750) をクリック
mDevice.click(500, 750);
- スクリーンショットを撮る(ピクチャーディレクトリへ保存)
String path = Environment.getExternalStoragePublicDirectory(DIRECTORY_PICTURES).getPath();
String filename = "test_001.png";
mDevice.takeScreenshot(new File(path + "/" + filename));
UiObject検索
※UiObject(UiObject2)については "3.アクション実行"項目 に記載します。
※BySelector(By), UiSelector については "2.検索"項目 に記載します。
- UiObject 検索
UiObject uiobject = mDevice.findObject(UiSelector selector);
- UiObject2 検索
UiObject2 uiobject2 = mDevice.findObject(BySelector selector);
- List< UiObject2 > 検索
List<UiObject2> list = mDevice.findObjects(BySelector selector);
2. 検索
検索条件設定用クラスについて記載します。
主に UiDevice クラスの findObject() や findObjects() などの引数として使用されます。
By
UI要素を検索するための条件を指定するクラス。
BySelectorの静的ファクトリーメソッドを提供
- 条件:リソースID
By.res("パッケージ名", "リソースID");
- 条件:パッケージ名
By.pkg("パッケージ名");
- 条件:クラス
By.clazz("クラス名");
- 条件:階層
By.depth(int depth);
- 条件:Text に設定されている文字列
By.text(String text);
- 条件:Clickable の有無
By.clickable(boolean isClickable);
記述例 :
- 検索条件:パッケージ名 "com.test" の リソースID "showText"
By.res("com.test", "showText");
- 検索条件:Clickable無効、かつ Buttonクラス
By.clickable(false).clazz(Button.class.getName());
UiSelector
UI要素を検索するための条件を指定するクラス。
- 条件:リソースID
new UiSelector().resourceId("パッケージ名" + ":id/" + "リソースID");
- 条件:パッケージ名
new UiSelector().packageName("パッケージ名");
- 条件:クラス
new UiSelector().className("クラス名");
- 条件:Text に設定されている文字列
new UiSelector().text(String text);
- 条件:Clickable の有無
new UiSelector().clickable(boolean isClickable);
記述例 :
- 検索条件:パッケージ名 "com.test"、リソースID "showText"
new UiSelector().resourceId("com.test:id/showText");
- 検索条件:Clickable無効、かつ Buttonクラス
new UiSelector().clickable(false).clazz(Button.class.getName());
3. アクション実行
アクションを実行するクラスである UiObject、UiObject2 について記載します。
UiObject
- クリック
uiobject.click();
- ロングクリック
uiobject.longClick();
- テキスト入力 Editableなフィールドがある場合に文字列をセット可能
uiobject.setText("文字列")
UiObject2
- クリック
uiobject2.click();
- ロングクリック
uiobject2.longClick();
- テキスト入力 Editableなフィールドがある場合に文字列をセット可能
uiobject2.setText("文字列")
※既知バグ ver2.1.2
API Level19 以下の端末で EditTextのフィールドに何も文字列がセットされていない状態で
実行すると NullPointerExceptionが発生する。
4. チェック
チェックには、Assertを使用します。
Assert
用意されている判定メソッドの一部を記載します。
| メソッド | 用途 |
|---|---|
| assertTrue(boolean condition) | condition が trueか どうか判別します。 |
| assertFalse(boolean condition) | condition が false かどうか判別します。 |
| assertNull(java.lang.Object object) | object が null かどうか判別します。 |
| assertThat(T actual, org.hamcrest.Matcher matcher) | actual が mathcer の結果となるか判定します。 |
※その他のメソッドについては以下を参考にして下さい。
http://junit.sourceforge.net/javadoc/org/junit/Assert.html
記述例 :
- 対象オブジェクトがNullでない事をチェック
assertThat(uiobject, notNullValue());
- 対象オブジェクトにセットされたテキストが”文字列”と等しい事をチェック
assertThat(uiobject.getText(), is(equalTo("文字列")));
- 対象オブジェクトが Checkされていない事をチェック
assertThat(uiobject2.isChecked(), is(false));
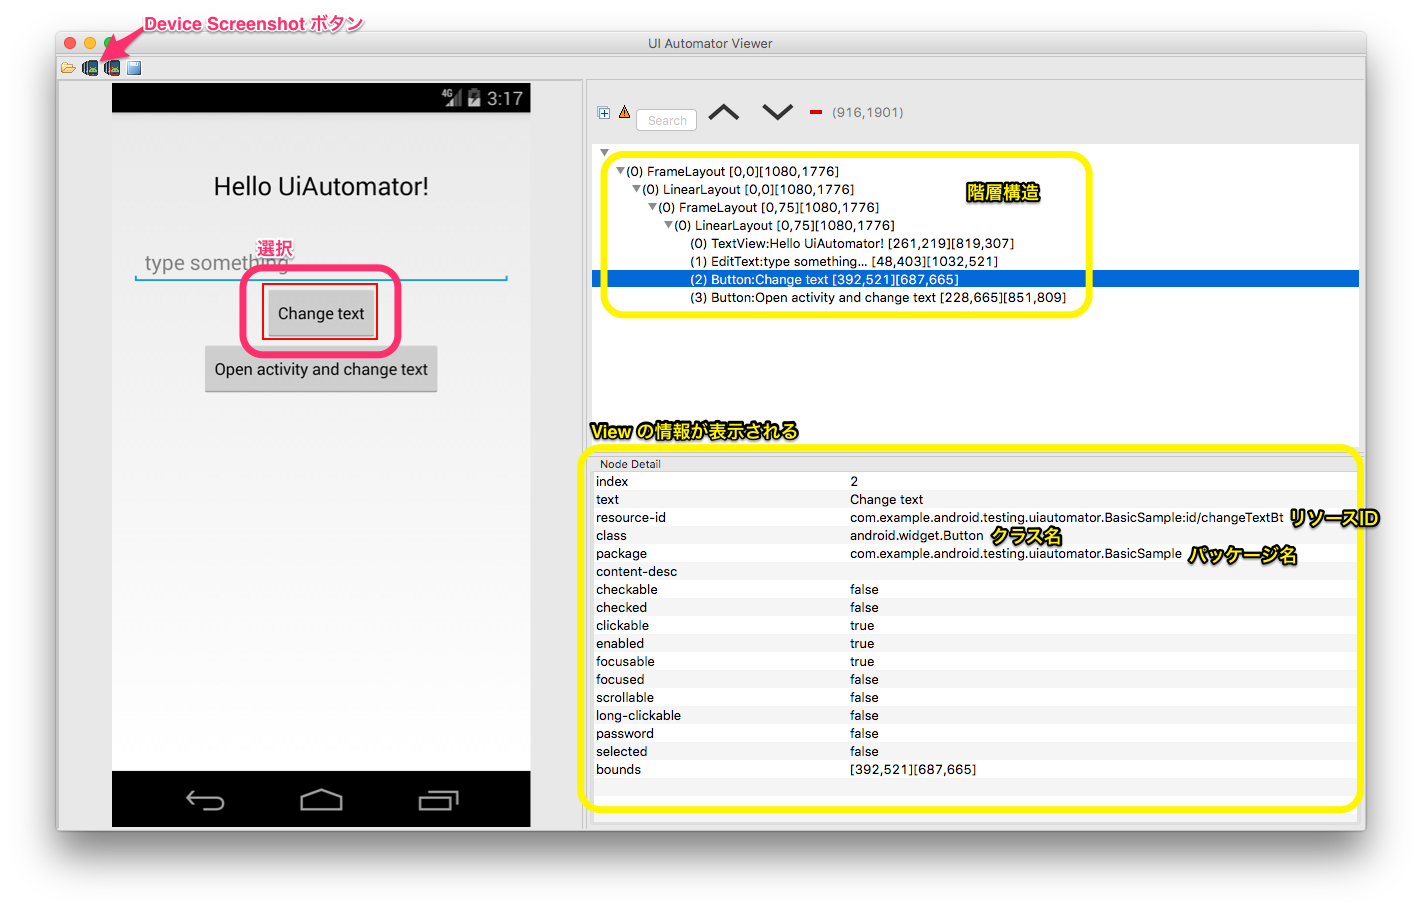
Ui Automator Viewer
Ui Automator Viewer を使う事で、他アプリを含む View の階層情報を得る事が出来ます。
- ターミナルから "uiautomatorviewer"をコマンド実行します。
※パスが通っていない場合は、Android SDK の tools フォルダまで移動し実行 - 端末、又はシミュレータにて対象アプリを起動し、Viewの階層情報を表示したい画面へ移動します。
- Ui Automator Viewer の "Device Screenshot" ボタンをクリックします。
- 画面キャプチャーが表示されるので、任意の View を選択します。
- 画面右に、View のリソースIDやクラス名、レイアウト構造が表示されるので確認
※この情報を元にテストを作成する事が可能です。
UiAutomator Samples
Googleのサンプルプロジェクトが GitHub に登録されている。
| サンプル名 | 内容 |
|---|---|
| BasicSample | Basic UI Automator sample |
Link
UiAutomator ドキュメント
https://developer.android.com/training/testing/ui-testing/uiautomator-testing.html