導入に際して
ここでは、CentOS7にてデータベースサーバーとしてMariaDBを使う場合についての簡単なまとめを入れておきます。
多少手抜きになっているため、セキュリティ上の注意も必要になります。
CentOS7からは、ライセンスのことを意識してか、MySQLが消えてMariaDBになっています。
ここでは、以下のことについて記述しています。
- MariaDBの導入
- 初期設定、日本語文字コードの設定
- VirtualBoxのポートフォワーディング周辺設定
動作環境
- VirtualBox
- VirtualBox上でCentOS7
- 直接コンソールでもいいですが、PuTTYなどSSH経由でつなげたほうがコピペしやすくて多分楽です
システム更新
サーバーとしての運用になるわけですから、できるだけ最新版に更新しましょう。
$ sudo yum update
カーネル更新がおきていれば、一度再起動しておきましょう。
$ sudo reboot
MariaDBの導入
続いてインストールです。
$ sudo yum install -y mariadb mariadb-server
これで依存関係一式インストールされます。
次から起動するように、systemdに教えておきましょう。
$ sudo systemctl enable mariadb.service
$ sudo systemctl start mariadb.service
この状態で接続をテストしておくといいでしょう。ここではまだ管理パスワードがありません(!!)
クライアントツールは互換性を考慮してか、 mysql コマンドのままです。
$ mysql -u root
MariaDB[(none)]>
接続できたら、ここでは確認だけですので、抜けておきましょう。
MariaDB[(none)]> exit;
$
余計な設定を削除し、管理パスワードを再設定しましょう
ここまででMariaDBが入りましたが、余計な設定がいくつか残っているので、最低限削除しておきましょう。
その過程で管理パスワードも再設定します。
$ sudo mysql_secure_installation   # ← mysql_secure_installationを呼び出す
[sudo] password for linux:

NOTE: RUNNING ALL PARTS OF THIS SCRIPT IS RECOMMENDED FOR ALL MariaDB
      SERVERS IN PRODUCTION USE!  PLEASE READ EACH STEP CAREFULLY!

In order to log into MariaDB to secure it, we'll need the current
password for the root user.  If you've just installed MariaDB, and
you haven't set the root password yet, the password will be blank,
so you should just press enter here.

Enter current password for root (enter for none):   # ←初期パスワードは空のため、[Enter]のみ
OK, successfully used password, moving on...

Setting the root password ensures that nobody can log into the MariaDB
root user without the proper authorisation.

Set root password? [Y/n] y  # ← パスワード再設定の確認、するので "y"
New password:               # ← ここで入力(エコーバックなし)
Re-enter new password:      # ← 再入力
Password updated successfully! # ←両方が一致してればOK
Reloading privilege tables..
 ... Success!


By default, a MariaDB installation has an anonymous user, allowing anyone
to log into MariaDB without having to have a user account created for
them.  This is intended only for testing, and to make the installation
go a bit smoother.  You should remove them before moving into a
production environment.

Remove anonymous users? [Y/n] y  # ← 匿名アクセス用アカウントの破棄、もちろん「はい」で "y"
 ... Success!

Normally, root should only be allowed to connect from 'localhost'.  This
ensures that someone cannot guess at the root password from the network.

Disallow root login remotely? [Y/n] y  # ← 管理者のリモート接続は禁止に("y")
 ... Success!

By default, MariaDB comes with a database named 'test' that anyone can
access.  This is also intended only for testing, and should be removed
before moving into a production environment.

Remove test database and access to it? [Y/n] y  # ← テスト用DBとアクセス権の破棄(もちろん「はい」)
 - Dropping test database...
 ... Success!
 - Removing privileges on test database...
 ... Success!

Reloading the privilege tables will ensure that all changes made so far
will take effect immediately.

Reload privilege tables now? [Y/n] y  # ← 権限情報を修正してるので即時反映("y")
 ... Success!

Cleaning up...

All done!  If you've completed all of the above steps, your MariaDB
installation should now be secure.

Thanks for using MariaDB!
これで、リモートアクセスがほぼできなくなっています。
MariaDBの設定変更
日本語周りを使う際に、日本語の文字コードを意識しない設定が標準になっているため、先に変更しておきましょう。
ファイル /etc/my.cnf.d/charset.cnf を作成する
$ sudo vi /etc/my.cnf.d/charset.cnf
[mysqld]
character-set-server=utf8

[client]
default-character-set=utf8
保存して反映させます。
$ sudo systemctl restart mariadb.service
これでほとんどの場所でUnicodeベース(UTF-8エンコーディング)を使うようになります。
Windows環境でShiftJISベースから扱う時は逆に注意が必要になります、はじめからUTF-8で作るようにしたほうがトラブルが少ないでしょう。
データベースを作る
実際に使うデータベースを作りましょう。
作った時には、アクセス権限を管理者ではなく、専用ユーザーにしておくほうがいいです。
下手に管理権限をばらまくのはお勧めできません。
ここではHOGEDBというものを作ることにします。
$ mysqladmin -u root -p create HOGEDB
$ mysql -u root -p HOGEDB
(設定した管理パスワードでログイン)
MariaDB [HOGEDB]>  GRANT ALL PRIVILEGES ON HOGEDB.* TO 'hoge'@'localhost' IDENTIFIED BY 'hogehoge';
MariaDB [HOGEDB]> exit;
これで、ユーザー hoge@localhost がパスワード hogehoge で接続できるようになりました。
同一マシン上にいれば"@localhost"は省略できるので、ユーザー名hogeとして接続できます。
$ mysql -u hoge -p HOGEDB  # ← ユーザー名hogeで接続
Enter password:
Welcome to the MariaDB monitor.  Commands end with ; or \g.
Your MariaDB connection id is 5
Server version: 5.5.52-MariaDB MariaDB Server

Copyright (c) 2000, 2016, Oracle, MariaDB Corporation Ab and others.

Type 'help;' or '\h' for help. Type '\c' to clear the current input statement.

MariaDB [HOGEDB]> exit;  #←接続確認だけなのですぐ抜ける
ポートフォワーディングをかける場合
ポートフォワーディングで他のホスト(ホスト側など)から接続する場合は、GRANT対象を増やす必要があります。
MariaDB [HOGEDB]>  GRANT ALL PRIVILEGES ON HOGEDB.* TO 'hoge'@'10.0.2.2' IDENTIFIED BY 'hogehoge';
MariaDB [HOGEDB]> FLUSH PRIVILEGES;
VirtualBoxの初期設定(NATモード)であれば、ホスト側は10.0.2.2になるので、上記のように行ってください。
接続する前に、VMのポートフォワーディング設定を出して確認してみましょう。
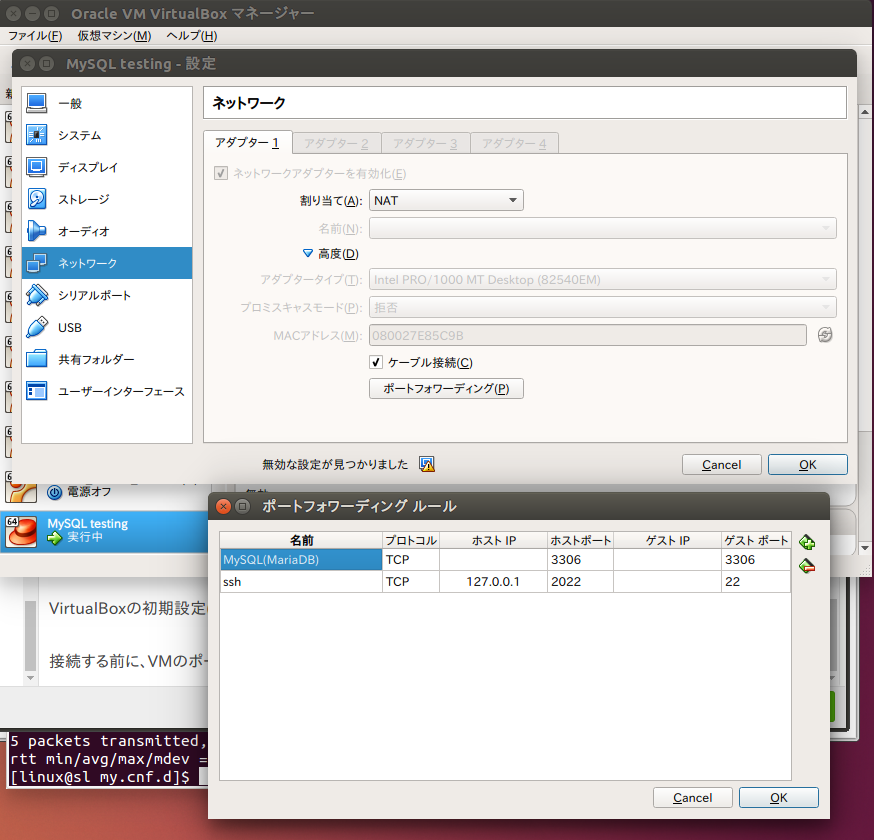
- ホストIPは空欄
- ホストポートは3306
- ゲストIPは空欄
- ゲストポートは3306
この形で、ホスト側からもつながるようになります。
# ホスト側で実行してください
$ mysql -u hoge -h 127.0.0.1 -p HOGEDB
もしくは完全に別のホストからでも接続できます。
# 完全に別のホストからの例
$ mysql -u hoge -h VMの動いてるホストのアドレス -p HOGEDB
他のホストからの接続を拒否する場合は、ポートフォワーディング設定でホストIPを自身(127.0.0.1)に限定することで対応可能です。
まとめ
このように、MySQLをCentOSで動かすことと、接続できるように準備することは、基本操作がわかっていれば案外単純に行えるようになっています。
あとはアプリから接続するようにして、データベースを操作するようにしてみましょう。