概要
Windows10でPython3の環境を構築します。生のPythonを入れて必要に応じて様々なライブラリを随時追加していきます。CLIはcmd.exeではなくPowerShellを使います。
Pythonのインストール
-
Pythonをインストールする(for Windows)
- この通りで入りました
pipの設定
何もしなくても入っている
> python -m pip --version
================================================
pip 9.0.1 from C:\Users\ftakao2007\AppData\Local\Programs\Python\Python36\lib\site-packages (python 3.6)
================================================
ansibleのインストール(保留中)
Ansible2.2のPython3.6.1対応はまだされていない可能性があるので。。
- 事前作業
- 単純にインストールしようとすると
error: Microsoft Visual C++ 14.0 is required.と怒られるので Visual C++ 2015 Build Tools をインストールしておく - pycryptoをインストールしておく
- pipで単純にpycriptをインストールしようとするとエラーになる
- 単純にインストールしようとすると
### こんなエラー
   C:\Program Files (x86)\Windows Kits\10\include\10.0.10240.0\ucrt\inttypes.h(26): error C2061: syntax error: identifier 'intmax_t'
   C:\Program Files (x86)\Windows Kits\10\include\10.0.10240.0\ucrt\inttypes.h(27): error C2061: syntax error: identifier 'rem'
   C:\Program Files (x86)\Windows Kits\10\include\10.0.10240.0\ucrt\inttypes.h(27): error C2059: syntax error: ';'
   C:\Program Files (x86)\Windows Kits\10\include\10.0.10240.0\ucrt\inttypes.h(28): error C2059: syntax error: '}'
   C:\Program Files (x86)\Windows Kits\10\include\10.0.10240.0\ucrt\inttypes.h(30): error C2061: syntax error: identifier 'imaxdiv_t'
   C:\Program Files (x86)\Windows Kits\10\include\10.0.10240.0\ucrt\inttypes.h(30): error C2059: syntax error: ';'
   C:\Program Files (x86)\Windows Kits\10\include\10.0.10240.0\ucrt\inttypes.h(40): error C2143: syntax error: missing '{' before '__cdecl'
   C:\Program Files (x86)\Windows Kits\10\include\10.0.10240.0\ucrt\inttypes.h(41): error C2146: syntax error: missing ')' before identifier '_Number'
   C:\Program Files (x86)\Windows Kits\10\include\10.0.10240.0\ucrt\inttypes.h(41): error C2061: syntax error: identifier '_Number'
   C:\Program Files (x86)\Windows Kits\10\include\10.0.10240.0\ucrt\inttypes.h(41): error C2059: syntax error: ';'
   C:\Program Files (x86)\Windows Kits\10\include\10.0.10240.0\ucrt\inttypes.h(42): error C2059: syntax error: ')'
   C:\Program Files (x86)\Windows Kits\10\include\10.0.10240.0\ucrt\inttypes.h(45): error C2143: syntax error: missing '{' before '__cdecl'
   C:\Program Files (x86)\Windows Kits\10\include\10.0.10240.0\ucrt\inttypes.h(46): error C2146: syntax error: missing ')' before identifier '_Numerator'
   C:\Program Files (x86)\Windows Kits\10\include\10.0.10240.0\ucrt\inttypes.h(46): error C2061: syntax error: identifier '_Numerator'
   C:\Program Files (x86)\Windows Kits\10\include\10.0.10240.0\ucrt\inttypes.h(46): error C2059: syntax error: ';'
   C:\Program Files (x86)\Windows Kits\10\include\10.0.10240.0\ucrt\inttypes.h(46): error C2059: syntax error: ','
   C:\Program Files (x86)\Windows Kits\10\include\10.0.10240.0\ucrt\inttypes.h(48): error C2059: syntax error: ')'
   C:\Program Files (x86)\Windows Kits\10\include\10.0.10240.0\ucrt\inttypes.h(50): error C2143: syntax error: missing '{' before '__cdecl'
   C:\Program Files (x86)\Windows Kits\10\include\10.0.10240.0\ucrt\inttypes.h(56): error C2143: syntax error: missing '{' before '__cdecl'
   C:\Program Files (x86)\Windows Kits\10\include\10.0.10240.0\ucrt\inttypes.h(63): error C2143: syntax error: missing '{' before '__cdecl'
   C:\Program Files (x86)\Windows Kits\10\include\10.0.10240.0\ucrt\inttypes.h(69): error C2143: syntax error: missing '{' before '__cdecl'
   C:\Program Files (x86)\Windows Kits\10\include\10.0.10240.0\ucrt\inttypes.h(76): error C2143: syntax error: missing '{' before '__cdecl'
   C:\Program Files (x86)\Windows Kits\10\include\10.0.10240.0\ucrt\inttypes.h(82): error C2143: syntax error: missing '{' before '__cdecl'
   C:\Program Files (x86)\Windows Kits\10\include\10.0.10240.0\ucrt\inttypes.h(89): error C2143: syntax error: missing '{' before '__cdecl'
   C:\Program Files (x86)\Windows Kits\10\include\10.0.10240.0\ucrt\inttypes.h(95): error C2143: syntax error: missing '{' before '__cdecl'
   error: command 'C:\\Program Files (x86)\\Microsoft Visual Studio 14.0\\VC\\BIN\\x86_amd64\\cl.exe' failed with exit status 2
- 対処として一時的に
inttypes.hを書き換えてインストール後に戻した
### PowerShellの管理者権限でinttypes.hを開いて編集して保存
> notepad 'C:\Program Files (x86)\Windows Kits\10\include\10.0.10240.0\ucrt\inttypes.h'
================================================
typedef struct
{
# define intmax_t long long               ### これを追記
# define uintmax_t unsigned long long     ### これを追記
    intmax_t quot;
    intmax_t rem;
} _Lldiv_t;

typedef _Lldiv_t imaxdiv_t;
================================================

### pycryptoのインストール
> python -m pip install pycrypto
================================================
Collecting pycrypto
  Using cached pycrypto-2.6.1.tar.gz
Building wheels for collected packages: pycrypto
  Running setup.py bdist_wheel for pycrypto ... done
  Stored in directory: C:\Users\ftakao2007\AppData\Local\pip\Cache\wheels\80\1f\94\f76e9746864f198eb0e304aeec319159fa41b082f61281ffce
Successfully built pycrypto
Installing collected packages: pycrypto
Successfully installed pycrypto-2.6.1
================================================

### PowerShellの管理者権限でinttypes.hを開いてさっき追記した箇所を削除して保存
> notepad 'C:\Program Files (x86)\Windows Kits\10\include\10.0.10240.0\ucrt\inttypes.h'
================================================
typedef struct
{
    intmax_t quot;
    intmax_t rem;
} _Lldiv_t;

typedef _Lldiv_t imaxdiv_t;
================================================

### ansibleのインストール
> python -m pip install ansible
- 事後作業
- このままだとansibleに実行権限が無く、単にansibleのファイルを開いてしまう動作になる
- (対応方法確認中...)
venvの設定
何もしなくても入っている
-
pyvenv は deprecated なので venv を使う話
-
pyvenvは今後無くなる予定とのこと
-
-
事前作業
-
WindowsでPowerShellスクリプトの実行セキュリティポリシーを変更する
- これをしてないとPowerShellでActivateするときにエラーになる
-
WindowsでPowerShellスクリプトの実行セキュリティポリシーを変更する
### 管理者権限でPowerShellを起動し、現在のポリシーを確認
> Get-ExecutionPolicy
================================================
Restricted
================================================

### ポリシーの変更(署名無しでもローカルのスクリプトは実行できるようにする)
> Set-ExecutionPolicy RemoteSigned
================================================
実行ポリシーの変更
実行ポリシーは、信頼されていないスクリプトからの保護に役立ちます。実行ポリシーを変更すると、about_Execution_Policies
のヘルプ トピック (http://go.microsoft.com/fwlink/?LinkID=135170)
で説明されているセキュリティ上の危険にさらされる可能性があります。実行ポリシーを変更しますか?
[Y] はい(Y)  [A] すべて続行(A)  [N] いいえ(N)  [L] すべて無視(L)  [S] 中断(S)  [?] ヘルプ (既定値は "N"): Y
================================================

> Get-ExecutionPolicy
================================================
RemoteSigned
================================================
venv実行テスト
### ワークスペースの作成
> python -m venv venvtest

### ワークスペースに移動
> cd venvtest

### アクティベート
> .\Scripts\Activate.ps1
================================================
### 以下のように先頭に(venvtest)がつく
(venvtest) PS C:\Users\ftakao2007\PycharmProjects\python\venv\venvtest>
================================================

### PowerShellではなくcmd.exeの場合は以下
### > Scripts\activate.bat
###

### ディアクティベート
> deactivate
PythonでMySQLに接続するための設定
Ununtu16.04の場合
# apt-get install libmysqlclient-dev
# pip install mysqlclient
これで import MySQLdb ができるようになる
PythonでMongoDBに接続するための設定
Ununtu16.04の場合
# apt-get install pymongo
これで import pymongo ができるようになる
例
import pymongo
import pandas as pd
from pymongo import MongoClient
client = MongoClient(host=['192.168.33.11:27017'])
db = client.joruri_plus
collection = db.plus_projects
data = pd.DataFrame(list(collection.find()))
data
Python周りのライブラリのインストール
- IPython
- Pythonの対話型インタプリタを強力に拡張したもの
- 拡張された対話型シェル
- 分離型プロセス間通信モデル
- 並列コンピューティング機構
- Pythonの対話型インタプリタを強力に拡張したもの
- Jupyter
- IPythonをサーバーで立ち上げてブラウザ上で実行できるようにしたもの
- 元々がIPython Notebookという名前だった
### jupyterのインストール (ipythonも入る)
> python -m pip install jupyter

### jupyterの起動
> jupyter notebook
ruby連携
数値計算・機械学習ライブラリのインストール
- NumPy
- 数値計算を効率的に処理するためのライブラリ
- SciPy
- 様々な科学計算が実装されたライブラリ
- 内部でNumPyが使われている
- matplotlib
- グラフ描画ライブラリ
- 内部でNumPyが使われている
- pandas
- Pythonでデータ構造を触ったりデータ分析したりするときに便利なライブラリ
- TendorFlow
- Googleによって開発されている
- ディープラーニングを実装するための機械学習ライブラリ
- scikit-learn
- Googleによって開発されている
- 機械学習全般のアルゴリズムやデータ処理用関数をカバーしたライブラリ
- SVM
- 決定木
- K-NN
- K-means
- 交差検定
- 回帰分析
- 主成分析
> python -m pip install numpy pandas matplotlib
PyCharmのインストール
-
最強のPython統合開発環境PyCharm
- 無償版もあったんですね
Jupyter Notebook使い方
ウェブDBプレスvol97の伊藤直也さんの記事参考
Hello World
def hello():
    return "Hello World"

hello()   ### ここでCtrl+Enter
================================================
'Hello World'
================================================
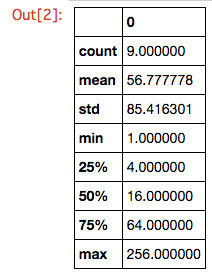
図を表示する
- 「%」では始まる命令はマジックコマンド
- Jupyterへの命令
%matplotlib inline
import pandas as pd

df = pd.DataFrame([1,2,4,8,16,32,64,128,256])
df.plot()
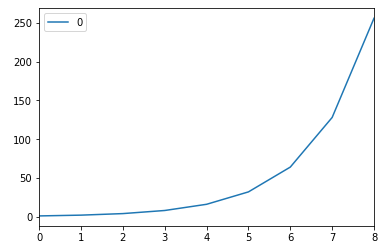
df.describe()
Markdownと数式のテスト
# Markdownテスト

## リストテスト

* リスト1
* リスト2

## 数式のテスト

$ \sqrt{x^2 + y^2} $

pandasの基本
- データ構造
- Series(シリーズ)
- 一次元のデータ構造
- DataFrame(データフレーム)
- 二次元のデータ構造
- 階層インデックス
- より高次元のデータを扱うとき
- Series(シリーズ)
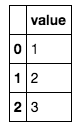
データフレームの初期化
df = pd.DataFrame([1,2,3], columns=['value'])
df
タプル(イミュータブルなシーケンス型)のリストを渡す
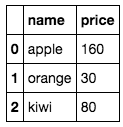
pd.DataFrame([('apple',160),('orange',30),('kiwi',80)], columns=['name', 'price'])
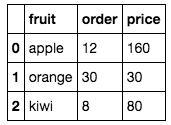
ディクショナリ(連想配列、ハッシュみたいなもの)でリストを渡す
data = {
    'fruit' : ['apple', 'orange', 'kiwi'],
    'price' : [160,30,80],
    'order' : [12,30,8]
}

pd.DataFrame(data)
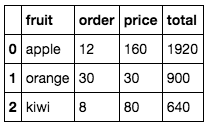
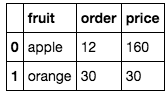
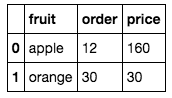
列の追加
値段と注文数を書けた合計金額を出す
data = {
    'fruit' : ['apple', 'orange', 'kiwi'],
    'price' : [160,30,80],
    'order' : [12,30,8]
}

df = pd.DataFrame(data)
df['total'] = df['order'] * df['price']
df
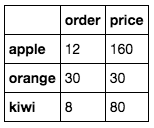
インデックスの指定
data = {
    'price' : [160,30,80],
    'order' : [12,30,8]
}

df = pd.DataFrame(data, index=['apple', 'orange', 'kiwi'])
df
特定の行をシリーズとして取り出し
data = {
    'price' : [160,30,80],
    'order' : [12,30,8]
}

df = pd.DataFrame(data, index=['apple', 'orange', 'kiwi'])
df.ix['kiwi']

サイズの調査
data = {
    'price' : [160,30,80],
    'order' : [12,30,8]
}

df = pd.DataFrame(data, index=['apple', 'orange', 'kiwi'])
df.shape
================================================
(3, 2)
### 3行2列。indexは入らない
================================================
行や列の選択
fruitの列を選択
data = {
    'fruit' : ['apple', 'orange', 'kiwi'],
    'price' : [160,30,80],
    'order' : [12,30,8]
}

df = pd.DataFrame(data)
df['fruit']

fruit, orderの2列選択
data = {
    'fruit' : ['apple', 'orange', 'kiwi'],
    'price' : [160,30,80],
    'order' : [12,30,8]
}

df = pd.DataFrame(data)
df[['fruit','order']]
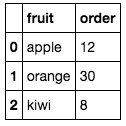
head, tail
data = {
'fruit' : ['apple', 'orange', 'kiwi'],
'price' : [160,30,80],
'order' : [12,30,8]
}
df = pd.DataFrame(data)
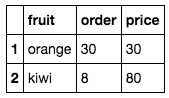
df.head(2)
data = {
    'fruit' : ['apple', 'orange', 'kiwi'],
    'price' : [160,30,80],
    'order' : [12,30,8]
}

df = pd.DataFrame(data)
df.tail(2)
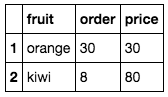
表示範囲をindexで指定
data = {
    'fruit' : ['apple', 'orange', 'kiwi'],
    'price' : [160,30,80],
    'order' : [12,30,8]
}

df = pd.DataFrame(data)
df[0:2]
data = {
    'fruit' : ['apple', 'orange', 'kiwi'],
    'price' : [160,30,80],
    'order' : [12,30,8]
}

df = pd.DataFrame(data)
df[1:]
data = {
'fruit' : ['apple', 'orange', 'kiwi'],
'price' : [160,30,80],
'order' : [12,30,8]
}
df = pd.DataFrame(data)
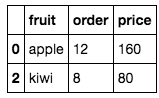
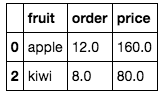
df.loc[[0,2]]
サンプリング
実行する毎に抽出される行が変わる
data = {
    'fruit' : ['apple', 'orange', 'kiwi'],
    'price' : [160,30,80],
    'order' : [12,30,8]
}

df = pd.DataFrame(data)
df.sample(n=2)

条件を指定した絞込
SQLのwhere句みたいなもの
data = {
'fruit' : ['apple', 'orange', 'kiwi'],
'price' : [160,30,80],
'order' : [12,30,8]
}
df = pd.DataFrame(data)
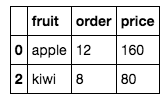
df[df.price > 50]
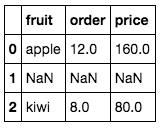
Where句を使うと条件にマッチしないものはNaN(Not a number:非数)で埋まる。
pandasでは欠損値として扱われる
data = {
    'fruit' : ['apple', 'orange', 'kiwi'],
    'price' : [160,30,80],
    'order' : [12,30,8]
}

df = pd.DataFrame(data)
df.where(df.price > 50)
欠損値は削除したり埋めたりできる
data = {
    'fruit' : ['apple', 'orange', 'kiwi'],
    'price' : [160,30,80],
    'order' : [12,30,8]
}

df = pd.DataFrame(data)
df.where(df.price > 50).dropna()
data = {
    'fruit' : ['apple', 'orange', 'kiwi'],
    'price' : [160,30,80],
    'order' : [12,30,8]
}

df = pd.DataFrame(data)
df.where(df.price > 50).fillna(df.mean())

任意の関数の適用
- axis=0 : 行方向
- axis=1 : 列方向
- upper : 大文字にする
data = {
'fruit' : ['apple', 'orange', 'kiwi'],
'price' : [160,30,80],
'order' : [12,30,8]
}
df = pd.DataFrame(data)
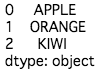
df.apply(lambda x: x.fruit.upper(), axis=1)
fruitの列を大文字にする
CSVのソート
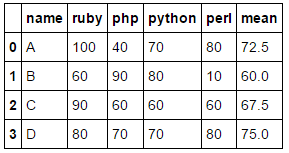
CSV読み込み
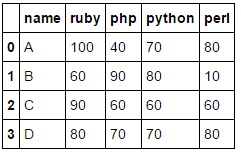
df = pd.read_csv('./ruby_1.csv')
df
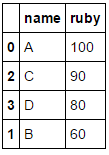
Rubyの点数が高い順
sort_by_ruby = df.sort_values(by='ruby', ascending=False)
sort_by_ruby[['name', 'ruby']]
平均を追加
df['mean'] = df.mean(axis=1)
df