概要
Ruby/Tkの覚え書き。常時更新です。
- ハッシュはRuby1.9以降対応の書き方にしています
- 例
- :text => 'Hello' (Ruby1.8以前でもOKな書き方)
- text: 'Hello' (Ruby1.9以降対応)
- 例
Ruby/Tkについて
-
Tcl/TkのTkを、Rubyから利用できるようにしたのがRuby/Tk
- Tcl/Tkとは、スクリプト言語 Tcl (Tool Command Language)と、そのGUIツールキット Tkのこと
-
Tk (Tool Kit)
- GUIを開発するためのクロスプラットフォームのウィジェット・ツールキット
- wish (Windowing Shell)
- Tkのコマンドラインインタプリタ
基本構成
ウィジット(Widget)
- グラフィカルユーザインタフェースを構成する部品要素、およびその集まり
- 例) ウィンドウ、テキストボックス、スライダー、ボタン、スクロールバー
- Ruby/Tkでは,すべてのウィジェットはクラスとして定義されている
- 例) TkLabelクラス
- 文字列を表示するラベルウィジェットはTkLabelクラスのオブジェクト
- 例) TkLabelクラス
- ウィジェットは様々な属性(プロパティ)を持っている
- 例) ラベルウィジェットのtext属性
- 文字列を設定すると,そのウィジェット内に文字列が表示される
- 例) ラベルウィジェットのtext属性
ジオメトリマネージャ
- 親オブジェクトの上にどのように配置するかを決める役割を果たすメソッド
- 4種類のメソッドがある
- pack : ウィジェットの大きさにあわせて下のウィンドウの大きさを自動調節(パック)する
- grid : -row, -columnオプションでウィジェットを格子状に配置する
- place : ウィンドウ上の座標を指定して配置する
- form : pack+place.ウィンドウを格子上に区切り,格子点へのplaceを行う
イベントループ
- GUIアプリケーションのベースとなるルートウィジェットを表示する
- ルートウィジット上に様々なウィジットを配置していくのが基本
- 発生したイベントをとらえてGUI部品に伝える
- イベントとは
- 「マウスクリック」や「キーボード入力」のような,GUI上で発生する様々な出来事
プログラム例
require 'tk'

label = TkLabel.new   ### newメソッドを実行することでインスタンス(実際のウィジェット)を作成
label.text("Hello, World!")   ### ラベルウィジェットのtext属性に文字列を設定
label.pack  ### ジオメトリマネージャ

Tk.mainloop   ### イベントループ
ウィジット作成部分は一般的には
クラス名.new(nil, 属性名: 値, 属性名: 値, ...).pack
のように書く。第一引数はnil(ルートウィジット)か親ウィジットを指定する。
require 'tk'

TkLabel.new(nil,
            text: 'Hello, World!',
            fg: 'green',  ### 文字の色
            bg: 'black').pack   ### 背景色

Tk.mainloop

クラス
TkLabel
文字列やイメージを表示する。
インスタンス変数
| プロパティ(省略形) | 説明 | 値、例 |
|---|---|---|
| background(bg) | 背景色 | 'blue','green','black'など |
| foreground(fg) | 前景色(文字色) | 'blue','green','black'など |
| anchor | 配置場所 | 'n','e','s','w','center' |
| bitmap | 表示するbitmap | TkBitmapImageオブジェクトで指定 |
| image | 表示するimage | TkPhotoImageオブジェクトで指定 |
| text | 表示する文字列 | 文字列 |
| textvariable | 表示する文字列変数 | 文字列変数 |
| justify | 文字列をよせる側 | 'left','center','right' |
| borderwidth | 枠の幅 | 整数値 |
| cursor | マウスカーソルの形 | 'hand','hand2','watch'など |
| highlightcolor | ウィジェットにフォーカスがある時の枠の色 | 'blue','green','black'など |
| highlightbackground | ウィジェットにフォーカスが無い時の枠の色 | 'hand','hand2','watch'など |
| highlightthickness | ウィジェットにフォーカスがある時の枠の幅 | 整数値 |
| relief | ウィジェットの凹凸 | 'raised','sunken' |
| wraplength | 折り畳むときの1行の文字数 | 整数値 |
| height | ウィジェットの高さ | |
| width | ウィジェットの幅 |
require 'tk'

TkLabel.new(nil,
            text: '日本語テスト').pack

n = TkVariable.new('hoge')
TkLabel.new(nil,
            textvariable: n,
            cursor: 'watch',
            relief: 'raised',
            highlightthickness: 5,
            highlightbackground: 'blue',
            bg: 'black',
            fg: 'white').pack

Tk.mainloop

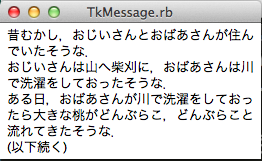
TkMessage
文字列を表示する。
- TkLabelとの違い
- 複数行に渡る文字列を表示するのに向いている
- イメージは表示できない
require 'tk'

string = "昔むかし,おじいさんとおばあさんが住んでいたそうな.\nおじいさんは山へ柴刈に,おばあさんは川で洗濯をしておったそうな.\nある日,おばあさんが川で洗濯をしておったら大きな桃がどんぶらこ,どんぶらこと流れてきたそうな.\n(以下続く)"

label1 = TkMessage.new(nil,
                      text: string,
                      aspect: 200).pack

Tk.mainloop
TkButton
クリックすると何がしかの働きをする
require 'tk'

TkButton.new(nil,
             text: 'push!',
             command: proc{print "Hello World\n"}).pack

Tk.mainloop
push! を押すとHello Worldがターミナルに表示される

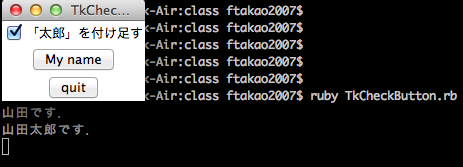
TkCheckButton
チェックボタンを表示する
require 'tk'

var = TkVariable.new('')

TkCheckButton.new(nil,
	       text: '「太郎」を付け足す',
	       onvalue: '太郎',
	       offvalue: '',
	       variable: var).pack

TkButton.new(nil,
             text: 'My name',
             command: proc{print "山田" + var.value + "です.\n"}).pack

TkButton.new(nil,
             text: 'quit',
             command: proc{ exit }).pack

Tk.mainloop
- チェックボックスが外れている状態でMy nameを押すと「山田です」と表示される
- チェックしている状態でMy nameを押すと「山田太郎です」と表示される
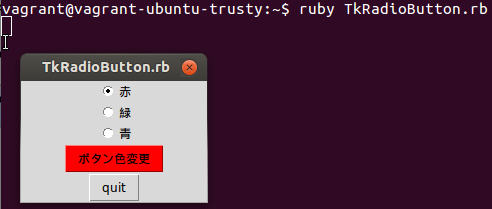
TkRadioButton
ラジオボタンを表示する。
require 'tk'

var = TkVariable.new('red')
TkRadioButton.new(nil,
		  text: '赤',
		  value: 'red',
		  variable: var).pack
TkRadioButton.new(nil,
		  text: '緑',
		  value: 'green',
		  variable: var).pack
TkRadioButton.new(nil,
		  text: '青',
		  value: 'blue',
		  variable: var).pack
w = TkButton.new(nil,
                 text: 'ボタン色変更',
                 command: proc{ w.background(var.value); w.activebackground(var.value)})
w.pack
TkButton.new(nil,
             text: 'quit',
             command: proc{ exit }).pack

Tk.mainloop
ボタンを押す毎に色が変わる。
Macはボタンの色が変わらないのでUbuntu14.04で実行。
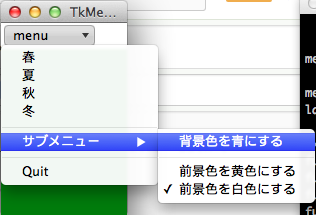
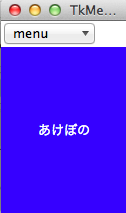
TkMenubutton, TkMenu
メニューを表示する
require 'tk'

var = TkVariable.new('')
bgcolor = TkVariable.new('darkgreen')
fgcolor = TkVariable.new('white')

frame = TkFrame.new(nil)
frame.pack(side: 'top', fill: 'x')

menubutton = TkMenubutton.new(frame,
			  text: 'menu')

label = TkLabel.new(nil,
		    width: 15,
		    height: 10,
		    background: 'darkgreen',
		    foreground: 'white',
		    textvariable: var)

menu = TkMenu.new(menubutton,
		   tearoff: 'off')

menu.add('command',
	 label: '春',
	 command: proc{var.value = 'あけぼの'})
menu.add('command',
	 label: '夏',
	 command: proc{var.value = 'よる'})
menu.add('command',
	 label: '秋',
	 command: proc{var.value = 'ゆふぐれ'})
menu.add('command',
	 label: '冬',
	 command: proc{var.value = 'つとめて'})
menu.add('separator')

submenu = TkMenu.new(menubutton,
		     tearoff: 'off')
submenu.add('checkbutton',
	    label: '背景色を青にする',
	    onvalue: 'blue',
	    offvalue: 'darkgreen',
	    variable: bgcolor,
	    command: proc{label.background(bgcolor.value)})

submenu.add('separator')

submenu.add('radiobutton',
	    label: '前景色を黄色にする',
	    value: 'yellow',
	    variable: fgcolor,
	    command: proc{label.foreground(fgcolor.value)})

submenu.add('radiobutton',
	    label: '前景色を白色にする',
	    value: 'white',
	    variable: fgcolor,
	    command: proc{label.foreground(fgcolor.value)})

menu.add('cascade',
	 label: 'サブメニュー',
	 menu: submenu)
menu.add('separator')
menu.add('command',
	 label: 'Quit',
	 command: proc{exit})
menubutton.menu(menu)

menubutton.pack(side: 'left')
label.pack(side: 'top', fill: 'both')

Tk.mainloop
「背景色を青にする」をクリックし、「春」を選択
TkEntry
一行の文字列を入力するために使用する。
require 'tk'

var = TkVariable.new('')
TkEntry.new(nil,
            textvariable: var,
            show: '*').pack

TkButton.new(nil,
             text: 'print',
             command: proc{print var.value, "\n"}).pack

TkButton.new(nil,
             text: 'quit',
             command: proc{exit}).pack

Tk.mainloop
入力文字した文字が「*」で表示される。任意の文字で伏せることができるが🍣は文字化けしてしまった。
printを押すとターミナルに入力した文字が表示される。

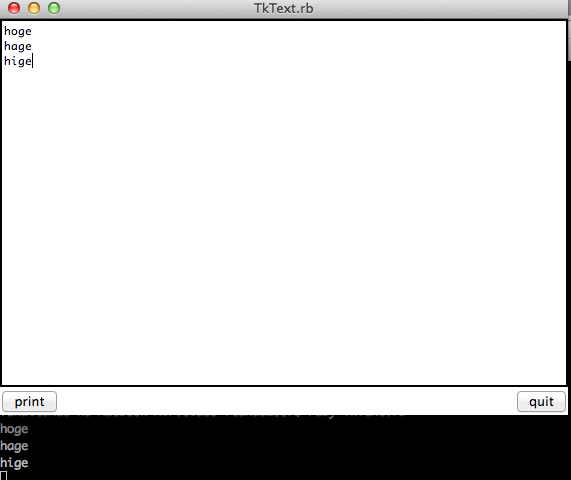
TkText
- ユーザが任意の文字列を入力するためのウィジェット
- 非常に多機能
require 'tk'

text = TkText.new(nil)
text.pack('side' => 'top', 'fill' => 'both')
button = TkButton.new(nil, 'text' => 'print',
		      'command' => proc{print text.value, "\n"})
button.pack('side' => 'left', 'fill' => 'both')

quitbutton = TkButton.new(nil, 'text' => 'quit',
		  'command' => proc{exit})
quitbutton.pack('side' => 'right', 'fill' => 'both')

Tk.mainloop
printを押すとターミナルに入力した文字列が表示される
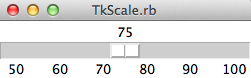
TkScale
ある数値を一つ指定するためのウィジェット
require 'tk'

var = TkVariable.new('50')
scale = TkScale.new(nil,
		    showvalue: 'true',
		    from: 50,
		    to: 100,
		    orient: 'horizontal',
		    length: 250,
		    tickinterval: 10,
		    variable: var).pack

Tk.mainloop
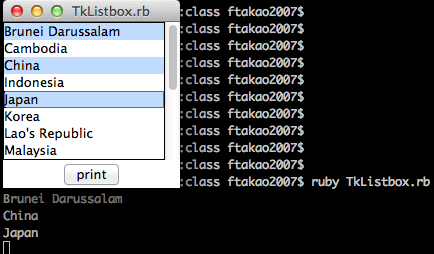
TkListbox
たくさんのリストの中から1つまたは複数の要素を選択させたいときに用いる
require 'tk'

frame = TkFrame.new(nil).pack
scrollbar = TkScrollbar.new(frame)

listbox = TkListbox.new(frame,
			height: 8,
			width: 20,
			selectmode: 'multiple',
			yscrollcommand: proc{|first, last|scrollbar.set(first, last)}).pack(side: 'left', fill: 'both')

scrollbar.command(proc{|first,last| listbox.yview(first,last)}).pack(side: 'right', fill: 'y')

arr = (['Japan','Korea','North Korea', 'China', 'Taiwan', 'Mongolia', 'Indonesia', 'Singapore', 'Philippinines', 'Thailand', 'Viet Nam', 'Cambodia', 'Lao\'s Republic', 'Malaysia', 'Myanmar', 'Brunei Darussalam']).sort
listbox.insert('end', *arr)

TkButton.new(nil,
	     text: 'print',
             command: proc{(listbox.curselection).each{|i| print arr[i], "\n"}}).pack

Tk.mainloop
選択した項目をprintで出力する
TkFrame
ウィジェットのまとまりを埋め込むウィジェットで,主に配置管理のために使用
require 'tk'

frame1 = TkFrame.new(nil).pack('side' => 'left')
frame2 = TkFrame.new(nil).pack('side' => 'right')

TkLabel.new(frame1,
            text: '左上',
            relief: 'raised').pack
TkLabel.new(frame2,
            text: '右上',
            relief: 'raised').pack
TkLabel.new(frame1,
            text: '左下',
            relief: 'raised').pack
TkLabel.new(frame2,
            text: '右下',
            relief: 'raised').pack

Tk.mainloop
以下のように表示される

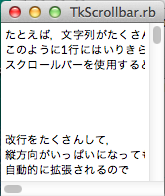
TkScrollbar
スクロールバーを表示する
require 'tk'

string = 'たとえば,文字列がたくさんあって,
このように1行にはいりきらなければ,
スクロールバーを使用すると効果的です.


改行をたくさんして,
縦方向がいっぱいになっても
自動的に拡張されるので
安心ですね.
以上がスクロールバーの
実例でした.'

frame = TkFrame.new(nil)
xscrollbar = TkScrollbar.new(nil,
			 orient: 'horizontal')
yscrollbar = TkScrollbar.new(frame,
			 orient: 'vertical')
text = TkText.new(frame,
		  wrap: 'none',
		  width: 20,
                  height: 10,
		  xscrollcommand: proc{|*idx| xscrollbar.set(*idx)},
		  yscrollcommand: proc{|*idx| yscrollbar.set(*idx)})

xscrollbar.command(proc{|*idx| text.xview(*idx)})
yscrollbar.command(proc{|*idx| text.yview(*idx)})

yscrollbar.pack(side: 'right', fill: 'both')
xscrollbar.pack(side: 'bottom', fill: 'both')
text.pack(side: 'left', fill: 'both', expand: 'yes')
frame.pack(side: 'top', fill: 'both', expand: 'yes')
text.insert('end',string)

Tk.mainloop
表示はされるがエラーダイアログが表示されます。いつか修正予定。
[2020/12/30追記]
@akira_kano1101 さんより、以下のように修正する事でダイアログが表示されない事を確認いただきました。
- xscrollcommand: proc{|idx| xscrollbar.set(*idx)},
- yscrollcommand: proc{|idx| yscrollbar.set(*idx)})
+ xscrollcommand: proc{|*idx| xscrollbar.set(*idx)},
+ yscrollcommand: proc{|*idx| yscrollbar.set(*idx)})
TkToplevel
トップレベルは新たにウィンドウを作成する。
require 'tk'

rootwindow = TkRoot.new
rootwindow.title('ルートウィンドウ')

TkLabel.new(rootwindow,
	    text: 'これがルートウィンドウです.').pack

newwindow = TkToplevel.new
newwindow.title('新しいウィンドウ')

TkLabel.new(newwindow,
	    text: 'これが新しいウィンドウです.').pack
TkButton.new(newwindow,
	     text: 'close',
	     command: proc{newwindow.destroy}).pack
Tk.mainloop
ルートウィンドウとは別にウィンドウが作成される。

TkVariable
Tclの変数をアクセスするためのクラス
Ruby 2.2.0 リファレンスマニュアル (TkVariable)
メソッド
全てのウィジェットクラス共通
bind
イベントがあったときになにかの反応をさせたいときに使用するメソッド
require 'tk'

root = TkRoot.new

var = TkVariable.new('bindtest')
label = TkLabel.new(root, 'textvariable' => var).pack('fill'=>'both')
TkMessage.new(root,
	      'width' => 150,
	      'text' => 'このウィンドウの上にカーソルを当ててクリックやキーにタッチすると,いろいろなことが起こりそうです.').pack

TkButton.new(root,
	     'text' => 'quit',
	     'command' => proc{exit}).pack
root.bind('Button-1', proc{label.background('blue')})
root.bind('ButtonRelease-1', proc{label.background('gray85')})
root.bind('Button-2', proc{label.background('green')})
root.bind('ButtonRelease-2', proc{label.background('gray85')})
root.bind('Button-3', proc{label.background('red')})
root.bind('ButtonRelease-3', proc{label.background('gray85')})
root.bind('Double-1', proc{label.background('gold')})
root.bind('Double-2', proc{label.background('purple')})
root.bind('Double-3', proc{label.background('white')})
root.bind('Enter', proc{var.value = 'test!'})
root.bind('Leave', proc{var.value = 'test'})
root.bind('Key', proc{|k| var.value = "You pressed \"#{k}\"."}, "%K")
Tk.mainloop

ジオメトリマネージャ
pack
- fill : ウィジェットの足りない幅をうめる
- 値 : 'x' (X方向),'y' (Y方向),'both' (両方) ,'none'(なし)
- expand : サイズの変化に合わせて伸ばす
- 値 : 'yes' or 'no'
- 例) pack('fill' => 'both', 'expand' => 'yes')
- anchor : アンカー位置を決める
- 値 : ,'n'(北) 'e'(東) 'w'(西) 's'(南)の組み合わせ,または,'c'(中央)
- 例) pack('anchor' => 'nw')
- side : パックする方向を指定する
- 値 : 'top', 'left', 'right', 'bottom'
- padx, pady : 隣りのウィジェットとの間に隙間を作る
- padx, pady : ウィジェット内に隙間を作る
- 値 : 数値。単位はピクセル
- 例) pack('padx' => 8, 'pady' => 10)