Docker上で unbound を動かす
DNSキャッシュサーバである unbound をDocker上で動かし、LAN内の名前解決をします。
今回は、既存のunbound入りのイメージや 既存のDockerfileを利用するのではなく、素のUbuntu 14.04をDocker上で動かし、そこにunboundをインストールします。
Docker上で Ubuntu 14.04 を動かす
unboundという名前で Ubuntu 14.04のコンテナを起動します。ローカルにイメージがないのでpull(ダウンロード)が始まり、20秒程度で起動しました。
$ docker run -i -t -d --name="unbound" ubuntu:14.04
Unable to find image 'ubuntu:14.04' locally
14.04: Pulling from library/ubuntu
0a85502c06c9: Pull complete
0998bf8fb9e9: Pull complete
a6785352b25c: Pull complete
e9ae3c220b23: Pull complete
Digest: sha256:28bd2edcebe82d41c3494bf6205016fe08e681452f1448acd44d55e2cda7e3c0
Status: Downloaded newer image for ubuntu:14.04
077627ae9f5b621406907c07d4b7f04a8c8f207ef978a36b0d82360fa5223317
attachコマンドでターミナルを開き、バージョンを確認します。
$ docker attach unbound

# cat /etc/lsb-release
DISTRIB_ID=Ubuntu
DISTRIB_RELEASE=14.04
DISTRIB_CODENAME=trusty
DISTRIB_DESCRIPTION="Ubuntu 14.04.3 LTS"
うまく起動できました。ターミナルを抜けるときは exit ではなく、Ctrl+p、Ctrl+q の順に押すとのこと。exitだとコンテナが停止してしまいます。
unbound をインストールする
ターミナルにて 普通にaptでインストールします。
# apt-get update
Ign http://archive.ubuntu.com trusty InRelease
Get:1 http://archive.ubuntu.com trusty-updates InRelease [64.4 kB]
(略)
Get:20 http://archive.ubuntu.com trusty/universe amd64 Packages [7589 kB]
Fetched 21.3 MB in 1min 48s (196 kB/s)
Reading package lists... Done

# apt-get install -y unbound
Reading package lists... Done
Building dependency tree
Reading state information... Done
The following extra packages will be installed:
  libevent-2.0-5 libpython2.7 libpython2.7-minimal libpython2.7-stdlib
  libunbound2 openssl unbound-anchor
Suggested packages:
  ca-certificates
The following NEW packages will be installed:
  libevent-2.0-5 libpython2.7 libpython2.7-minimal libpython2.7-stdlib
  libunbound2 openssl unbound unbound-anchor
0 upgraded, 8 newly installed, 0 to remove and 3 not upgraded.
(略)
Setting up openssl (1.0.1f-1ubuntu2.15) ...
Setting up unbound-anchor (1.4.22-1ubuntu4.14.04.2) ...
Setting up unbound (1.4.22-1ubuntu4.14.04.2) ...
invoke-rc.d: policy-rc.d denied execution of start.
Processing triggers for libc-bin (2.19-0ubuntu6.6) ...
Processing triggers for ureadahead (0.100.0-16) ...
unbound を設定する
/etc/unbound/unbound.conf を編集してunboundを設定します。こちら&こちらを参考にしています
# Unbound configuration file for Debian.
#
# See the unbound.conf(5) man page.
#
# See /usr/share/doc/unbound/examples/unbound.conf for a commented
# reference config file.
#
# The following line includes additional configuration files from the
# /etc/unbound/unbound.conf.d directory.
include: "/etc/unbound/unbound.conf.d/*.conf"

# #ADD
verbosity: 1

interface: 0.0.0.0
access-control: 127.0.0.1/32 allow
access-control: 192.168.0.0/24 allow

local-zone: "example.com" static
local-data: "foo.example.com A 192.168.0.101"
local-data: "bar.example.com A 192.168.0.102"

forward-zone:
name: "."
forward-addr: 192.168.0.1
動作確認しようとしたら、53番ポートを開けていないことに気付きました。一旦コンテナをイメージに書き出したあと削除し、ポートを開けつつイメージから再作成してみます。
Dockerイメージを書き出す
unboundをインストールしたUbuntu 14.04を 新しいイメージとして書き出します。
$ docker commit unbound unbound
49e569a8725704c2c0b4c7a5da0ca348847422c1592a7c4a451c3a291c4fbe97
若干紛らわしいですが、unboundという名前のコンテナをunboundというイメージに書きこみました。
docker imagesコマンドで確認します。
$ docker images
REPOSITORY          TAG                 IMAGE ID            CREATED              VIRTUAL SIZE
unbound             latest              49e569a87257        About a minute ago   228.6 MB
(略)
イメージが作成されました。
Dockerイメージからコンテナを起動する
起動中のコンテナを停めて、そして削除します。
$ docker stop unbound && docker rm unbound
unbound
unbound
そして -p オプションで 53番ポートを開放しつつ、作成したイメージ unbound のコンテナを起動します。
$ docker run -i -t -d --name="unbound" -p 53:53 -p 53:53/udp unbound
c7b4167bff0cf267656919430021841368881345779fb539f92103b54b64c650
ターミナルでunboundを起動し、netstatでポートの状況を確認します。
$ docker attach unbound

# service unbound start
 * Starting recursive DNS server unbound                                 [ OK ]

# netstat -nap
Active Internet connections (servers and established)
Proto Recv-Q Send-Q Local Address           Foreign Address         State       PID/Program name
tcp        0      0 0.0.0.0:53              0.0.0.0:*               LISTEN      -
tcp        0      0 127.0.0.1:8953          0.0.0.0:*               LISTEN      -
tcp6       0      0 ::1:8953                :::*                    LISTEN      -
udp        0      0 0.0.0.0:53              0.0.0.0:*                           -
(略)
ポート53がLISTENされています。ホスト側のポートも確認してみます。
$ netstat -nap | grep 53
(No info could be read for "-p": geteuid()=1000 but you should be root.)
tcp6       0      0 :::53                   :::*                    LISTEN      -
udp6       0      0 :::53                   :::*                                -
(略)
…IPv6のエントリしかないのが気になりますが、このまま進めてみます。1
ターミナルを抜けて、ドメイン example.com の名前解決に コンテナ上のunboundを参照するよう 既存のDNSサーバの設定を編集します。ウチではAtermのルータ(のDNS機能)を使っていまして、こんな画面で設定しました。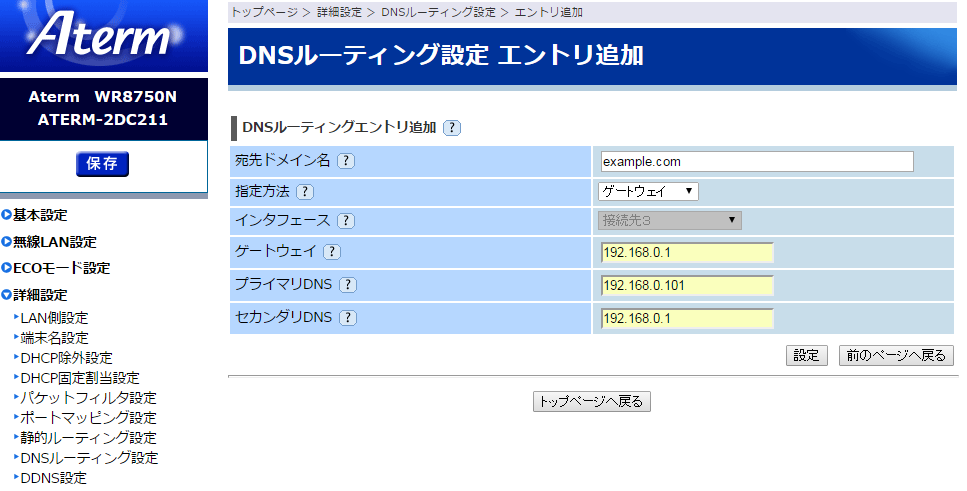
最後に、名前解決の動作を確認します。
$ dig foo.example.com

; <<>> DiG 9.9.5-3ubuntu0.5-Ubuntu <<>> foo.example.com
;; global options: +cmd
;; Got answer:
;; ->>HEADER<<- opcode: QUERY, status: NOERROR, id: 739
;; flags: qr aa rd ra; QUERY: 1, ANSWER: 1, AUTHORITY: 0, ADDITIONAL: 1

;; OPT PSEUDOSECTION:
; EDNS: version: 0, flags:; udp: 4096
;; QUESTION SECTION:
;foo.example.com.                        IN      A

;; ANSWER SECTION:
foo.example.com.         3600    IN      A       192.168.0.101

;; Query time: 2 msec
;; SERVER: 192.168.0.1#53(192.168.0.1)
;; WHEN: Sun Nov 29 15:10:17 JST 2015
;; MSG SIZE  rcvd: 59

$ dig bar.example.com

; <<>> DiG 9.9.5-3ubuntu0.5-Ubuntu <<>> bar.example.com
;; global options: +cmd
;; Got answer:
;; ->>HEADER<<- opcode: QUERY, status: NOERROR, id: 60144
;; flags: qr aa rd ra; QUERY: 1, ANSWER: 1, AUTHORITY: 0, ADDITIONAL: 1

;; OPT PSEUDOSECTION:
; EDNS: version: 0, flags:; udp: 4096
;; QUESTION SECTION:
;bar.example.com.               IN      A

;; ANSWER SECTION:
bar.example.com.        3600    IN      A       192.168.0.102

;; Query time: 2 msec
;; SERVER: 192.168.0.1#53(192.168.0.1)
;; WHEN: Sun Nov 29 15:11:15 JST 2015
;; MSG SIZE  rcvd: 60
foo.example.com と bar.example.com が IPアドレスに解決されました!