この記事は CureApp Advent Calendar 2016 7日の記事です。
今日は Elastic Beanstalk に Docker (ECS) で複数アプリをデプロイする話です。
目的
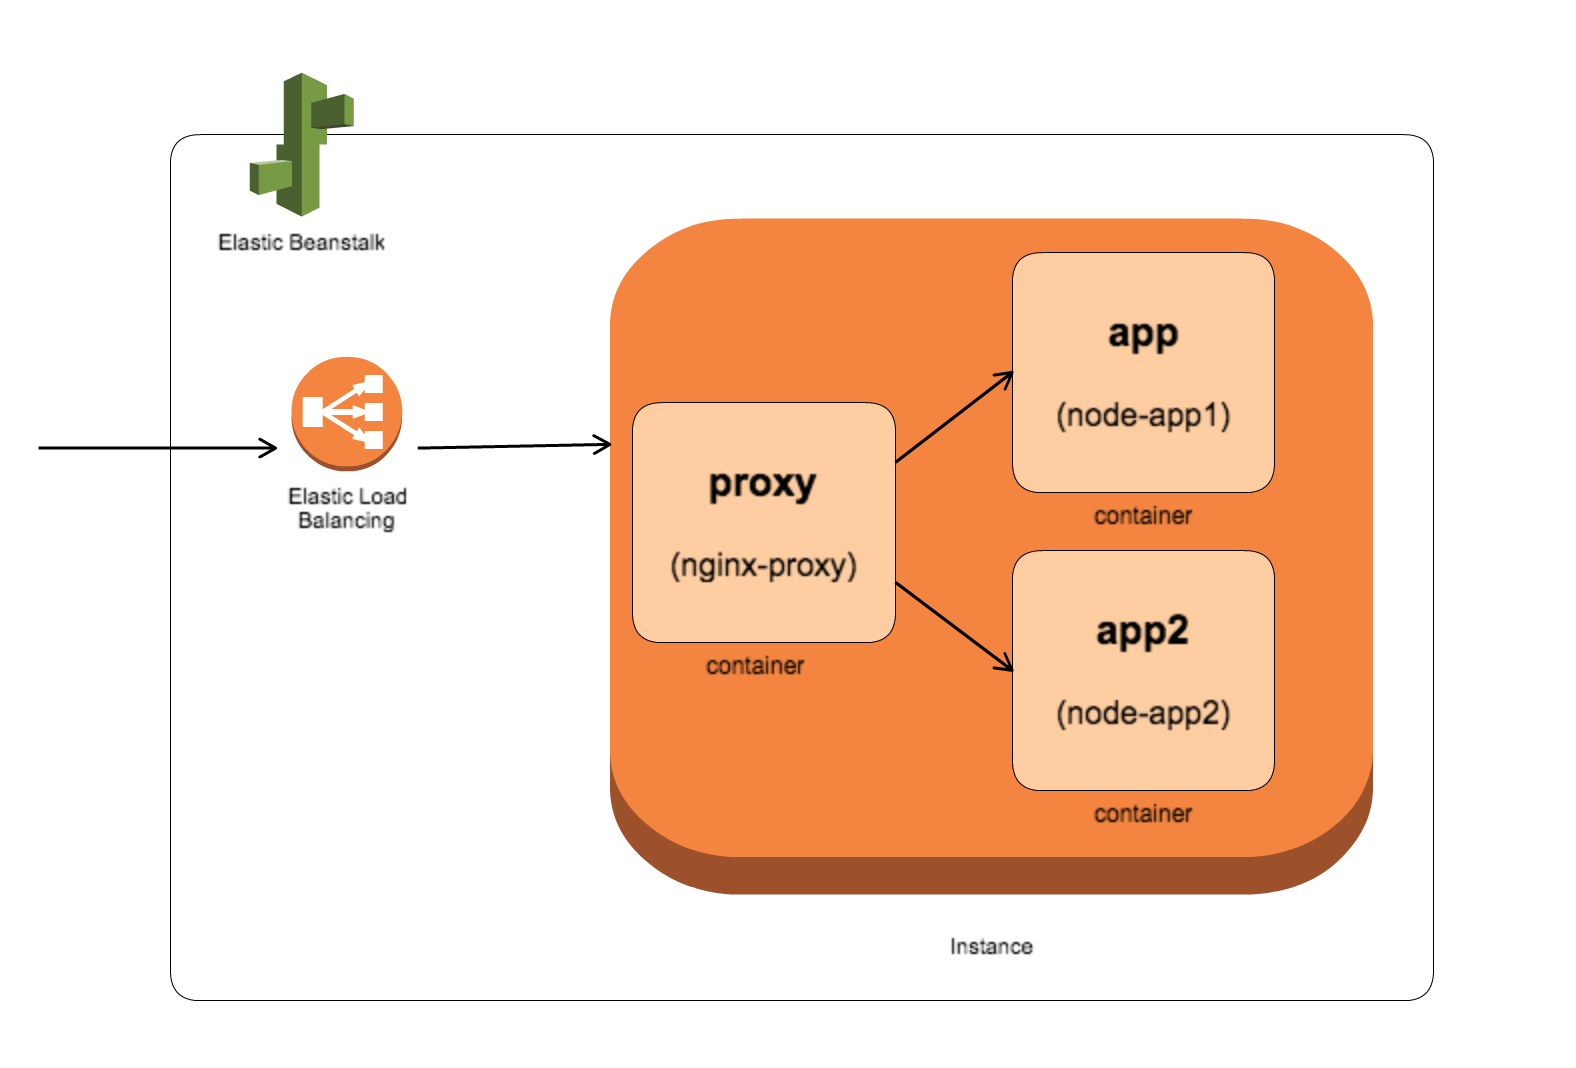
ひとつの Elastic Beanstalk に複数のアプリケーションを入れたら、
インスタンスの節約になったりするかも。
という動機のもとで、以下のような構成を検討しました。
前提条件
- aws アカウント
- node, docker, docker-compose インストール (ローカル確認用なので必須ではないです)
手順
1. テスト用アプリケーション作成
node で表示するだけのアプリケーションを作成。
{
  "name": "node-app1",
  "version": "1.0.0",
  "description": "sample node app 1",
  "main": "server.js",
  "scripts": {
    "start": "node server.js"
  },
  "author": "",
  "license": "ISC"
}
var http = require('http')
var server = http.createServer()

server.on('request', function(req, res) {
    res.writeHead(200, {'Content-Type': 'text/html'})
    res.write('<h1>Hello my first application!</h1>')
    res.end()
})

server.listen(80)
console.log('server listening...')
$ sudo npm start
同様に表示を少し変えて node-app2 も作成しました。
2. nginx の設定
server {
    listen 80;
    server_name localhost;

    location / {
        proxy_pass http://node-app1;
    }

    location /second/ {
        proxy_pass http://node-app2;
    }
}
通常は server_name とかで分けると思いますが、テストを簡単にするため、url で分岐させています。
3. docker compose で動かしてみる
試しに docker compose を使ってローカルで動かしてみました。
version: '2'
services:
  node-app1:
    image: node:6.9.1-slim
    volumes:
    - ./node-app1:/usr/src/app
    working_dir: /usr/src/app
    command: npm start

  node-app2:
    image: node:6.9.1-slim
    volumes:
    - ./node-app2:/usr/src/app
    working_dir: /usr/src/app
    command: npm start

  nginx-proxy:
    image: nginx
    volumes:
    - ./proxy/conf.d:/etc/nginx/conf.d
    ports:
    - "80:80"
    links:
    - node-app1
    - node-app2
.
├── docker-compose.yml
├── node-app1
│   ├── package.json
│   └── server.js
├── node-app2
│   ├── package.json
│   └── server.js
└── proxy
    └── conf.d
        └── default.conf
$ docker-compose up
ブラウザから確認。
http://localhost/first
http://localhost/second
今回は node:6.9.1-slim を使いましたが、実際は Docker Hub にあげて使う感じでしょうか。
Elastic Beanstalk 複数コンテナ環境では Dockerfile は使えないらしい。。(公式サイト)
4. アップロードファイル作成
公式サイトと docker-compose.yml を見比べながら、Dockerrun.aws.json を作成しました。
{
  "AWSEBDockerrunVersion": 2,
  "volumes": [
    {
      "name": "node-app1-src",
      "host": {
        "sourcePath": "/var/app/current/node-app1"
      }
    },
    {
      "name": "node-app2-src",
      "host": {
        "sourcePath": "/var/app/current/node-app2"
      }
    },
    {
      "name": "nginx-proxy-conf",
      "host": {
        "sourcePath": "/var/app/current/proxy/conf.d"
      }
    }
  ],
  "containerDefinitions": [
    {
      "name": "node-app1",
      "image": "node:6.9.1-slim",
      "essential": true,
      "memory": 128,
      "mountPoints": [
        {
          "sourceVolume": "node-app1-src",
          "containerPath": "/usr/src/app",
          "readOnly": true
        }
      ],
      "workingDirectory" : "/usr/src/app",
      "command": ["npm", "start"]
    },
    {
      "name": "node-app2",
      "image": "node:6.9.1-slim",
      "essential": true,
      "memory": 128,
      "mountPoints": [
        {
          "sourceVolume": "node-app2-src",
          "containerPath": "/usr/src/app",
          "readOnly": true
        }
      ],
      "workingDirectory" : "/usr/src/app",
      "command": ["npm", "start"]
    },
    {
      "name": "nginx-proxy",
      "image": "nginx",
      "essential": true,
      "memory": 128,
      "portMappings": [
        {
          "hostPort": 80,
          "containerPort": 80
        }
      ],
      "links": [
        "node-app1",
        "node-app2"
      ],
      "mountPoints": [
        {
          "sourceVolume": "nginx-proxy-conf",
          "containerPath": "/etc/nginx/conf.d",
          "readOnly": true
        },
        {
          "sourceVolume": "awseb-logs-nginx-proxy",
          "containerPath": "/var/log/nginx"
        }
      ]
    }
  ]
}
このあと作成する zip がホストの /var/app/current に解凍されます。
essentialは、true に設定されたコンテナが止まると他のコンテナもすべて止まるという設定。(公式サイト)
.
├── Dockerrun.aws.json
├── node-app1
│   ├── package.json
│   └── server.js
├── node-app2
│   ├── package.json
│   └── server.js
└── proxy
    └── conf.d
        └── default.conf
圧縮します。
$ zip -r apps.zip Dockerrun.aws.json node-app1 node-app2 proxy
5. デプロイ
AWS Elastic Beanstalk コンソールからアプリケーションを作成。
| 項目 | 入力値 |
|---|---|
| 環境 | ウェブサーバー環境 |
| アプリケーション名 | 任意 |
| プラットフォーム | Multi-container Docker |
| アプリケーションコード | 作成した apps.zip をアップロード |
表には記載していませんが、[さらにオプションを設定] → [セキュリティ] → [キーペア]を設定すると、
ホストに SSH で入れるようになります。
6. 完成!
作成後、無事ブラウザからアクセスできました。
http://******.elasticbeanstalk.com/first
http://******.elasticbeanstalk.com/second
EC2 Container Service のコンソール画面から確認。

SSH でホストに入って確認。
$ sudo docker ps

感想
以外にすんなり動きました。
最初に作成する際は、docker compose でやってみると、前もって動作確認ができるのと、Dockerrun.aws.json も作成しやすくなるのでいいです。
リソースの問題などいろいろ考慮する必要があると思うので、実際に使えるかどうかは、まだなんとも。。
明日は、@kt3k@github さんです。
- 参考資料 amazon 開発者ガイド
- 作成したコード github