開発環境
- iOS9.2
- Swift2
- Xcode7.2
概要
ボタンを押した時などに表示されるアラートダイアログの基本的な書き方について記述します。
ポイント
- UIAlertControllerを使用する
- 各ボタンはUIAlertActionクラスを使用して作成する
- アラートの表示スタイルとしてAlert/ActionSheetがある
- ボタンの表示スタイルとしてdefault/cancel/destructiveがある
- クロージャ(closure)でボタンを押した時の処理を書く
アラートを表示(Alert/ActionSheet)
表示スタイル:Alert
ダイアログ風のアラートが表示する
Display
 ### Swift Code
```swift:AlertController.swift
// ボタンを押下した時にアラートを表示するメソッド
@IBAction func dispAlert(sender: UIButton) {
// ① UIAlertControllerクラスのインスタンスを生成
// タイトル, メッセージ, Alertのスタイルを指定する
// 第3引数のpreferredStyleでアラートの表示スタイルを指定する
let alert: UIAlertController = UIAlertController(title: "アラート表示", message: "保存してもいいですか?", preferredStyle:  UIAlertControllerStyle.Alert)

// ② Actionの設定
// Action初期化時にタイトル, スタイル, 押された時に実行されるハンドラを指定する
// 第3引数のUIAlertActionStyleでボタンのスタイルを指定する
// OKボタン
let defaultAction: UIAlertAction = UIAlertAction(title: "OK", style: UIAlertActionStyle.Default, handler:{
    // ボタンが押された時の処理を書く(クロージャ実装)
    (action: UIAlertAction!) -> Void in
    print("OK")
})
// キャンセルボタン
let cancelAction: UIAlertAction = UIAlertAction(title: "キャンセル", style: UIAlertActionStyle.Cancel, handler:{
    // ボタンが押された時の処理を書く(クロージャ実装)
    (action: UIAlertAction!) -> Void in
    print("Cancel")
})

// ③ UIAlertControllerにActionを追加
alert.addAction(cancelAction)
alert.addAction(defaultAction)

// ④ Alertを表示
presentViewController(alert, animated: true, completion: nil)
}
## 表示スタイル:ActionSheet
画面下部から出てくるアラートが表示する
### Display
<img width="375" alt="ActionSheet_Disp.png" src="https://qiita-image-store.s3.amazonaws.com/0/79137/d2ad3604-d7c0-ad94-767b-d5a72881e0c5.png">
### Swift Code
UIAlertControllerクラスのインスタンス生成時に、第3引数のpreferredStyleにActionSheetを指定する。(その他のコードは「表示スタイル:Alert」と同じ)

```swift:AlertController.swift
let alert: UIAlertController = UIAlertController(title: "アラート表示", message: "保存してもいいですか?", preferredStyle:  UIAlertControllerStyle.ActionSheet)
ボタンのスタイルについて
以下の3タイプが指定できる
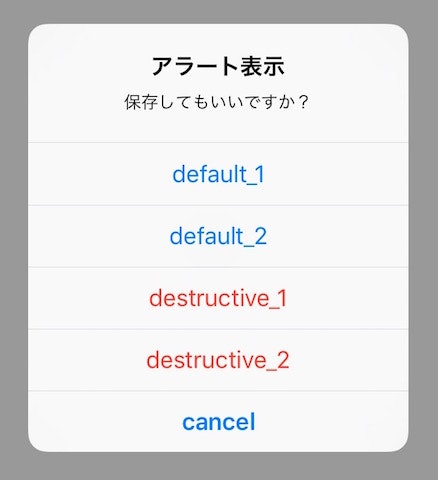
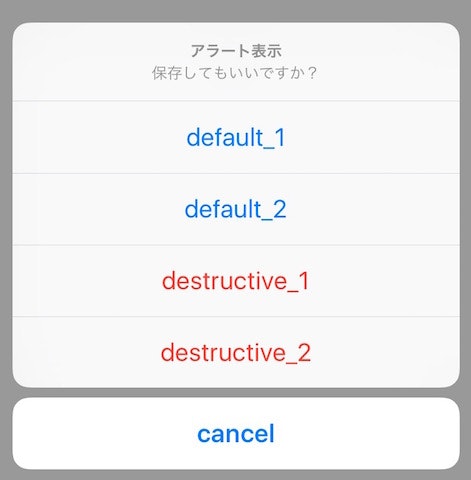
| UIAlertActionStyle | 説明 |
|---|---|
| default | 文字:標準/複数指定可 |
| cancel | 文字:ボールド/複数指定不可/最下部に位置固定 |
| destructive | 文字:赤文字/複数指定可 |
Display(表示スタイル:Alert)
Display(表示スタイル:ActionSheet)
Swift Code
// Defaultボタン
let defaultAction_1: UIAlertAction = UIAlertAction(title: "default_1", style: UIAlertActionStyle.Default, handler:{
    (action: UIAlertAction!) -> Void in
    print("defaultAction_1")
})
let defaultAction_2: UIAlertAction = UIAlertAction(title: "default_2", style: UIAlertActionStyle.Default, handler:{
    (action: UIAlertAction!) -> Void in
    print("defaultAction_2")
})

// Cancelボタン
let cancelAction: UIAlertAction = UIAlertAction(title: "cancel", style: UIAlertActionStyle.Cancel, handler:{
    (action: UIAlertAction!) -> Void in
    print("cancelAction")
})

// Destructiveボタン
let destructiveAction_1: UIAlertAction = UIAlertAction(title: "destructive_1", style: UIAlertActionStyle.Destructive, handler:{
    (action: UIAlertAction!) -> Void in
    print("destructiveAction_1")
})
let destructiveAction_2: UIAlertAction = UIAlertAction(title: "destructive_2", style: UIAlertActionStyle.Destructive, handler:{
    (action: UIAlertAction!) -> Void in
    print("destructiveAction_2")
})
ボタンアクションはクロージャ(closure)で処理
Swift Code
AlertController.swift
let defaultAction: UIAlertAction = UIAlertAction(title: "OK", style: UIAlertActionStyle.Default, handler:{
    // ボタンが押された時の処理を書く(クロージャ実装)
    (action: UIAlertAction!) -> Void in
    print("OK")
})
今回は単純に、ボタンが押された時"OK"という文字列をコンソールに出力します。
また別の機会にクロージャについては書ければと思ってますが、最低限だけ触れておくと、クロージャとは、一言で言えば「名無しの関数式」のことであり、基本的な書き方は以下となります。
{(引数: 引数の型) -> (戻り値の型) in
    // 処理
}

