内容
Angular2のチュートリアルをやってみました~
The Hero Editorからやり始めました.URLはこちらです.
間違いなどがありましたら教えていただけると幸いです.
徐々に追記していきます.
The Hero Editor - 2016/04/04
Master/Detail - 2016/04/04 23:05
Multiple Components - 2016/04/05 12:37
Services - 2016/04/09 17:45
環境
- CentOS 7.0
- vagrant 1.8.1
- npm 3.7.3
- node 5.8.0
The Hero Editor
まず初めに初期のプロジェクトを提供してくださっているので,GitHubからCloneします.このプロジェクトはUpdateする予定はないので.gitフォルダは削除してくださいとのことです.
> git clone  https://github.com/angular/quickstart angular2-tutorial
> cd angular2-tutorial
> rm -rf .git
その後,npm installでpackage.jsonに書かれているものをインストールを行います.
> npm install
ひとまず動かしてみよう
さて実際に書いていきます.まず初めに./app/app.component.tsを以下のように編集します.
import {Component} from 'angular2/core';

@Component({
    selector: 'my-app',
    template: '<h1>{{title}}</h1><h2>{{hero}} details!</h2>'
})

export class AppComponent {
    title = 'Tour of Heroes';
    hero = 'windstorm';
}
まず初めに,import {Component} from 'angular2/core';についてですが,
Here we import the Angular Component decorator function from the main Angular library module because we need it to define our component.
こういうことらしいです.私たちのComponentを定義するためにメインのAngularのライブラリからimportするっぽい.
@Component({})内には,AngularJSで言うDirectiveの中に書いている情報を書くみたい.
angular.module("app").directive("hogeDirective", function() {
  return {
    restrict: "E",
    template: '<h1>hell world</h1>',
    // etc...
  };
});
またclassに関しては,@Component内のtitleとheroに関連しています.
さて一回実行してみましょう.
> npm start
そうするとこのような表示がされます.

Heroオブジェクトの作成
最終的なコードは以下のようになります.
import {Component} from 'angular2/core';

export class Hero{
    id: number;
    name: string;
}

@Component({
    selector: 'my-app',
    template: '<h1>{{title}}</h1><h2>{{hero.name}} details!</h2>'
})

export class AppComponent {
    title = 'Tour of Heroes';
    hero: Hero = {
        id: 1,
        name: 'windstorm'
    };
}
それでは説明します.
先ほどのAppComponentクラスのheroにはnameの情報のみ保持しています.その他にid属性をつけたい場合はこのようにします.
- idとnameプロパティを持つHeroクラスを定義(C言語で言う構造体みたいなもの)
- Heroクラスをpropertyとしてid = 1, name = 'Windstorm'として初期化し,利用
- 変数heroにはidとname属性があるので,nameを表示させたい場合は,templateのheroをhero.nameとする.
export class Hero {
  id: number;
  name: string;
}
hero: Hero = {
  id: 1,
  name: 'Windstorm'
};
template: '<h1>{{title}}</h1><h2>{{hero.name}} details!</h2>'
これを実行すると先ほどと同じ実行結果となります.
templateのHTMLを増やしてみる
先ほどのtemplateをこのように変えてみましょう.
template: '<h1>{{title}}</h1><h2>{{hero.name}} details!</h2><div><label>id: </label>{{hero.id}}</div><div><label>name: </label>{{hero.name}}</div>'
あら・・・一行で書くとアレですね・・・てことで複数行で書きたい場合は``(バッククオート)で囲むと複数行にわたって書くことが出来ます.
template:`
  <h1>{{title}}</h1>
  <h2>{{hero.name}} details!</h2>
  <div><label>id: </label>{{hero.id}}</div>
  <div><label>name: </label>{{hero.name}}</div>
  `
実行するとこのようになります.

双方向バインディング
次に双方向バインディングについてです.まず初めにtemplate部分を以下のように変更します.
template:`
  <h1>{{title}}</h1>
  <h2>{{hero.name}} details!</h2>
  <div><label>id: </label>{{hero.id}}</div>
  <div>
    <label>name: </label>
    <input [(ngModel)]="{{hero.name}}" placeholder="name">
  </div>
  `
Angular1系だとng-modelでしたが,2系になると[(ngModel)]となります.また,単方向バインディングをしたい場合は,(ngModel)とすればよいみたいです.
これを実行するとこのようになります.

HTMLのinputのところを変化させるとh2タグに囲まれたところも変化していることが確認できると思います.
最終的なコードは以下のようになりました.
import {Component} from 'angular2/core';
export class Hero {
  id: number;
  name: string;
}
@Component({
  selector: 'my-app',
  template:`
    <h1>{{title}}</h1>
    <h2>{{hero.name}} details!</h2>
    <div><label>id: </label>{{hero.id}}</div>
    <div>
      <label>name: </label>
      <input [(ngModel)]="hero.name" placeholder="name">
    </div>
    `
})
export class AppComponent {
  title = 'Tour of Heroes';
  hero: Hero = {
    id: 1,
    name: 'Windstorm'
  };
}
Master/Detail
次はngForやngIfなど,Angular2の詳細に少し踏み入れていきます.では先ほどのコードを基に書き加えていきます.
先ほどは,Heroがid: 1, name: windstormと1名であるが,今回は複数名の場合を考えます../app/app.component.tsの一番下にHeroのリストを定義します.
var HEROES: Hero[] = [
  { "id": 11, "name": "Mr. Nice" },
  { "id": 12, "name": "Narco" },
  { "id": 13, "name": "Bombasto" },
  { "id": 14, "name": "Celeritas" },
  { "id": 15, "name": "Magneta" },
  { "id": 16, "name": "RubberMan" },
  { "id": 17, "name": "Dynama" },
  { "id": 18, "name": "Dr IQ" },
  { "id": 19, "name": "Magma" },
  { "id": 20, "name": "Tornado" }
];
Hero[]と大括弧を付けることで配列になります.
次にAppComponentに定義したHEROESの情報をheroesに渡します.
export class AppComponent {
    title = 'Tour of Heroes';
    //追記
    public heroes = HEROES;
}
Displaying Our Heroes
次に,変数heroesが持っているHeroの複数人のデータを表示するHTMLを作成します.
@Component({
    selector: 'my-app',
    template: `
        <h1>Tour of Heroes</h1>
        <h2>My Heroes</h2>
        <ul class="heroes">
            <li *ngFor="#hero of heroes">
                <!-- each hero goes here -->
                <span class="badge">{{hero.id}}</span> {{hero.name}}
            </li>
        </ul>
    `
});
ngForの前にある*に関しては,こう説明されています.
The (*) prefix to ngFor indicates that the
element and its children constitute a master template.
li要素とその子要素はマスターテンプレートを構成することを示すらしい.#heroに関しては,ローカル変数heroであることを示している.このローカル変数を用いて{{hero.id}}と{{hero.name}}と書いています.
また,ngForのテンプレートとしてこのような感じらしい.詳しくはこちらを参照していただきたい.
<li *ngFor="#item of items; #i = index">...</li>

<li template="ngFor #item of items; #i = index">...</li>

<template ngFor #item [ngForOf]="items" #i="index"><li>...</li></template>
次は,Heroのリストを表示するのにCSSで表示を綺麗にするために,@Componentにstyleを追記しましょう.
@Component({
  selector: 'my-app',
  template:`
    <h1>{{title}}</h1>
    <h2>My Heroes</h2>
    <ul class="heroes">
      <li *ngFor="#hero of heroes">
        <span class="badge">{{hero.id}}</span> {{hero.name}}
      </li>
    </ul>
  `,
  styles:[`
    .selected {
      background-color: #CFD8DC !important;
      color: white;
    }
    .heroes {
      margin: 0 0 2em 0;
      list-style-type: none;
      padding: 0;
      width: 15em;
    }
    .heroes li {
      cursor: pointer;
      position: relative;
      left: 0;
      background-color: #EEE;
      margin: .5em;
      padding: .3em 0;
      height: 1.6em;
      border-radius: 4px;
    }
    .heroes li.selected:hover {
      background-color: #BBD8DC !important;
      color: white;
    }
    .heroes li:hover {
      color: #607D8B;
      background-color: #DDD;
      left: .1em;
    }
    .heroes .text {
      position: relative;
      top: -3px;
    }
    .heroes .badge {
      display: inline-block;
      font-size: small;
      color: white;
      padding: 0.8em 0.7em 0 0.7em;
      background-color: #607D8B;
      line-height: 1em;
      position: relative;
      left: -1px;
      top: -4px;
      height: 1.8em;
      margin-right: .8em;
      border-radius: 4px 0 0 4px;
    }
  `]
})
現在のコードはこのようになっていると思います.
import {Component} from 'angular2/core';

export class Hero{
    id: number;
    name: string;
}

@Component({
    selector: 'my-app',
    template: `
        <h1>Tour of Heroes</h1>
        <h2>My Heroes</h2>
        <ul class="heroes">
            <li *ngFor="#hero of heroes">
                <!-- each hero goes here -->
                <span class="badge">{{hero.id}}</span> {{hero.name}}
            </li>
        </ul>
        `,
    styles:[`
            .selected {
                background-color: #CFD8DC !important;
                color: white;
            }
            .heroes {
                margin: 0 0 2em 0;
                list-style-type: none;
                padding: 0;
                width: 15em;
            }
            .heroes li {
                cursor: pointer;
                position: relative;
                left: 0;
                background-color: #EEE;
                margin: .5em;
                padding: .3em 0;
                height: 1.6em;
                border-radius: 4px;
            }
            .heroes li.selected:hover {
                background-color: #BBD8DC !important;
                color: white;
            }
            .heroes li:hover {
                color: #607D8B;
                background-color: #DDD;
                left: .1em;
            }
            .heroes .text {
                position: relative;
                top: -3px;
            }
            .heroes .badge {
                display: inline-block;
                font-size: small;
                color: white;
                padding: 0.8em 0.7em 0 0.7em;
                background-color: #607D8B;
                line-height: 1em;
                position: relative;
                left: -1px;
                top: -4px;
                height: 1.8em;
                margin-right: .8em;
                border-radius: 4px 0 0 4px;
            }
        `]
})
export class AppComponent {
    title = 'Tour of Heroes';
    public heroes = HEROES;
}

var HEROES: Hero[] = [
  { "id": 11, "name": "Mr. Nice" },
  { "id": 12, "name": "Narco" },
  { "id": 13, "name": "Bombasto" },
  { "id": 14, "name": "Celeritas" },
  { "id": 15, "name": "Magneta" },
  { "id": 16, "name": "RubberMan" },
  { "id": 17, "name": "Dynama" },
  { "id": 18, "name": "Dr IQ" },
  { "id": 19, "name": "Magma" },
  { "id": 20, "name": "Tornado" }
];
では実行してみると以下のようになります.

Selecting a Hero
次はリスト表示されているHeroリストを選択すると,選択したHeroの情報を表示するプログラムを作成します.まず,
タグをクリックした場合任意の関数を実行するように(click)="onSelect(hero)"を追加します.heroは選択されたHeroの情報が引数として書かれています.
<li *ngFor="#hero of heroes" (click)="onSelect(hero)">
  <span class="badge">{{hero.id}}</span> {{hero.name}}
</li>
次にAppComponent内で,選択されたHeroの情報を保持するselectedHeroをHeroの型で定義します.また,Webを見ているユーザがHeroを選択する前にselectedHeroを初期化するべきではないので,選択された場合に実行されるonSelect関数を定義します.
export class AppComponent {
    title = 'Tour of Heroes';
    public heroes = HEROES;
    //追記
    selectedHero: Hero;
    //追記
    onSelect(hero: Hero) { this.selectedHero = hero; }
}
選択されたHeroがonSelect関数で取得できた後は,そのデータを表示させるだけです.template部分を以下のようにします.
template: `
        <h1>Tour of Heroes</h1>
        <h2>My Heroes</h2>
        <ul class="heroes">
            <li *ngFor="#hero of heroes" (click)="onSelect(hero)">
                <!-- each hero goes here -->
                <span class="badge">{{hero.id}}</span> {{hero.name}}
            </li>
        </ul>
        <!-- 追記 -->
        <div *ngIf="selectedHero">
            <h2>{{selectedHero.name}} details!</h2>
            <div><label>id: </label>{{selectedHero.id}}</div>
            <div>
                <label>name: </label>
                <input [(ngModel)]="selectedHero.name" placeholder="name">
            </div>
        </div>
まず初めはselectedHeroには何も選択されていないので,*ngIfで値の確認を行います.その後,選択された場合onSelect(hero: Hero) { this.selectedHero = hero; }が実行され,selectedHeroに値が入るので,その値(Heroのid, name)を表示させます.また,[(ngModel)]="selectedHero.name"とすることで双方向バインディングが出来ます.
選択されたHeroのclass属性にchecked追加
選択されたHeroのclass属性にcheckedを追加させる場合は,
タグに[class.selected]="hero === selectedHero"を追記することで出来ます.
今の./app/app.component.tsはこのようになってると思います.
import {Component} from 'angular2/core';

export class Hero{
    id: number;
    name: string;
}

@Component({
    selector: 'my-app',
    template: `
        <h1>Tour of Heroes</h1>
        <h2>My Heroes</h2>
        <ul class="heroes">
            <li *ngFor="#hero of heroes" [class.selected]="hero === selectedHero" (click)="onSelect(hero)">
                <!-- each hero goes here -->
                <span class="badge">{{hero.id}}</span> {{hero.name}}
            </li>
        </ul>
        <div *ngIf="selectedHero">
            <h2>{{selectedHero.name}} details!</h2>
            <div><label>id: </label>{{selectedHero.id}}</div>
            <div>
                <label>name: </label>
                <input [(ngModel)]="selectedHero.name" placeholder="name">
            </div>
        </div>
        `,
    styles:[`
            .selected {
                background-color: #CFD8DC !important;
                color: white;
            }
            .heroes {
                margin: 0 0 2em 0;
                list-style-type: none;
                padding: 0;
                width: 15em;
            }
            .heroes li {
                cursor: pointer;
                position: relative;
                left: 0;
                background-color: #EEE;
                margin: .5em;
                padding: .3em 0;
                height: 1.6em;
                border-radius: 4px;
            }
            .heroes li.selected:hover {
                background-color: #BBD8DC !important;
                color: white;
            }
            .heroes li:hover {
                color: #607D8B;
                background-color: #DDD;
                left: .1em;
            }
            .heroes .text {
                position: relative;
                top: -3px;
            }
            .heroes .badge {
                display: inline-block;
                font-size: small;
                color: white;
                padding: 0.8em 0.7em 0 0.7em;
                background-color: #607D8B;
                line-height: 1em;
                position: relative;
                left: -1px;
                top: -4px;
                height: 1.8em;
                margin-right: .8em;
                border-radius: 4px 0 0 4px;
            }
        `]
})
export class AppComponent {
    title = 'Tour of Heroes';
    public heroes = HEROES;
    selectedHero: Hero;

    onSelect(hero: Hero) { this.selectedHero = hero; }
}

var HEROES: Hero[] = [
  { "id": 11, "name": "Mr. Nice" },
  { "id": 12, "name": "Narco" },
  { "id": 13, "name": "Bombasto" },
  { "id": 14, "name": "Celeritas" },
  { "id": 15, "name": "Magneta" },
  { "id": 16, "name": "RubberMan" },
  { "id": 17, "name": "Dynama" },
  { "id": 18, "name": "Dr IQ" },
  { "id": 19, "name": "Magma" },
  { "id": 20, "name": "Tornado" }
];
さて実行してみます.
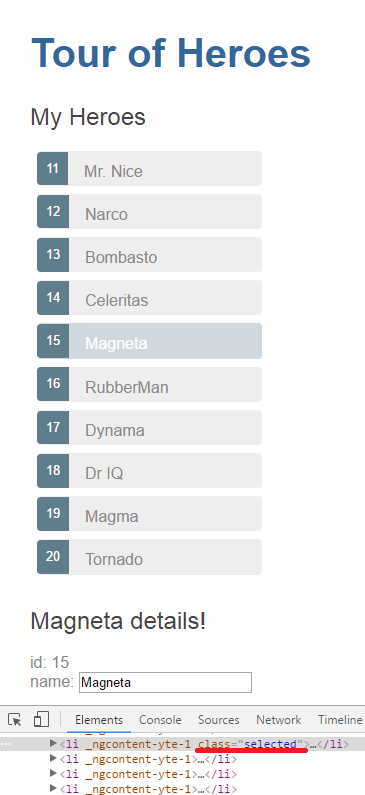
ちゃんと動いているようですね.
Multiple Components
選択されたらHeroの詳細を表示するHTML部分を同じapp.component.tsにまとめて書いていました.出来るだけComponentに分けたほうが良いため,今回は選択された時に表示するComponentを作成し,分割します.
まず,Heroの詳細を表示する./app/hero-detail.component.tsファイルを作成します.
import {Component, Input} from 'angular2/core';

@Component({
  selector: 'my-hero-detail',
  template: `
    <div *ngIf="hero">
      <h2>{{hero.name}} details!</h2>
      <div><label>id: </label>{{hero.id}}</div>
      <div>
        <label>name: </label>
        <input [(ngModel)]="hero.name" placeholder="name"/>
      </div>
    </div>
  `
})
export class HeroDetailComponent {
   hero: Hero;
}
selectorのmy-hero-detailは,このComponentを利用するところに<my-hero-detail></my-hero-detail>と書くとtemplate部分が利用できます.
また,app.component.tsのtemplate部分に書いていた選択された場合に表示するHTMLをhero-detail.component.tsのtemplateに移動させます.
そしてHeroDetailComponentには,@Componentのtemplate部分に書いているheroの変数を定義します.
Heroクラスのファイル作成及びそのファイルのインポート
次に,app.component.tsに書いていたHeroクラスをファイルに分割し,作成します.
export class Hero {
  id: number;
  name: string;
}
このクラスを利用するために,hero-detail.component.tsとapp.component.tsでは,このファイルをimportします.方法としては,以下のコードをimport {Component, Input} from 'angular2/core';の次の行に追記します.
import {Hero} from './hero';
hero-detail.component.tsの利用
次は,app.component.tsに作成したhero-detail.component.tsを利用します.app.component.tsのコードを以下に示します.
import {Component} from 'angular2/core';
import {Hero} from './hero';
//追記
import {HeroDetailComponent} from './hero-detail.component';

@Component({
  selector: 'my-app',
  template:`
    <h1>{{title}}</h1>
    <h2>My Heroes</h2>
    <ul class="heroes">
      <li *ngFor="#hero of heroes"
        [class.selected]="hero === selectedHero"
        (click)="onSelect(hero)">
        <span class="badge">{{hero.id}}</span> {{hero.name}}
      </li>
    </ul>
    <!-- 追記 -->
    <my-hero-detail [hero]="selectedHero"></my-hero-detail>
  `,
  styles:[`
    .selected {
      background-color: #CFD8DC !important;
      color: white;
    }
    .heroes {
      margin: 0 0 2em 0;
      list-style-type: none;
      padding: 0;
      width: 15em;
    }
    .heroes li {
      cursor: pointer;
      position: relative;
      left: 0;
      background-color: #EEE;
      margin: .5em;
      padding: .3em 0;
      height: 1.6em;
      border-radius: 4px;
    }
    .heroes li.selected:hover {
      background-color: #BBD8DC !important;
      color: white;
    }
    .heroes li:hover {
      color: #607D8B;
      background-color: #DDD;
      left: .1em;
    }
    .heroes .text {
      position: relative;
      top: -3px;
    }
    .heroes .badge {
      display: inline-block;
      font-size: small;
      color: white;
      padding: 0.8em 0.7em 0 0.7em;
      background-color: #607D8B;
      line-height: 1em;
      position: relative;
      left: -1px;
      top: -4px;
      height: 1.8em;
      margin-right: .8em;
      border-radius: 4px 0 0 4px;
    }
  `],
  //追記
  directives: [HeroDetailComponent]
})
export class AppComponent {
  title = 'Tour of Heroes';
  heroes = HEROES;
  selectedHero: Hero;

  onSelect(hero: Hero) { this.selectedHero = hero; }
}

var HEROES: Hero[] = [
  { "id": 11, "name": "Mr. Nice" },
  { "id": 12, "name": "Narco" },
  { "id": 13, "name": "Bombasto" },
  { "id": 14, "name": "Celeritas" },
  { "id": 15, "name": "Magneta" },
  { "id": 16, "name": "RubberMan" },
  { "id": 17, "name": "Dynama" },
  { "id": 18, "name": "Dr IQ" },
  { "id": 19, "name": "Magma" },
  { "id": 20, "name": "Tornado" }
];
まず,hero-detail.component.tsのHeroDetailComponentクラスを利用するためにimport {HeroDetailComponent} from './hero-detail.component';を追記し,importします.その後,選択されたHeroの詳細を表示するHTMLを削除し,代わりに<my-hero-detail [hero]="selectedHero"></my-hero-detail>を書きます.[hero]="selectedHero"は,heroの変数にselectedHeroの値を渡しています.渡された値を用いてhero-detail.component.tsで処理します.
directives: [HeroDetailComponent]に関しては,HeroDetailComponentを使いますよーってことを知らせています.
app.component.tsからの値を取得
hero-detail.component.tsは<my-hero-detail [hero]="selectedHero"></my-hero-detail>により,app.component.tsから値が渡されます.それを利用するには,HeroDetailComponentクラスに@Input()を追記します.
export class HeroDetailComponent {
  @Input()
  hero: Hero;
}
これでheroには,app.component.tsから渡されたデータが格納されます.今回Multiple Componentsで作成/編集したファイルこのようになります.
import {Component} from 'angular2/core';
import {Hero} from './hero';
import {HeroDetailComponent} from './hero-detail.component';
@Component({
  selector: 'my-app',
  template:`
    <h1>{{title}}</h1>
    <h2>My Heroes</h2>
    <ul class="heroes">
      <li *ngFor="#hero of heroes"
        [class.selected]="hero === selectedHero"
        (click)="onSelect(hero)">
        <span class="badge">{{hero.id}}</span> {{hero.name}}
      </li>
    </ul>
    <my-hero-detail [hero]="selectedHero"></my-hero-detail>
  `,
  styles:[`
    .selected {
      background-color: #CFD8DC !important;
      color: white;
    }
    .heroes {
      margin: 0 0 2em 0;
      list-style-type: none;
      padding: 0;
      width: 15em;
    }
    .heroes li {
      cursor: pointer;
      position: relative;
      left: 0;
      background-color: #EEE;
      margin: .5em;
      padding: .3em 0;
      height: 1.6em;
      border-radius: 4px;
    }
    .heroes li.selected:hover {
      background-color: #BBD8DC !important;
      color: white;
    }
    .heroes li:hover {
      color: #607D8B;
      background-color: #DDD;
      left: .1em;
    }
    .heroes .text {
      position: relative;
      top: -3px;
    }
    .heroes .badge {
      display: inline-block;
      font-size: small;
      color: white;
      padding: 0.8em 0.7em 0 0.7em;
      background-color: #607D8B;
      line-height: 1em;
      position: relative;
      left: -1px;
      top: -4px;
      height: 1.8em;
      margin-right: .8em;
      border-radius: 4px 0 0 4px;
    }
  `],
  directives: [HeroDetailComponent]
})
export class AppComponent {
  title = 'Tour of Heroes';
  heroes = HEROES;
  selectedHero: Hero;
  onSelect(hero: Hero) { this.selectedHero = hero; }
}
var HEROES: Hero[] = [
  { "id": 11, "name": "Mr. Nice" },
  { "id": 12, "name": "Narco" },
  { "id": 13, "name": "Bombasto" },
  { "id": 14, "name": "Celeritas" },
  { "id": 15, "name": "Magneta" },
  { "id": 16, "name": "RubberMan" },
  { "id": 17, "name": "Dynama" },
  { "id": 18, "name": "Dr IQ" },
  { "id": 19, "name": "Magma" },
  { "id": 20, "name": "Tornado" }
];
import {Component, Input} from 'angular2/core';
import {Hero} from './hero';
@Component({
  selector: 'my-hero-detail',
  template: `
    <div *ngIf="hero">
      <h2>{{hero.name}} details!</h2>
      <div><label>id: </label>{{hero.id}}</div>
      <div>
        <label>name: </label>
        <input [(ngModel)]="hero.name" placeholder="name"/>
      </div>
    </div>
  `
})
export class HeroDetailComponent {
  @Input()
  hero: Hero;
}
export class Hero {
  id: number;
  name: string;
}
これで実行してみるとこのようになります.

Master/Detailで作成したものと同じものが表示されていればComponentの分割は成功しています.
Services
この章では,Heroのデータを提供するServiceとしてapp.component.tsから分割を行います.
HeroServiceの作成
他にHeroServiceをimportするためのHeroServiceを作成します.
Angularの1系やったことがある人は分かると思いますが,DI(Dependency Injection)をするためにimport {Injectable} from 'angular2/core';を記述します.また,Heroのデータを取得する関数getHeroes()を定義します.
import {Injectable} from 'angular2/core';

@Injectable()
export class HeroService {
   getHeroes(){
   }
}
mockデータの作成
次は,app.component.tsに記述していたHeroのデータをmock-heroes.tsに移します.
import {Hero} from './hero';
export var HEROES: Hero[] = [
    {"id": 11, "name": "Mr. Nice"},
    {"id": 12, "name": "Narco"},
    {"id": 13, "name": "Bombasto"},
    {"id": 14, "name": "Celeritas"},
    {"id": 15, "name": "Magneta"},
    {"id": 16, "name": "RubberMan"},
    {"id": 17, "name": "Dynama"},
    {"id": 18, "name": "Dr IQ"},
    {"id": 19, "name": "Magma"},
    {"id": 20, "name": "Tornado"}
];
mockデータの利用
hero.service.tsはimport {HEROES} from './mock-heroes';を追記し,mock-heroes.tsのHEROESからデータを取得します.またhero.service.tsの関数getHeroesはHeroのデータを返す機能を付けます.データの取得の際には,Promiseを利用します.
//追加(HEROESのインポート)
import {HEROES} from './mock-heroes';
import {Injectable} from 'angular2/core';

@Injectable()
export class HeroService {
  getHeroes() {
    return Promise.resolve(HEROES);
  }
}
app.component.ts側もServiceを利用する準備をしましょう.まず,Serviceを利用するためにimportをする必要がありますので,app.component.tsの先頭の方に以下を追記しましょう.
import {Component} from 'angular2/core';
import {Hero} from './hero';
import {HeroDetailComponent} from './hero-detail.component';
//追加
import {HeroService} from './hero.service';
また,heroesの型をHero[]にして,Heroのデータを受け取る用意をしましょう.
export class AppComponent {
  title = 'Tour of Heroes';
  //変更
  heroes: Hero[];
  selectedHero: Hero;

  onSelect(hero: Hero) { this.selectedHero = hero; }
}
ServiceのInjection
次は,ServiceのInjectionを行います.利用側では以下のことを行います.
- コンストラクタを作成
- metadataとしてcomponentにprovidersを追記し,利用するServiceの明示
この2つのことを行ったapp.component.tsは以下のようになります.
import {Component} from 'angular2/core';
import {Hero} from './hero';
import {HeroDetailComponent} from './hero-detail.component';
import {HeroService} from './hero.service';

@Component({
  selector: 'my-app',
  template:`
    <h1>{{title}}</h1>
    <h2>My Heroes</h2>
    <ul class="heroes">
      <li *ngFor="#hero of heroes"
        [class.selected]="hero === selectedHero"
        (click)="onSelect(hero)">
        <span class="badge">{{hero.id}}</span> {{hero.name}}
      </li>
    </ul>
    <my-hero-detail [hero]="selectedHero"></my-hero-detail>
  `,
  styles:[`
    .selected {
      background-color: #CFD8DC !important;
      color: white;
    }
    .heroes {
      margin: 0 0 2em 0;
      list-style-type: none;
      padding: 0;
      width: 15em;
    }
    .heroes li {
      cursor: pointer;
      position: relative;
      left: 0;
      background-color: #EEE;
      margin: .5em;
      padding: .3em 0;
      height: 1.6em;
      border-radius: 4px;
    }
    .heroes li.selected:hover {
      background-color: #BBD8DC !important;
      color: white;
    }
    .heroes li:hover {
      color: #607D8B;
      background-color: #DDD;
      left: .1em;
    }
    .heroes .text {
      position: relative;
      top: -3px;
    }
    .heroes .badge {
      display: inline-block;
      font-size: small;
      color: white;
      padding: 0.8em 0.7em 0 0.7em;
      background-color: #607D8B;
      line-height: 1em;
      position: relative;
      left: -1px;
      top: -4px;
      height: 1.8em;
      margin-right: .8em;
      border-radius: 4px 0 0 4px;
    }
  `],
  directives: [HeroDetailComponent],
  //プロバイダの追加
  providers: [HeroService]
})
export class AppComponent{
  title = 'Tour of Heroes';
  heroes: Hero[];
  selectedHero: Hero;
  //コンストラクタの追加
  constructor(private _heroService: HeroService) { }

  onSelect(hero: Hero) { this.selectedHero = hero; }
}
これでDIはひとまず完了です.次にデータを利用するためのメソッドを呼び出します.
データの取得
次は,HeroServiceからHeroのデータを取得します.HeroServiceにはgetHeroesメソッドを作成したのでgetHeroesメソッドを利用します.
 getHeroes() {
    return Promise.resolve(HEROES);
  }
これをapp.component.tsのAppComponentクラスから呼び出し,Heroのデータを取得するgetHeroes関数を作成します.
export class AppComponent{
  title = 'Tour of Heroes';
  heroes: Hero[];
  selectedHero: Hero;
  constructor(private _heroService: HeroService) { }
  //メソッドの追加
  getHeroes() {
    this._heroService.getHeroes().then(heroes => this.heroes = heroes);
  }
  onSelect(hero: Hero) { this.selectedHero = hero; }
}
メソッドを呼び出さなければ実行されないので,初期化したときに実行されるngOnInit関数を利用します.利用するには,import {OnInit} from 'angular2/core';を追加し,AppComponentクラスにはインタフェースのOninitをimplementsします.
それを行ったapp.component.tsを以下に示します.
//OnInitの追加
import {Component, OnInit} from 'angular2/core';
import {Hero} from './hero';
import {HeroDetailComponent} from './hero-detail.component';
import {HeroService} from './hero.service';
@Component({
  selector: 'my-app',
  template:`
    <h1>{{title}}</h1>
    <h2>My Heroes</h2>
    <ul class="heroes">
      <li *ngFor="#hero of heroes"
        [class.selected]="hero === selectedHero"
        (click)="onSelect(hero)">
        <span class="badge">{{hero.id}}</span> {{hero.name}}
      </li>
    </ul>
    <my-hero-detail [hero]="selectedHero"></my-hero-detail>
  `,
  styles:[`
    .selected {
      background-color: #CFD8DC !important;
      color: white;
    }
    .heroes {
      margin: 0 0 2em 0;
      list-style-type: none;
      padding: 0;
      width: 15em;
    }
    .heroes li {
      cursor: pointer;
      position: relative;
      left: 0;
      background-color: #EEE;
      margin: .5em;
      padding: .3em 0;
      height: 1.6em;
      border-radius: 4px;
    }
    .heroes li.selected:hover {
      background-color: #BBD8DC !important;
      color: white;
    }
    .heroes li:hover {
      color: #607D8B;
      background-color: #DDD;
      left: .1em;
    }
    .heroes .text {
      position: relative;
      top: -3px;
    }
    .heroes .badge {
      display: inline-block;
      font-size: small;
      color: white;
      padding: 0.8em 0.7em 0 0.7em;
      background-color: #607D8B;
      line-height: 1em;
      position: relative;
      left: -1px;
      top: -4px;
      height: 1.8em;
      margin-right: .8em;
      border-radius: 4px 0 0 4px;
    }
  `],
  directives: [HeroDetailComponent],
  providers: [HeroService]
})
//implements OnInitの追加
export class AppComponent implements OnInit {
  title = 'Tour of Heroes';
  heroes: Hero[];
  selectedHero: Hero;
  constructor(private _heroService: HeroService) { }
  getHeroes() {
    this._heroService.getHeroes().then(heroes => this.heroes = heroes);
  }
  //追加
  ngOnInit() {
    this.getHeroes();
  }
  onSelect(hero: Hero) { this.selectedHero = hero; }
}
今回作成/編集したファイルのhero.service.tsとmock-heroes.tsを以下に示します.
import {Injectable} from 'angular2/core';
import {Hero} from './hero';
import {HEROES} from './mock-heroes';
@Injectable()
export class HeroService {
  getHeroes() {
    return Promise.resolve(HEROES);
  }
  // See the "Take it slow" appendix
  getHeroesSlowly() {
    return new Promise<Hero[]>(resolve =>
      setTimeout(()=>resolve(HEROES), 2000) // 2 seconds
    );
  }
}
getHeroesSlowly関数は2秒後にデータ取得する処理です.
import {Hero} from './hero';
export var HEROES: Hero[] = [
    {"id": 11, "name": "Mr. Nice"},
    {"id": 12, "name": "Narco"},
    {"id": 13, "name": "Bombasto"},
    {"id": 14, "name": "Celeritas"},
    {"id": 15, "name": "Magneta"},
    {"id": 16, "name": "RubberMan"},
    {"id": 17, "name": "Dynama"},
    {"id": 18, "name": "Dr IQ"},
    {"id": 19, "name": "Magma"},
    {"id": 20, "name": "Tornado"}
];
さて実行してみましょう.Multiple Componentと同様の実行結果が得られたと思います.

参考文献
npm i angular2してHello World!するところまで
[初心者向け] Angular2からみるJSフレームワーク入門
AngularJS2 Tour of Heroesしてみる