RaspberryPiにA/D変換
なんと Raspberry PiにはA/D変換がない!(知らなかった、arduinoやbeagleboneにはあるのに…)ということで外付けのADCをSPIにぶら下げるまでの顛末。
作業は http://tightdev.net/SpiDev_Doc.pdf を参考に行う。
SPI on Raspberry Pi
MCP3002 - 10bit 2ch ADC
2CHのアナログ入力のある10bit SPI接続A/Dコンバータ。安い!(180円)。
2CHでは足りない人には8CHのMCP3008もあるけど、ブレッドボードの場所をとらないMCP3002で十分。
SPI driver
RaspberryPi上のSPI driverを有効にする。公式のSPIドキュメントにしたがってraspi-configを使うか、config.txtを書き換えてSPIを有効にする。
$ sudo vi /boot/config.txt
config.txt
# Uncomment some or all of these to enable the optional hardware interfaces
# dtparam=i2c_arm=on
# dtparam=i2s=on
dtparam=spi=on
$ sudo reboot
...
$ lsmod
Module                  Size  Used by
...
spi_bcm2708             5121  0
py-spidev
spi deviceを操作するpython module。https://github.com/doceme/py-spidev からソースコードを取得してインストールしておく。
$ git clone git://github.com/doceme/py-spidev
$ cd py-spidev
$ sudo python setup.py install
SPI経由でADCの値を読む
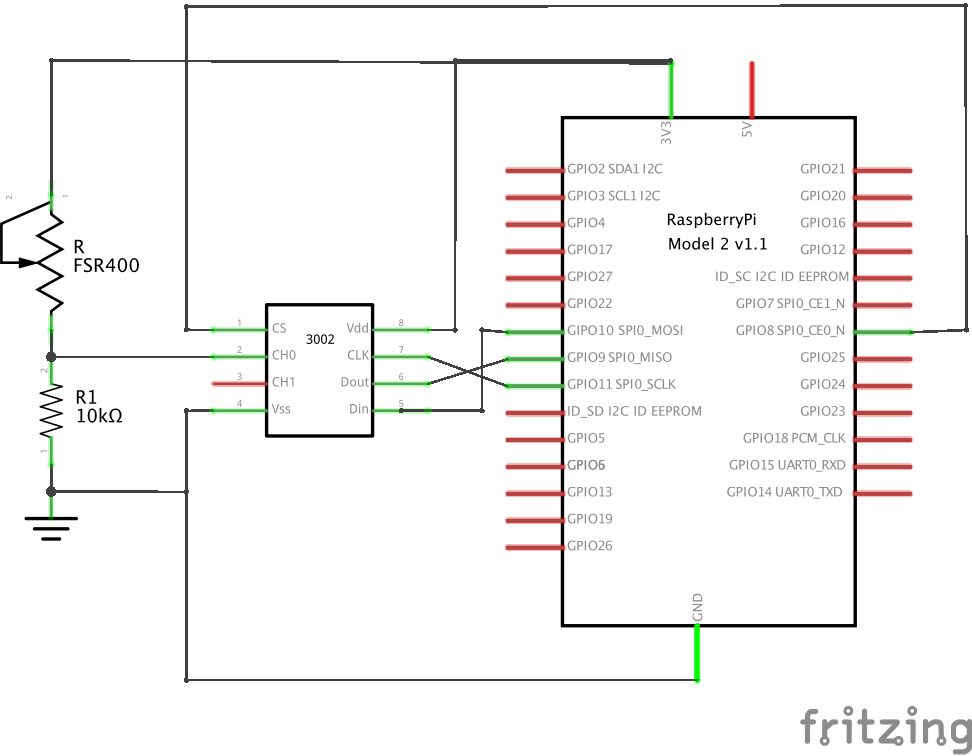
ADCテスト用回路
圧力センサーFSR400の抵抗値変化を読みだすテスト用回路。SPI0.0にMCP3002をつなぎ、MCP3002のchannel 0にセンサーを接続する。
Python Code
spidevを使ってMCP3002のアナログ値を1秒毎に読み出すpythonコード。
read_adc.py
# !/usr/bin/env python
# Read the analog sensor value via MCP3002.

import spidev
import time
import subprocess

# open SPI device 0.0
spi = spidev.SpiDev()
spi.open(0, 0)

try:
    while True:
        resp = spi.xfer2([0x68, 0x00])
        value = (resp[0] * 256 + resp[1]) & 0x3ff
        print value
        time.sleep(1)
except KeyboardInterrupt:
    spi.close()
実行中に圧力センサーを指で押すと値が増加する。
$ python read_adc.py
0
4
971
2
932
974
1
6