はじめに
この記事では,TOPPERS/R2CAによる NCES IoT Base Shield のGrove機能の使い方について説明します.
NCES IoT Base Shiledについてはこの記事を参照して下さい.
Grove Sytemについて
Grove Sytem はAruduinoのシールドに対して,各種センサやアクチュエータを簡単に着脱可能な環境です.100種類以上のモジュールがリリースされています.
各 Grove モジュールにはWikiページとArduinoライブラリが用意されており,容易に使うことが可能です.
必要なハードウェア
- Arduino M0 Pro
- NCES IoT Base Shield
- Grove Servo
- Grove - Ultrasonic Ranger
- Grove - OLED Display 1.12
- 無く場合は出力をSerialに出せばプログラムは動作します.
- Windows PC
- Windows7とWindows10で動作を確認しています.
- USB(microB)ケーブル
- ボードには付属していないので用意して下さい.
Grove Servo
ライブラリがすでにR2CAに入っている例として,Grove Servo について説明します.
ハードウェアセットアップ
M0にNCES IoT Base Shield を取り付けて,さらにGrove Servoを接続します.接続先はD2からD8のいずれかでよいですが,今回はD2に接続します.

ソフトウェアセットアップ
次にGrove ServoのWikiをチェックします.WikiによるとArduinoのServoプログラムで動作するとあります.
ライブラリはR2CAの以下の場所にあります.
- arduino_lib\libraries\Servo\
次のサンプルを動かしてみたいと思います.
- arduino_lib\libraries\Servo\examples\Sweep\Sweep.ino
まずexamples\Basicのフォルダを同じ階層にコピーして適当な名前に変更します(完成したものがNCESIoTとしてあります).次にr2ca_app.cpp の1行目以外をクリアして,Sweep.inoの内容をコピーします.
コードは次のようになっています.サーボを15m周期で一度ずつ移動させています.サーボの接続先がD2なので,myservo.attac(2)として指定します.
# include "r2ca.h"
/* Sweep
 by BARRAGAN <http://barraganstudio.com>
 This example code is in the public domain.

 modified 8 Nov 2013
 by Scott Fitzgerald
 http://arduino.cc/en/Tutorial/Sweep
*/

# include <Servo.h>

Servo myservo;  // create servo object to control a servo
                // twelve servo objects can be created on most boards

int pos = 0;    // variable to store the servo position

void setup()
{
  myservo.attach(2);  // attaches the servo on pin 9 to the servo object
}

void loop()
{
  for(pos = 0; pos <= 180; pos += 1) // goes from 0 degrees to 180 degrees
  {                                  // in steps of 1 degree
    myservo.write(pos);              // tell servo to go to position in variable 'pos'
    delay(15);                       // waits 15ms for the servo to reach the position
  }
  for(pos = 180; pos>=0; pos-=1)     // goes from 180 degrees to 0 degrees
  {
    myservo.write(pos);              // tell servo to go to position in variable 'pos'
    delay(15);                       // waits 15ms for the servo to reach the position
  }
}
次にサーボ用のライブラリをビルド対象とします.arduino_lib\libraries\Servo\以下のファイルをチェックして,ソースが置かれているフォルダと.c/.cppを examples\NCESIoT\Makefileに登録します.
Servoの場合,ファイルが置かれているフォルダが2個あるため,APPL_DIRにそれぞれのフォルダを登録します.コンパイル対象のファイルとしてはServo.cppがあるため,これをAPPL_CXXOBJSに登録します.
- examples\NCESIoT\Makefile
APPL_DIR     += $(R2CA_DIR)/arduino_lib/libraries/Servo/src/ $(R2CA_DIR)/arduino_lib/libraries/Servo/src/samd
APPL_CXXOBJS += Servo.o
APPL_COBJS   +=
最後にdo_make.batを実行するとビルドされ,do_run.batを実行するとプログラムが実行されます.サーボがプログラムの通りに動作するはずです.
Ultrasonic Ranger
次にライブラリをダウンロードする必要のあるUltrasonic Rangerを使います.
ハードウェアセットアップ
M0にNCES IoT Base Shield を取り付けて,さらにUltrasonic Rangerを接続します.接続先はD2からD8のいずれかでよいですが,今回はD3に接続します.

ソフトウェアセットアップ
次にUltrasonic RangerのWikiをチェックします.WikiによるとライブラリをGitからダウンロードする必要があるとのことです.
Gitにアクセスしてライブラリをダウンロードします.Gitのページの右側にあるDownload ZIPのリンクをクリックしてzipファイルをダウンロードします.
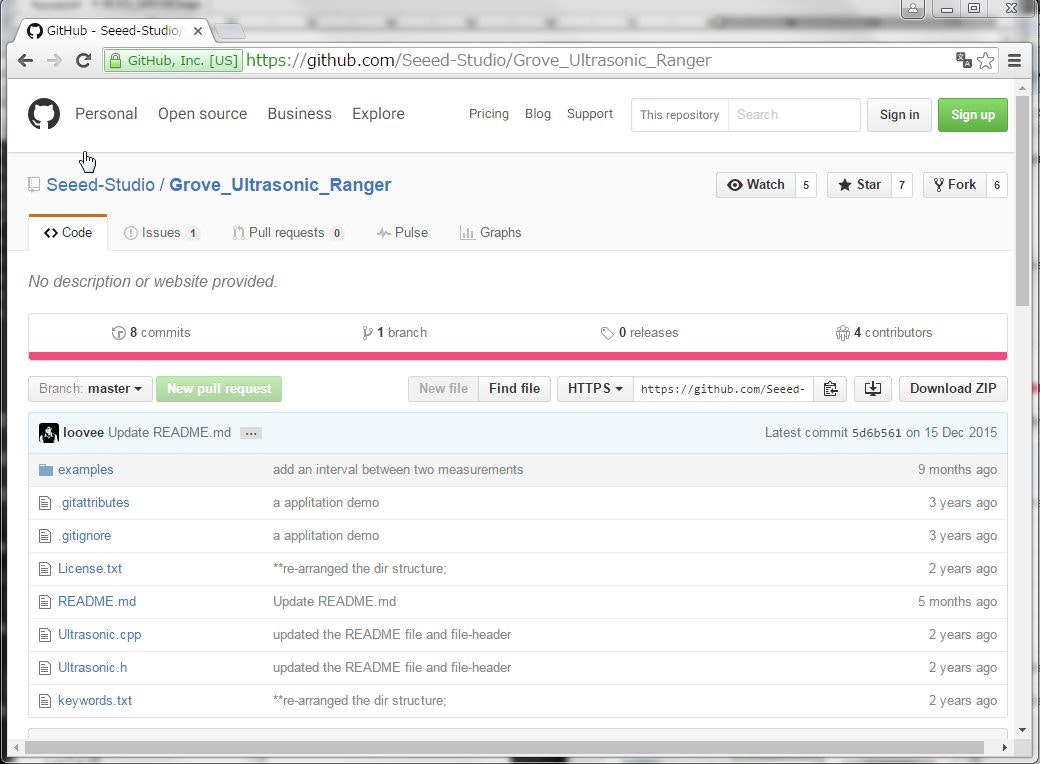
ダウンロード後に展開します.フォルダ名に"-master"が入っているためこれを取ります.最後にフォルダGrove_Ultrasonic_RangerをNCESIoTフォルダ以下にコピーします.
こちらも以下のサンプルをベースに動かします.
- example\NCESIot\Grove_Ultrasonic_Ranger\UltrasonicDisplayOnTerm\UltrasonicDisplayOnTerm.ino
Grove Servoで使用したr2ca_app.cppの1行目のみ残してUltrasonicDisplayOnTerm.ino の内容をコピーします.インチ出力は削除して,D3に接続しているので,Ultrasonic ultrasonic(3); として指定します.
# include "r2ca.h"


Ultrasonic ultrasonic(3);
void setup()
{
	Serial.begin(115200);
}
void loop()
{
	long RangeInCentimeters;
	RangeInCentimeters = ultrasonic.MeasureInCentimeters(); // two measurements should keep an interval
	Serial.print(RangeInCentimeters);//0~400cm
	Serial.println(" cm");
	delay(250);
}
次にUltora Sonic用のライブラリをビルド対象とします../Grove_Ultrasonic_Ranger以下のファイルをチェックして,ソースが置かれているフォルダと.c/.cppを examples\NCESIoT\Makefileに登録します.
Ultora Sonicの場合,./Grove_Ultrasonic_Rangerにファイルが置かれている
ため,APPL_DIRに登録します.コンパイル対象のファイルとしてはUltrasonic.cpp
があるため,これをAPPL_CXXOBJSに登録します.
APPL_DIR     += ./Grove_Ultrasonic_Ranger
APPL_CXXOBJS += Ultrasonic.o
APPL_COBJS   +=
最後にdo_make.batを実行するとビルドされ,do_run.batを実行するとプログラムが実行されます.サーボがプログラムの通りに動作するはずです.
Grove - OLED Display 1.12
Ultora Sonicで取得した値をOLEDに表示します.
ハードウェアセットアップ
M0にNCES IoT Base Shield を取り付けて,さらにUltrasonic RangerをD3に接続します.OLEDはI2C接続なので,I2Cと書いてあるコネクタのいずれかに接続します.

ソフトウェアセットアップ
上記と同様にOLEDのWikiにアクセスしてライブラリを取得します.
次にサンプルを参考にUltora Sonicの値をOLED表示するようにプログラムを書きます.
# include <Wire.h>
# include <SeeedGrayOLED.h>
# include <avr/pgmspace.h>
# include "Ultrasonic.h"

Ultrasonic ultrasonic(3);

void setup()
{
    Wire.begin();
    SeeedGrayOled.init();             //initialize SEEED OLED display
    SeeedGrayOled.clearDisplay();     //Clear Display.
    SeeedGrayOled.setNormalDisplay(); //Set Normal Display Mode
    SeeedGrayOled.setVerticalMode();  // Set to vertical mode for displaying text
}

void loop()
{
    long RangeInCentimeters;

    SeeedGrayOled.setTextXY(0,0);  //set Cursor to ith line, 0th column
    SeeedGrayOled.setGrayLevel(15); //Set Grayscale level. Any number between 0 - 15.
    RangeInCentimeters = ultrasonic.MeasureInCentimeters(); // two measurements should keep an interval
    SeeedGrayOled.putNumber(RangeInCentimeters);//0~400cm
    SeeedGrayOled.putString(" cm      ");
    delay(250);
}
Makefileにフォルダやビルド対象のファイルを指定します.OLEDはI2Cを使用するのでUSE_WIREをtrueに設定します.
- examples\NCESIoT\Makefile
USE_WIRE = true
#
APPL_DIR     += ./LCD_Display9696
APPL_CXXOBJS += SeeedGrayOLED.o
APPL_COBJS   +=
マルチタスク
サーボとUltoraSonicのサンプルをそれぞれ別タスクで実行します.変更は簡単で,タスク数を2として,片方のsetupの内容をsetupに,loopをloop1にするtask1_を付けるだけです.

# ifndef _R2CA_APP_H_
# define _R2CA_APP_H_

# define R2CA_NUM_TASK 1

# endif /* _R2CA_APP_H_ */
# include <Wire.h>
# include <SeeedGrayOLED.h>
# include <avr/pgmspace.h>
# include "Ultrasonic.h"

Ultrasonic ultrasonic(3);
extern void task1_setup();

void setup()
{
    Wire.begin();
    SeeedGrayOled.init();             //initialize SEEED OLED display
    SeeedGrayOled.clearDisplay();     //Clear Display.
    SeeedGrayOled.setNormalDisplay(); //Set Normal Display Mode
    SeeedGrayOled.setVerticalMode();  // Set to vertical mode for displaying text

    task1_setup();
}

void loop()
{
    long RangeInCentimeters;

    SeeedGrayOled.setTextXY(0,0);  //set Cursor to ith line, 0th column
    SeeedGrayOled.setGrayLevel(15); //Set Grayscale level. Any number between 0 - 15.
    RangeInCentimeters = ultrasonic.MeasureInCentimeters(); // two measurements should keep an interval
    SeeedGrayOled.putNumber(RangeInCentimeters);//0~400cm
    SeeedGrayOled.putString(" cm      ");
    delay(250);
}

/* Sweep
 by BARRAGAN <http://barraganstudio.com>
 This example code is in the public domain.

 modified 8 Nov 2013
 by Scott Fitzgerald
 http://arduino.cc/en/Tutorial/Sweep
*/

# include <Servo.h>

Servo myservo;  // create servo object to control a servo
                // twelve servo objects can be created on most boards

int pos = 0;    // variable to store the servo position

void task1_setup()
{
  myservo.attach(2);  // attaches the servo on pin 9 to the servo object
}

void task1_loop()
{
  for(pos = 0; pos <= 180; pos += 1) // goes from 0 degrees to 180 degrees
  {                                  // in steps of 1 degree
    myservo.write(pos);              // tell servo to go to position in variable 'pos'
    delay(15);                       // waits 15ms for the servo to reach the position
  }
  for(pos = 180; pos>=0; pos-=1)     // goes from 180 degrees to 0 degrees
  {
    myservo.write(pos);              // tell servo to go to position in variable 'pos'
    delay(15);                       // waits 15ms for the servo to reach the position
  }
}
おわりに
この記事では,TOPPERS/R2CAによる NCES IoT Base Shield のGrove機能の使い方について説明しました.他のモジュールも同様にWikiをチェックしてライブラリを利用することで使うことができます.