96
85

More than 5 years have passed since last update.

画像付きUIButtonのレイアウトを変更する

Posted at

スクリーンショット 2014-03-30 16.53.31.png

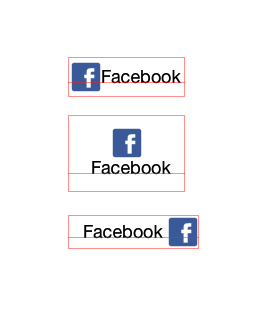
デフォルトは一番上ですが、こんな感じのボタンとかもUIButtonで作れます。

Storyboard(Interface Builder)で設定する

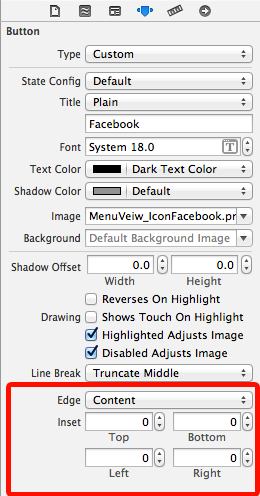
スクリーンショット-2014-03-30-16.44.49.png

ここを変更することで、画像の位置とテキストの位置を調整することができます。

  • Content
    • 画像とテキスト全体
  • Title
    • テキストのみ
  • Image
    • 画像のみ

スクリーンショット 2014-03-30 16.43.13.png

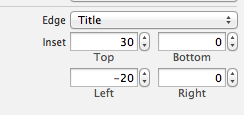
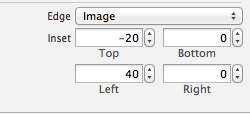
たとえば、上記のように画像の下にテキストを表示するようなスタイルのボタンを作りたい場合は以下のようにTitleのInsetとImageのInsetを設定します。

スクリーンショット 2014-03-30 16.43.22.png スクリーンショット 2014-03-30 16.43.36.png

コードで設定する

button.titleEdgeInsets = UIEdgeInsetsMake(30.0f, -20.0f, 0, 0);
button.imageEdgeInsets = UIEdgeInsetsMake(-20.0f, 40.0f, 0, 0);

こんな感じで簡単に指定することができます。
参考文献

画像付きUIButtonのレイアウト調整 - PILOG

96
85
0

Register as a new user and use Qiita more conveniently

  1. You get articles that match your needs
  2. You can efficiently read back useful information
  3. You can use dark theme
What you can do with signing up
96
85