はじめに
Slack用ボットの定番は Heroku+Hubot だと思いますが、
- もっと簡単、シンプルに
- よりElastic (負荷の増減に柔軟)に
- かつ、低予算 (サーバーレス) で
運用したいので、AWS Lambda 上に、ライブラリ(Hubot)を使わないで構築します。
システム構成は以下のようになります。
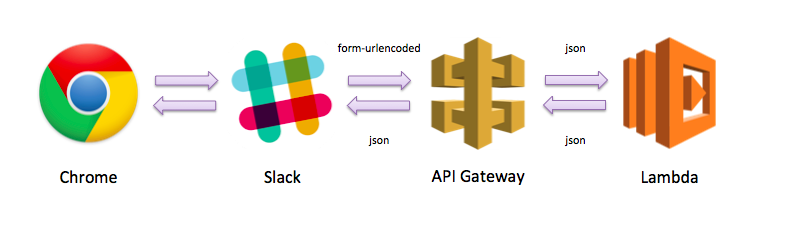
Slack→Lambda連携では、Content-Type について
- Slack「Outgoing WebHooks」出力は、
application/x-www-form-urlencoded - AWS「Lambda」入力は、
application/json
なので、API Gateway での Content-Typeの変換処理がポイントになります。
以下、順番に作成していきます。
AWS側の設定
最初はLambda関数から。
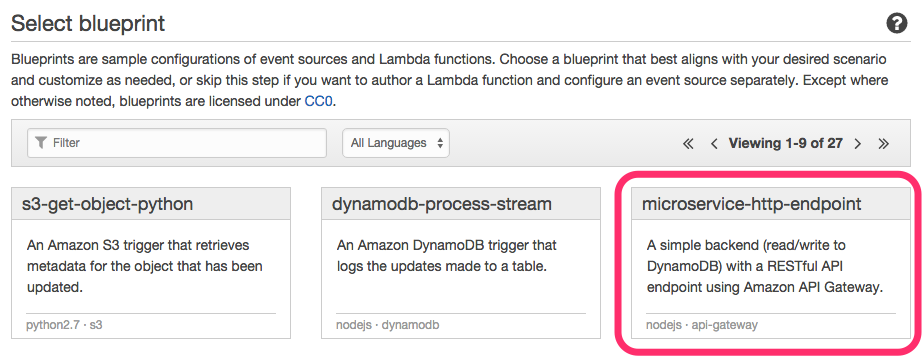
Step 1: Select blueprint
- 「microservice-http-endpoint」を選択。(これはらくちんだ!)
Step 2: Configure function
- Name ですが「Lambot(ランボー)」と名づけました。(Lambda+Bot)
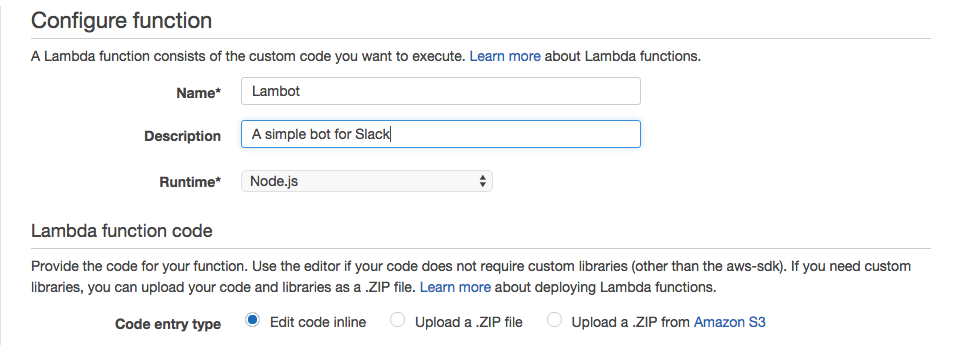
- Lambda関数は、「Edit code inline」で以下を記述。(→参考 1)
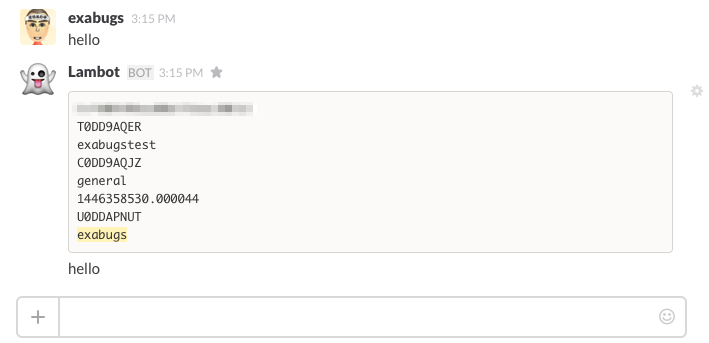
exports.handler = function(event, context) {

  var text = [
    event.token,
    event.team_id,
    event.team_domain,
    event.channel_id,
    event.channel_name,
    event.timestamp,
    event.user_id,
    event.user_name,
    event.trigger_word
  ].join("\n");

  text = ["```" + text + "```", event.text].join("\n");

  context.done(null, {text: text});

};
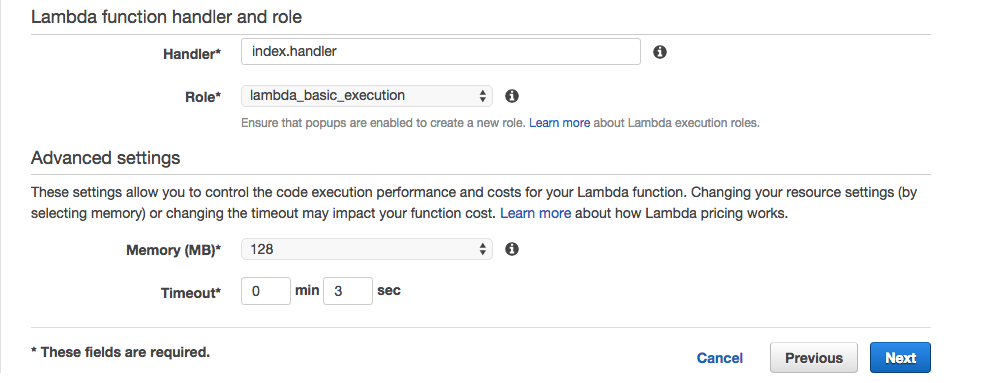
- Role は「Basic execution role」で。
- Memory は最小(128MB) でよい。(→参考 2)
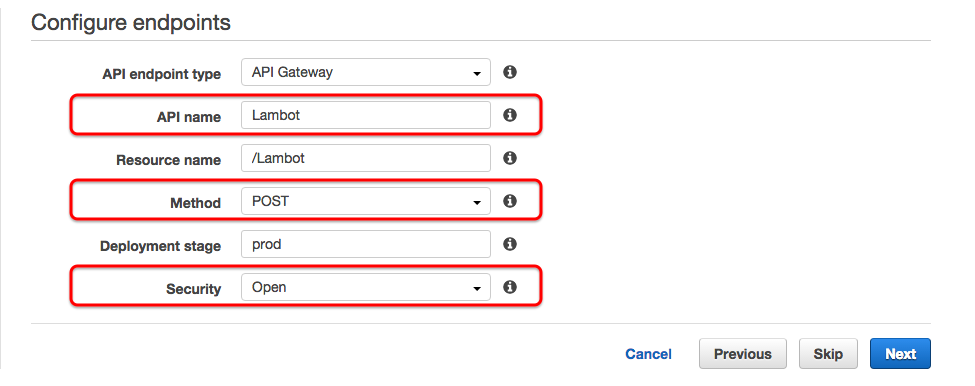
Step 3: Configure endpoints
- API Name は「Lambot」
- Method は「POST」
- Security は「Open」
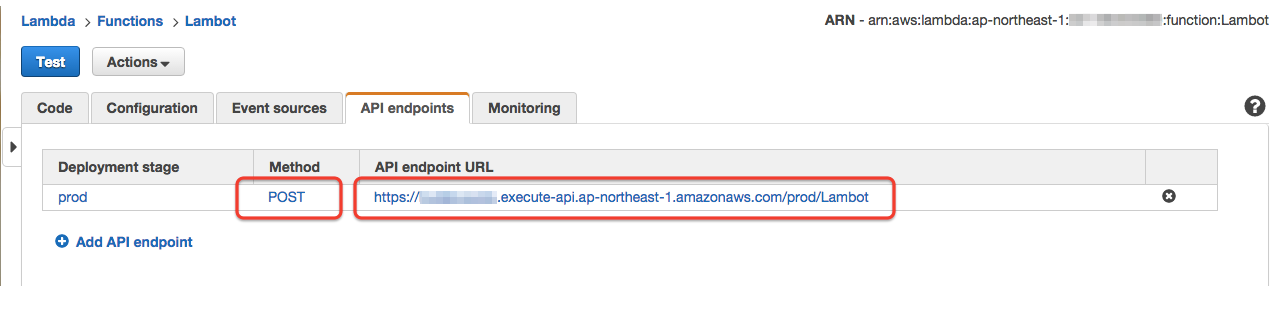
Lamba 関数が作成できたら、以下の画面になります。
「API endpoint URL」をメモしておいて下さい。(後でSlack側に設定します。)
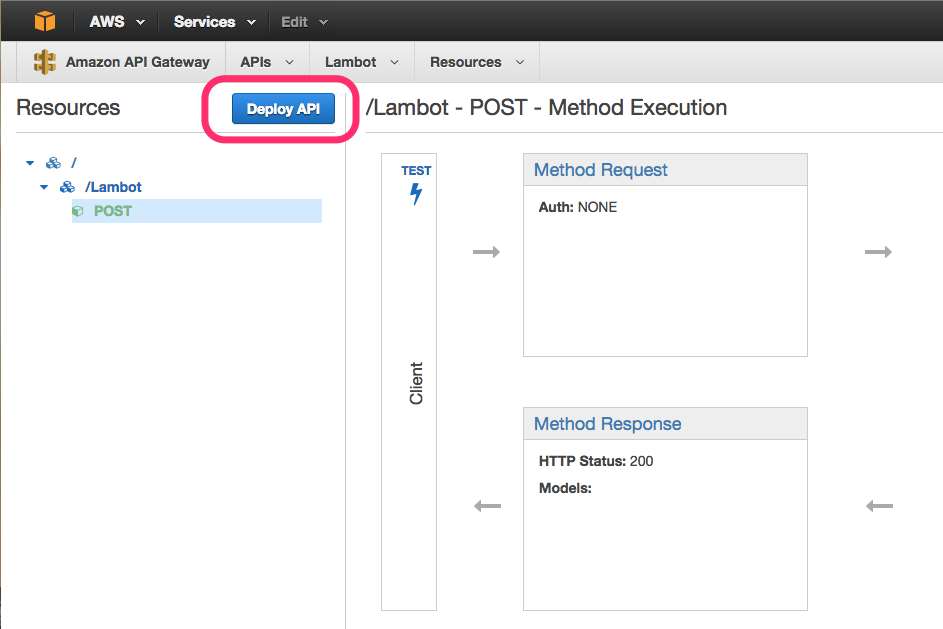
「POST」をクリックして、API Gateway に移動します。
以下の API Gateway に移動したら、「Integration Request」をクリック。
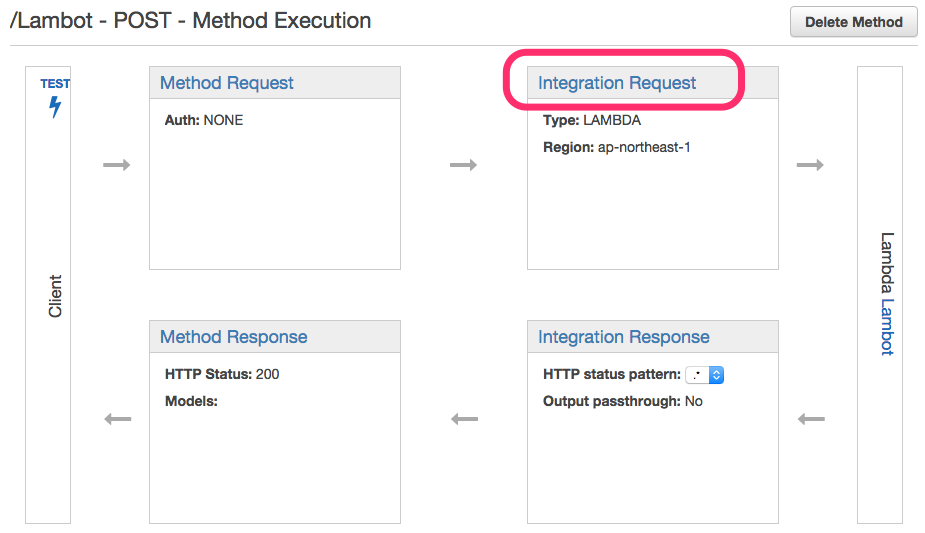
さらに、「Mapping Template」をクリック。

ここが一番分かりづらいですが、要は「application/x-www-form-urlencoded」の時は json 型に変換するマッピングを定義します。
1.「Add mapping template」をクリック
2.「application/x-www-form-urlencoded」を入力して、すぐ右にあるチェックをクリック
3. 保存されたら、「application/x-www-form-urlencoded」をクリック
4.「Input passthrough」の右の鉛筆をクリック。
5.「Input passthrough」を「Mapping template」に変更。
6. 「Template」に以下を記載。
7. 保存されていることを確認。
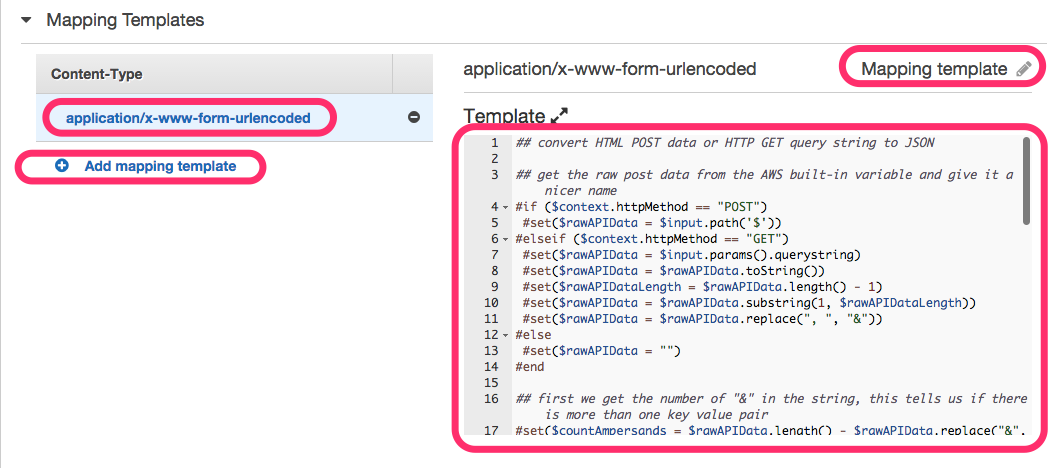
Templateコード (→参考 3)
## convert HTML POST data or HTTP GET query string to JSON

## get the raw post data from the AWS built-in variable and give it a nicer name
# if ($context.httpMethod == "POST")
 #set($rawAPIData = $input.path('$'))
# elseif ($context.httpMethod == "GET")
 #set($rawAPIData = $input.params().querystring)
 #set($rawAPIData = $rawAPIData.toString())
 #set($rawAPIDataLength = $rawAPIData.length() - 1)
 #set($rawAPIData = $rawAPIData.substring(1, $rawAPIDataLength))
 #set($rawAPIData = $rawAPIData.replace(", ", "&"))
# else
 #set($rawAPIData = "")
# end

## first we get the number of "&" in the string, this tells us if there is more than one key value pair
# set($countAmpersands = $rawAPIData.length() - $rawAPIData.replace("&", "").length())

## if there are no "&" at all then we have only one key value pair.
## we append an ampersand to the string so that we can tokenise it the same way as multiple kv pairs.
## the "empty" kv pair to the right of the ampersand will be ignored anyway.
# if ($countAmpersands == 0)
 #set($rawPostData = $rawAPIData + "&")
# end

## now we tokenise using the ampersand(s)
# set($tokenisedAmpersand = $rawAPIData.split("&"))

## we set up a variable to hold the valid key value pairs
# set($tokenisedEquals = [])

## now we set up a loop to find the valid key value pairs, which must contain only one "="
# foreach( $kvPair in $tokenisedAmpersand )
 #set($countEquals = $kvPair.length() - $kvPair.replace("=", "").length())
 #if ($countEquals == 1)
  #set($kvTokenised = $kvPair.split("="))
  #if ($kvTokenised[0].length() > 0)
   ## we found a valid key value pair. add it to the list.
   #set($devNull = $tokenisedEquals.add($kvPair))
  #end
 #end
# end

## next we set up our loop inside the output structure "{" and "}"
{
# foreach( $kvPair in $tokenisedEquals )
  ## finally we output the JSON for this pair and append a comma if this isn't the last pair
  #set($kvTokenised = $kvPair.split("="))
 "$util.urlDecode($kvTokenised[0])" : #if($kvTokenised[1].length() > 0)"$util.urlDecode($kvTokenised[1])"#{else}""#end#if( $foreach.hasNext ),#end
# end
}
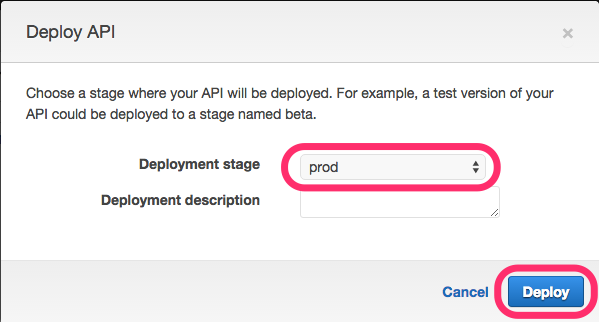
最後に、「Deploy API」をクリックして、ステージ「prod」をデプロイしてください。
これで AWS 側は完成。
Slack側の設定
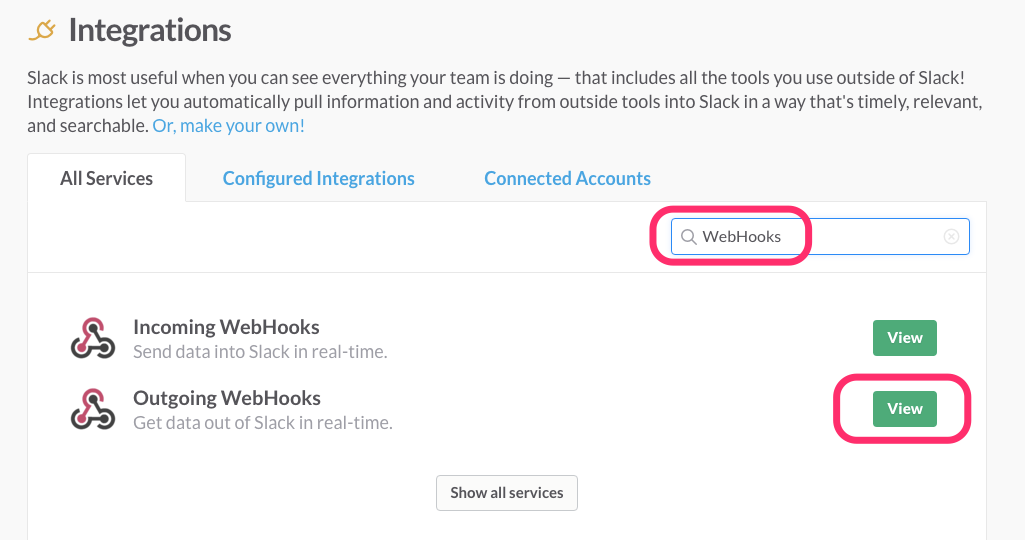
Step 1: Outgoing WebHooks
チームのIntegrations 設定で、「Outgoing WebHooks」を選択してください。
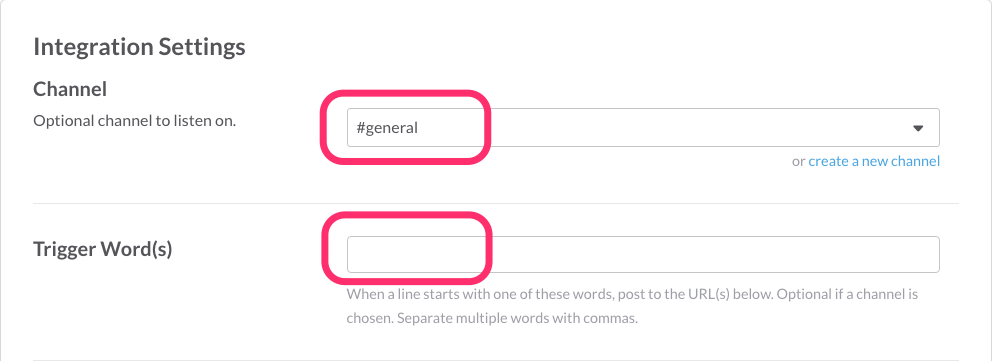
以下は、「Outgoing WebHook」の設定になります。
- Channelを「Any」にしたい場合は、「Trigger Word」を指定する必要があります。
- 今回は全ての発言をトリガーしたいので、「#general」チャンネルに限定して、「Trigger Word」は「(なし)」にしています。
URLは、先ほどメモした API Gateway のリソース URL を記述してください。

Name と Icon は、お好みで。
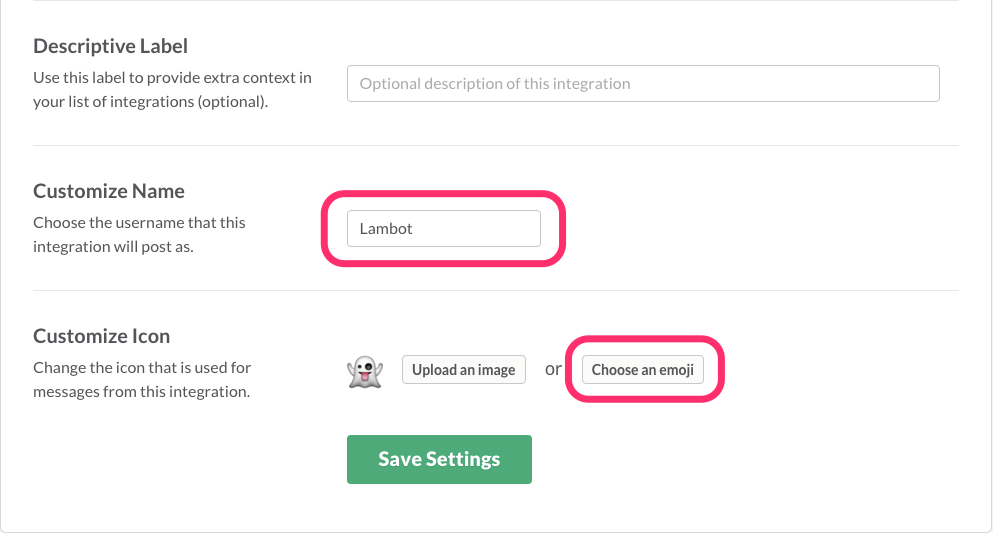
「Save Settings」を押下すれば、Slack側の設定は完成です。
確認
Slack画面で発言してみます。おぉ、Lambotから返事がきました。
今後の展開
- Lambda関数の内部を充実させて、何かコマンドが実行できるようにします。
- LambdaはSQSをトリガーにできない(2015/11/01)です。もしできるようになれば、非同期処理的なコマンドも処理できるようになるでしょう。
参考
参考 1
- Lambda関数は、今回はインライン編集ですませましたが、npmモジュールが必要な場合は package.json と node_modules が含まれたコード一式をzipで固めてアップロードします。
参考 2 (AWS Lambda 費用)
リクエストのうち毎月最初の 1,000,000 件は無料
メモリ128MB(最小)の場合
| 1 か月の無料利用枠の秒数 | 100 ミリ秒単位の価格 (USD) |
|---|---|
| 3,200,000 | 0.000000208 |
費用について詳しくは以下を参照
https://aws.amazon.com/jp/lambda/pricing/
参考 3 (x-www-form-urlencoded を Lambda で処理するには)
Special Thanks!!!!