iOS6から追加されたViewControllerで、写真アプリのようなまとまったコレクションを表現するビューです。
UITableViewと非常に似ていて、各アイテムを返すDataSourceとDelegateメソッドを実装します。
ちなみにこちらのスライドがとても分かりやすかったです。
デリゲートメソッド
UITableViewと非常に似た名称でメソッドが定義されています。
このあたりの使用感はUITableViewを使ったことがある人であれば違和感なく使えるでしょう。
UICollectionViewDataSource
まずはDataSource。
-
- (NSInteger)numberOfSectionsInCollectionView:(UICollectionView *)collectionView;
-
- (NSInteger)collectionView:(UICollectionView *)collectionView numberOfItemsInSection:(NSInteger)section;
-
- (UICollectionViewCell *)collectionView:(UICollectionView *)collectionView cellForItemAtIndexPath:(NSIndexPath *)indexPath;
UITableViewのデリゲートとほぼ一緒ですね。
UICollectionViewDelegate
-
- (BOOL)collectionView:(UICollectionView *)collectionView shouldHighlightItemAtIndexPath:(NSIndexPath *)indexPath;
-
- (BOOL)collectionView:(UICollectionView *)collectionView shouldSelectItemAtIndexPath:(NSIndexPath *)indexPath;
-
- (BOOL)collectionView:(UICollectionView *)collectionView shouldShowMenuForItemAtIndexPath:(NSIndexPath *)indexPath;
-
- (BOOL)collectionView:(UICollectionView *)collectionView canPerformAction:(SEL)action forItemAtIndexPath:(NSIndexPath *)indexPath withSender:(id)sender;
-
- (void)collectionView:(UICollectionView *)collectionView performAction:(SEL)action forItemAtIndexPath:(NSIndexPath *)indexPath withSender:(id)sender;
こちらはUITableViewとはあまり関連性がない感じになっています。
Layout用クラス
テーブルビューとの大きな違いは、レイアウトを完全にカスタマイズできる点です。
レイアウトについてはいわゆるStrategyパターンで実装されており、レイアウトに関する定義を個別に行えるようになっています。
UICollectionViewLayoutクラス
UICollectionView向けにUICollectionViewLayoutクラという抽象クラスが定義されています。
このクラスのサブクラスを作って、オーバーライドが必要なメソッドを実装することによりカスタムのレイアウトを実装することができます。
ちなみに、写真アプリのような見た目のレイアウトはUICollectionViewFlowLayoutというクラスが標準で提供されています。
オーバーライドすべきメソッド
Appleのドキュメントに書かれている、オーバーライドすべきメソッドは以下です。
| メソッド名 | 意味 |
|---|---|
| collectionViewContentSize | Collection View のコンテンツのサイズを返す。 |
| layoutAttributesForElementsInRect: | 引数のRectで指定されたエリアに存在するCell群のレイアウト情報(UICollectionViewLayoutAttributesクラスのオブジェクト)をNSArrayで返す。 |
| layoutAttributesForItemAtIndexPath: | NSIndexPathで指定されたCellのレイアウト情報(UICollectionViewLayoutAttributesクラスのオブジェクト)を返す。 |
| layoutAttributesForSupplementaryViewOfKind:atIndexPath: | supplementary viewのレイアウト情報を生成する。(supplementary viewを利用する場合) |
| layoutAttributesForDecorationViewOfKind:atIndexPath: | decoration viewのレイアウト情報を生成する。(decoration viewを利用する場合) |
| shouldInvalidateLayoutForBoundsChange: | collection viewがスクロールするたびに呼ばれ、YESを返すとlayoutAttributesForElementsInRect:が呼ばれる。(なのでセルのサイズや見た目が変化しない場合は常にNOを返しておいたほうがいい) |
レイアウト決定の流れ
最初、どういう情報をどう返せばいいのかが分かりづらかったですが、冒頭で紹介したスライドがとても分かりやすかったです。
おおまかにどういう処理の流れになっているかというと、以下のような流れでレイアウトを決定します。
- レイアウトのための情報を集める(
prepareLayout) - コレクション全体のサイズを設定する(
collectionViewContentSize) - 表示領域に表示されるべきセルの情報を集める(
layoutAttributesForElementsInRect:) - 表示領域に表示されるべきセルのレイアウト情報を生成する(
layoutAttributesForItemAtIndexPath:)
ごく簡単な例では主に上記のような情報を作ればいいわけです。
UITableViewでは表示されるべきセルだけを生成してメモリ消費を抑えていますが、それと同じ理由です。
ただ、UICollectionViewの場合はレイアウトも自由なため、見えているセルの情報に加えて、それらのセルがどういうレイアウトをされるべきか、というのを表さないとなりません。
図解してみる
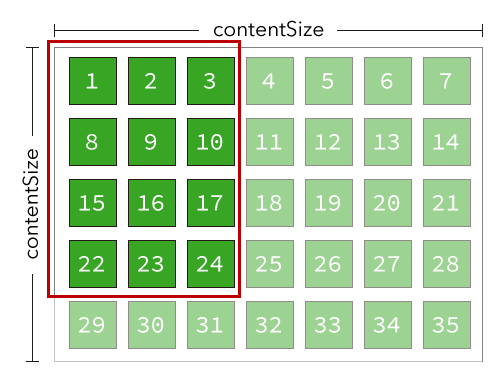
まず、以下のようなレイアウトをするUICollectionViewがあったとします。(分かりやすくするため、数も位置もすべて固定として考えてください)
7 x 5 の、合計35個のセルが並んでいます。これが表示すべき全データだと思ってください。
レイアウトのための情報を集める(prepareLayout)
一番最初に呼び出されるのがこのprepareLayoutメソッドです。
ここでレイアウトに関する情報(例えば上記の例で言えば7x5の35のセルがある、など)を集めます。
コレクション全体のサイズを設定する(collectionViewContentSize)
次に呼ばれるのがcollectionViewContentSizeです。
これはコレクション全体のサイズを返して設定するメソッドです。
上記の例で言えば、7x5に整列されたサイズを計算して返します。
表示領域に表示されるべきセルの情報を集める(layoutAttributesForElementsInRect:)
上記ふたつはすぐに理解できましたが、このlayoutAttributesForElementsInRect:が最初どういうことか悩みました。
が、以下の図を見てもらうと分かると思います。
この赤枠で囲まれたところがInRectの意味です。
つまり、上記の図で言えば1, 2, 3, 8, 9, 10, 15, 16, 17, 22, 23, 24のセルが該当します。
そしてlayoutAttributesForElementsInRect:メソッドは、上記のセルのレイアウト情報を配列で返すという仕様になっています。(例えば0のセルはorigin.x = 0, origin.y = 0、9のセルはorigin.x = 50, origin.y = 50、のように)
そして当然ですが、この矩形内に入るセルがどれか、というのは自分で考えたレイアウトに従って自分で計算し、それを適切に返さないとなりません。(逆にそれができなければカスタムのレイアウトは作れません)
表示領域に表示されるべきセルのレイアウト情報を生成する(layoutAttributesForItemAtIndexPath:)
さて、上記のタイミングでどのセルがレイアウトされるべきか、というのを計算しました。
返すのはUICollectionViewLayoutAttributesオブジェクトの配列です。
そしてこのUICollectionViewLayoutAttributesを生成するのがlayoutAttributesForItemAtIndexPath:メソッドです。
これをオーバーライドし、レイアウト情報を生成します。
具体例
簡単な例として、AppStoreのアプリ紹介のように、1行で横方向にのみスクロールして整列するようなものを考えてみます。
そうした場合に上記の各種メソッドは以下のような感じの実装になります。
prepareLayout
- (void)prepareLayout
{
    [super prepareLayout];

    // コレクションからひとつのセクションにあるアイテムの数を取得する。(DataSourceメソッド)
    self.cellCount = [self.collectionView numberOfItemsInSection:0];
}
collectionViewContentSize
- (CGSize)collectionViewContentSize
{
    CGSize size = self.collectionView.bounds.size;
    size.width = self.cellCount * ITEM_INTERVAL;
    return size;
}
コンテンツのサイズは、1行に入るアイテム数とアイテムの幅の合計値を利用しています。
layoutAttributesForElementsInRect:
- (NSArray *)layoutAttributesForElementsInRect:(CGRect)rect
{
    NSArray *indices = [self indexPathsForItemsInRect:rect];
    NSMutableArray *array = [NSMutableArray arrayWithCapacity:indices.count];
    for (NSIndexPath *indexPath in indices) {
        [array addObject:[self layoutAttributesForItemAtIndexPath:indexPath]];
    }
    return array;
}
- (NSArray *)indexPathsForItemsInRect:(CGRect)rect
{
    NSMutableArray *array = [NSMutableArray array];

    NSInteger minRow = MAX(0, (NSInteger)floor(rect.origin.x / ITEM_INTERVAL));
    for (NSInteger i = minRow; i < self.cellCount; i++) {
        if (i * ITEM_INTERVAL > rect.size.width) {
            break;
        }
        [array addObject:[NSIndexPath indexPathForItem:i
                                             inSection:0]];
    }
    return array;
}
indexPathsForItemsInRect:メソッドは独自に実装した矩形に存在するセルを特定するメソッドです。
layoutAttributesForElementsInRect:メソッド内で実行し、該当するセルのindexPathを調べて返しています。
そして求められた配列から、該当セルのレイアウト情報を生成しそれを返します。
layoutAttributesForItemAtIndexPath:
- (UICollectionViewLayoutAttributes *)layoutAttributesForItemAtIndexPath:(NSIndexPath *)indexPath
{
    UICollectionViewLayoutAttributes *attributes = [UICollectionViewLayoutAttributes layoutAttributesForCellWithIndexPath:indexPath];
    CGFloat offsetX = indexPath.item * ITEM_INTERVAL;
    CGRect frame = CGRectMake(offsetX, 0, 0, 0);
    frame.size = self.cellSize;
    attributes.frame = frame;
    return attributes;
}
最後に、layoutAttributesForItemAtIndexPath:メソッドで該当のセルのレイアウト情報を生成して返しています。
UICollectionViewLayoutAttributesは以下のプロパティを持ちます。
- frame
- bounds
- center
- size
- transform3D
- transform
- alpha
- zIndex
- hidden
それぞれに値を設定することで、その情報でセルが表示されるようになります。
通常のUIViewでもよく使うプロパティなのでこのあたりは迷わないでしょう。
まとめ
これ以外にもまだメソッドがあるようですが、最低限オーバーライドすべきメソッドは以上です。
UITableViewよりも柔軟にレイアウトできる分、そのレイアウト部分の処理がややこしいですが、分かってしまえばそれほどむずかしくないと思います。
UICollectionViewというとグリッドのものをイメージしていたんですが、とにかくレイアウトを柔軟にできるビューなんだ、ということが理解出来ました。
(まぁ調べたものの、結局案件では普通にUIScrollviewで実装することになりましたが・・w)

