はじめに
縦と横の両方向にスクロールしたいときありますよね?
そんなときに、TableViewCellにCollectionViewを設置することで実現できました。
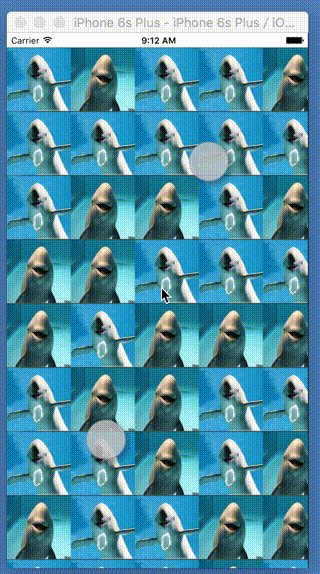
完成イメージ
実装サンプル
実装手順は、下記のとおりです。
- レイアウトを作成する
- TableViewCellのカスタムクラスを定義する
- TableViewCell中に設置するCollectionViewのCellのカスタムクラスを定義する
- 利用の仕方
1. レイアウトを作成する
レイアウトは、下記のような階層構造です。
ポイントは、TableViewCell内にCollectionViewを設置している点です。

| クラス名 | 説明 |
|---|---|
| TableViewInCollectionViewCell | TableViewCellのカスタムクラス名 |
| CollectionViewCell | TableViewCell中に設置するCollectionViewCellのカスタムクラス名 |
| ViewController | 画面クラス名 |
なお、CollectionViewのScroll Directionは、
横にスクロールするために「Horizontal」を指定しています。
2. TableViewCellのカスタムクラスを定義する
TableViewCell内で横スクロールできるようにしておきます。
また、何行目が呼ばれたか分かるようにtagに行番号を保存しておきます。
TableViewInCollectionViewCell.swift
import UIKit

class TableViewInCollectionViewCell: UITableViewCell {

    @IBOutlet weak var collectionView: UICollectionView!

    static var identifier: String {
        get {
             return String(self)
        }
    }
}

extension TableViewInCollectionViewCell {

    func setCollectionViewDataSourceDelegate<D: protocol<UICollectionViewDataSource, UICollectionViewDelegate>>(
        dataSourceDelegate: D, forRow row: Int) {

        collectionView.delegate = dataSourceDelegate
        collectionView.dataSource = dataSourceDelegate
        collectionView.tag = row
        collectionView.setContentOffset(collectionView.contentOffset, animated: false)
        collectionView.reloadData()
    }

    var collectionViewOffset: CGFloat {
        set {
            collectionView.contentOffset.x = newValue
        }

        get {
            return collectionView.contentOffset.x
        }
    }
}
3. TableViewCell中に設置するCollectionViewのCellのカスタムクラスを定義する
画像を表示するだけのセルを定義します。
自由にカスタマイズしてください。
CollectionViewCell
import UIKit

class CollectionViewCell: UICollectionViewCell {

    @IBOutlet weak var imageView: UIImageView!

    static var identifier: String {
        get {
            return String(self)
        }
    }
}
4. 利用の仕方
ポイントは、TableViewを表示したタイミングでCollectionViewの表示及び、スクロールの調整をしている点です。
ViewController.swift
import UIKit

class ViewController: UIViewController {

    @IBOutlet weak var tableView: UITableView!
    let dataSource = ViewController.generateRandomData() //テストデータ
    var offsets = [Int: CGFloat]()
}

extension ViewController: UITableViewDataSource {

    func tableView(tableView: UITableView, numberOfRowsInSection section: Int) -> Int {
        return dataSource.count
    }

    func tableView(tableView: UITableView, cellForRowAtIndexPath indexPath: NSIndexPath) -> UITableViewCell {

        let cell = tableView.dequeueReusableCellWithIdentifier(TableViewInCollectionViewCell.identifier,
                                                               forIndexPath: indexPath)
        return cell
    }
}

extension ViewController: UITableViewDelegate {

    //TableViewCellが表示されたときに、CollectionViewの描画する
    func tableView(tableView: UITableView, willDisplayCell cell: UITableViewCell,
                   forRowAtIndexPath indexPath: NSIndexPath) {

        guard let tableViewCell = cell as? TableViewInCollectionViewCell else {
            return
        }

        tableViewCell.setCollectionViewDataSourceDelegate(self, forRow: indexPath.row)
        tableViewCell.collectionViewOffset = offsets[indexPath.row] ?? 0
    }

    func tableView(tableView: UITableView,
                   didEndDisplayingCell cell: UITableViewCell,
                   forRowAtIndexPath indexPath: NSIndexPath) {

        guard let tableViewCell = cell as? TableViewInCollectionViewCell else {
            return
        }

        offsets[indexPath.row] = tableViewCell.collectionViewOffset
    }
}

extension ViewController: UICollectionViewDataSource {

    func collectionView(collectionView: UICollectionView,
                        numberOfItemsInSection section: Int) -> Int {

        return dataSource[collectionView.tag].count
    }

    func collectionView(collectionView: UICollectionView,
                        cellForItemAtIndexPath indexPath: NSIndexPath) -> UICollectionViewCell {

        let cell = collectionView.dequeueReusableCellWithReuseIdentifier(CollectionViewCell.identifier,
                                                                         forIndexPath: indexPath) as! CollectionViewCell
        cell.imageView.image = dataSource[collectionView.tag][indexPath.item]
        return cell
    }
}

extension ViewController: UICollectionViewDelegate {

    //タップされたときに、縦が何行目、横が何マス目か判断する
    func collectionView(collectionView: UICollectionView, didSelectItemAtIndexPath indexPath: NSIndexPath) {
        print("Line : \(collectionView.tag) / section : \(indexPath.section) / row : \(indexPath.row)")
    }
}

// 画像表示用のダミーデータを取得する機能
extension ViewController {

    class func randomImage() -> UIImage {

        let fileNameIndex = arc4random() % 2
        let fileName = "image\(fileNameIndex + 1).jpg"
        return UIImage.init(named: fileName)!
    }

    class func generateRandomData() -> [[UIImage]] {
        let numberOfRows = 15
        let numberOfItemsPerRow = 10

        return (0..<numberOfRows).map { _ in
            return (0..<numberOfItemsPerRow).map { _ in randomImage() }
        }
    }
}
まとめ
TableViewCellの中にTableViewを配置する方法も試しましたが、
TableViewとTableViewCellの向きをそれぞれ90度回転しなければ、
表示される向きが期待通りに表示できませんでした。
しかし、CollectionViewは、Scrollの向きを縦 or 横に指定できるため
シンプルに実装できました。
参考
以上です。