Random Erasing Data Augmentation とは
機械学習において、入力データを加工することで過学習を防ぐ Data Augmentation はよく使われますが、最近画像認識の分野において新たな Data Augmentation手法が提案されました。
- Zhun Zhong el al., 2017, Random Erasing Data Augmentation (以下Random Erasing)
- Terrance DeVries, Graham W. Taylor, 2017, Improved Regularization of Convolutional Neural Networks with Cutout (以下Cutout)
どちらも教師データとなる画像のランダムな一部矩形領域をマスクするという手法です。
Random Erasingは矩形の大きさ、アスペクト比をランダムにするのに対してCutoutは固定サイズという違いがあります。(ただしCutoutはターゲットとなる物体の一部を選択的にマスクする手法も試しており、それと比較して固定サイズのマスクも同じくらい有効なので、単純化のために固定サイズマスクを使っていると主張している)
Random Erasingでは画像のクラス分類の他に、物体検出、人物照合においても有効性を確認しています。
Random Erasingのイメージ
(ここで使用している画像は今回使用したデータとは異なります)
| 画像加工前 | 画像加工後 |
|---|---|
 |
 |
Random Erasing Data Augmentationを試す
Random Erasing を試してみることにしました。Cutoutではなくこちらを選んだのは矩形サイズをランダムにしたほうがなんとなく有効そうだという理由です。
行ったタスクはCIFAR-10データセットのクラス分類です。Chainerで実装しました。
ソースコードは以下にあります。
- Random Erasing不使用: https://github.com/dsanno/chainer-cifar
- Random Erasing使用: https://github.com/dsanno/chainer-cifar/tree/random_erasing (上記リポジトリのブランチ)
ソースコードをCloneした後、以下のコマンドで学習を行うことができます(最後の-pオプションを同じままにすると保存データを上書きするので学習のたびに変えることをお勧めします)。
$ python src/download.py
$ python src/dataset.py
$ python src/train.py -g 0 -m vgg_no_fc -p remove_aug --iter 300 -b 128 --lr 0.1 --lr_decay_iter 150,225
Random Erasing の実装
ハイパーパラメータ
Random Erasingに関するハイパーパラメータは以下の通りです。
- $p$ : Random Erasingを使用する確率
- $s_l, s_h$ : マスクする領域の最小比率と最大比率(画像全体に対する面積比)
- $r_1, r_2$ : マスク領域のアスペクト比の最小値と最大値
今回は論文に近い値を選んで以下のように設定しました。
| ハイパーパラメータ | 値 |
|---|---|
| p | 0.5 |
| $s_l$ | 0.02 |
| $s_h$ | 0.4 |
| $r_1$ | 1/3 |
| $r_2$ | 3 |
実装
実際に使用したコードは以下のようになっています。
chainer.datasets.TupleDatasetの継承クラスのメソッドとして実装しています。
"# Remove erasing start"~"# Remove erasing end"の部分がRemove Erasingに関する処理で、ランダムな矩形領域をランダムな値で塗りつぶしています。(塗りつぶす値の範囲は使用するデータの範囲に揃えるのがよいと思います)
_transformのxは入力データの配列で、[バッチサイズ, チャンネル数, 高さ, 幅]のサイズを持ちます。
    def _transform(self, x):
        image = np.zeros_like(x)
        size = x.shape[2]
        offset = np.random.randint(-4, 5, size=(2,))
        mirror = np.random.randint(2)
        remove = np.random.randint(2)
        top, left = offset
        left = max(0, left)
        top = max(0, top)
        right = min(size, left + size)
        bottom = min(size, top + size)
        if mirror > 0:
            x = x[:,:,::-1]
        image[:,size-bottom:size-top,size-right:size-left] = x[:,top:bottom,left:right]
        # Remove erasing start
        if remove > 0:
            while True:
                s = np.random.uniform(0.02, 0.4) * size * size
                r = np.random.uniform(-np.log(3.0), np.log(3.0))
                r = np.exp(r)
                w = int(np.sqrt(s / r))
                h = int(np.sqrt(s * r))
                left = np.random.randint(0, size)
                top = np.random.randint(0, size)
                if left + w < size and top + h < size:
                    break
            c = np.random.randint(-128, 128)
            image[:, top:top + h, left:left + w] = c
        # Remove erasing end
        return image
ニューラルネットワーク構造
ネットワークのコードを以下に示します。
VGGのようにConvolutionalとMax Poolingを組み合わせています。
ただしFully Connected Layerは設けず、代わりにGlobal Poolingを行うことでパラメータ数を減らしています。
class BatchConv2D(chainer.Chain):
    def __init__(self, ch_in, ch_out, ksize, stride=1, pad=0, activation=F.relu):
        super(BatchConv2D, self).__init__(
            conv=L.Convolution2D(ch_in, ch_out, ksize, stride, pad),
            bn=L.BatchNormalization(ch_out),
        )
        self.activation=activation

    def __call__(self, x):
        h = self.bn(self.conv(x))
        if self.activation is None:
            return h
        return self.activation(h)

class VGGNoFC(chainer.Chain):
    def __init__(self):
        super(VGGNoFC, self).__init__(
            bconv1_1=BatchConv2D(3, 64, 3, stride=1, pad=1),
            bconv1_2=BatchConv2D(64, 64, 3, stride=1, pad=1),
            bconv2_1=BatchConv2D(64, 128, 3, stride=1, pad=1),
            bconv2_2=BatchConv2D(128, 128, 3, stride=1, pad=1),
            bconv3_1=BatchConv2D(128, 256, 3, stride=1, pad=1),
            bconv3_2=BatchConv2D(256, 256, 3, stride=1, pad=1),
            bconv3_3=BatchConv2D(256, 256, 3, stride=1, pad=1),
            bconv3_4=BatchConv2D(256, 256, 3, stride=1, pad=1),
            fc=L.Linear(256, 10),
        )

    def __call__(self, x):
        h = self.bconv1_1(x)
        h = self.bconv1_2(h)
        h = F.dropout(F.max_pooling_2d(h, 2), 0.25)
        h = self.bconv2_1(h)
        h = self.bconv2_2(h)
        h = F.dropout(F.max_pooling_2d(h, 2), 0.25)
        h = self.bconv3_1(h)
        h = self.bconv3_2(h)
        h = self.bconv3_3(h)
        h = self.bconv3_4(h)
        h = F.dropout(F.max_pooling_2d(h, 2), 0.25)
        h = F.average_pooling_2d(h, 4, 1, 0)
        h = self.fc(F.dropout(h))
        return h
学習時の条件
学習時の条件は以下の通りです。
- 学習データ50,000枚のうち45,000枚を学習用、5,000枚をvalidation用に分けた
- 各Epoch完了時にValidation ErrorとTest Errorを測定し、Validation Errorが最良時のEpochにおけるTest Errorを学習結果の精度とした
- 学習回数は300 Epoch
- 最適化アルゴリズムはSGD
- 学習率の初期値は0.1で、150, 225 Epoch完了時に0.1倍する
- Momentumは0.9固定
- Weight Decayは0.0001
- Random Erasingとは別にData AugmentationとしてRandom Cropと確率0.5で左右反転を行う
結果
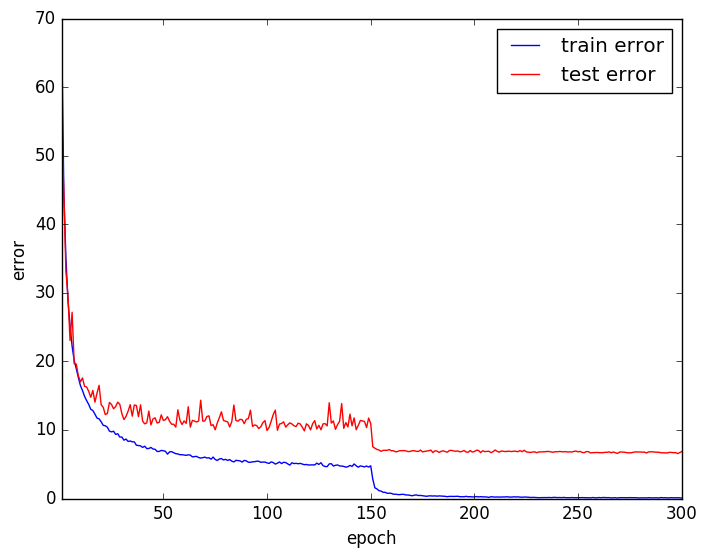
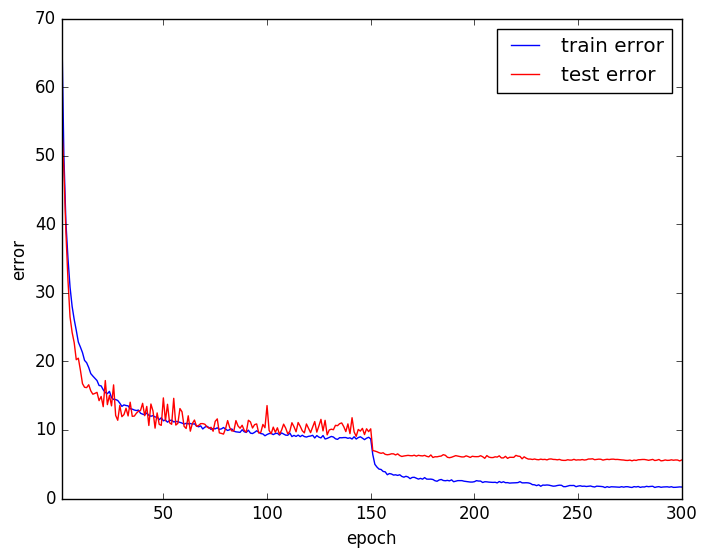
以下のようにRandom Erasingを使用することで精度が向上しました。
| 手法 | Test Error |
|---|---|
| Random Erasing不使用 | 6.68 |
| Random Erasing使用 | 5.67 |
Training Error, Test Errorの推移は以下のようになりました。
Random Erasing使用時の方がTraining ErrorとTest Errorの乖離が小さく、過学習を抑えられているようです。
おわりに
入力画像をマスクするだけの簡単な手法だったのですぐに試すことができました。
今回は効果がありましたが、様々な条件で有効な手法かどうかは検証が必要だと思います。
有効性が認められれば今後のスタンダードになるかもしれません。
あまりに単純な手法なので、実は過去に提案されていたりしないかが個人的に気になるところです。
参考文献
- Zhun Zhong el al., 2017, Random Erasing Data Augmentation
- Terrance DeVries, Graham W. Taylor, 2017, Improved Regularization of Convolutional Neural Networks with Cutout

