Chainerでcaffemodelを読み込んで画像を分類します。
Chainerのサンプルにも画像分類はあるのですが、認識率が出力されるだけでどの画像がどのカテゴリに分類されたかがわかりません。
分類結果としてカテゴリ名とスコアを出力できるようにします。
こちらにソースコードがあります。(この記事のコードをクラス化したものです)
記事を読むのが面倒という方はcloneしてください
caffemodelをダウンロードする
今回はmodelとしてbvlc_googlenetを使います。
1000カテゴリの分類が可能です。
bvlc_googlenet のページにcaffemodelファイルへのリンクがあるので、そこからダウンロードしてください。
ラベルファイルを生成する
分類結果のカテゴリ番号とカテゴリ名を紐付られるようにラベルファイルを生成します。
以下にimagenet関連ファイルをダウンロードするスクリプトがあります。
https://github.com/BVLC/caffe/blob/master/data/ilsvrc12/get_ilsvrc_aux.sh
この中に記述されているcaffe_ilsvrc12.tar.gzが含むsynset_words.txtを加工してラベルファイルを生成します。
n01440764 tench, Tinca tinca
n01443537 goldfish, Carassius auratus
n01484850 great white shark, white shark, man-eater, man-eating shark, Carcharodon carcharias
n01491361 tiger shark, Galeocerdo cuvieri
以下のコマンドを実行します
wget http://dl.caffe.berkeleyvision.org/caffe_ilsvrc12.tar.gz
tar -xf caffe_ilsvrc12.tar.gz
sed -e 's/^[^ ]* //g' synset_words.txt > labels.txt
ラベルファイルができました。
tench, Tinca tinca
goldfish, Carassius auratus
great white shark, white shark, man-eater, man-eating shark, Carcharodon carcharias
tiger shark, Galeocerdo cuvieri
hammerhead, hammerhead shark
"crane"という行が2つあってまぎらわしいので、135行目を"crane(bird)"に、518行目を"crane(machine)"に変更しておきます。
画像をnumpy配列に変換する
Pillowを使って画像を読み込み、リサイズ、クリップした後numpy配列に変換します
import numpy as np
from PIL import Image

# 入力画像サイズの定義
image_shape = (224, 224)

# 画像を読み込み、RGB形式に変換する
image = Image.open('sample.png').convert('RGB')

# 画像のリサイズとクリップ
image_w, image_h = self.image_shape
w, h = image.size
if w > h:
    shape = (image_w * w / h, image_h)
else:
    shape = (image_w, image_h * h / w)
x = (shape[0] - image_w) / 2
y = (shape[1] - image_h) / 2
image = image.resize(shape)
image = image.crop((x, y, x + image_w, y + image_h))
pixels = np.asarray(image).astype(np.float32)

# pixelsは3次元でそれぞれの軸は[Y座標, X座標, RGB]を表す
# 入力データは4次元で[画像インデックス, BGR, Y座標, X座標]なので、配列の変換を行う
# RGBからBGRに変換する
pixels = pixels[:,:,::-1]

# 軸を入れ替える
pixels = pixels.transpose(2,0,1)

# 平均画像を引く
mean_image = np.ndarray((3, 224, 224), dtype=np.float32)
mean_image[0] = 103.939
mean_image[1] = 116.779
mean_image[2] = 123.68
pixels -= self.mean_image

# 4次元にする
pixels = pixels.reshape((1,) + pixels.shape)
caffemodelを読み込んで分類を行う
caffemodelを読み込んで、先ほど生成した配列を入力データとして使用します。
import chainer
import chainer.functions as F
from chainer.functions import caffe

# caffemodelを読み込む
func = caffe.CaffeFunction('bvlc_googlenet.caffemodel')

# レイヤー'loss3/classifier'の出力を得て、softmaxを適用する
x = chainer.Variable(pixels, volatile=True)
y, = func(inputs={'data': x}, outputs=['loss3/classifier'], disable=['loss1/ave_pool', 'loss2/ave_pool'], train=False)
prediction = F.softmax(y)
結果を出力する
分類結果を出力します。
# ラベルを読み込む
categories = np.loadtxt('labels.txt', str, delimiter="\n")

# スコアとラベルを紐づけスコアの高い順にソートする
result = zip(prediction.data.reshape((prediction.data.size,)), categories)
result = sorted(result, reverse=True)

# 上位10個の結果を表示する
for i, (score, label) in enumerate(result[:10]):
    print '{:>3d} {:>6.2f}% {}'.format(i + 1, score * 100, label)
認識例
浅草で撮影した風景画像を認識させたところ、以下のようになりました。
トップカテゴリはモスクとなりました。
高層ビルやタワーを認識してほしいところですがカテゴリにはないようです。
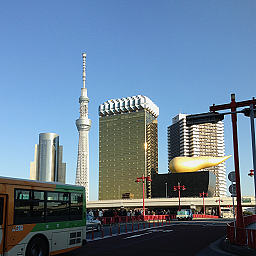
  1  38.85% mosque
  2   6.07% fire engine, fire truck
  3   5.15% traffic light, traffic signal, stoplight
  4   3.97% radio, wireless
  5   3.25% cinema, movie theater, movie theatre, movie house, picture palace
  6   2.14% pier
  7   2.01% limousine, limo
  8   1.92% stage
  9   1.89% trolleybus, trolley coach, trackless trolley
 10   1.61% crane (machine)
終わりに
学習済みのcaffemodelはいくつか公開されており、それらを使うと誰でも画像の分類ができます。
今回は入力画像が1枚だけでしたが、複数の画像を同時に入力することも可能です。
caffemodelの読み込みには時間がかかるので、caffemodelを読み込んだ状態を保持しながら画像を読み込ませるのがよいでしょう。