Nikolaってなに?
NikolaはPython製の静的サイトジェネレータです。
公式サイト: https://getnikola.com
静的サイトジェネレータはJekyllやHUGO、Hexo等がメジャーらしいです。
Python製ではPelicanが有名です。
今回Nikolaを取り上げた理由としてはこのようなものが挙げられます。
- Python製
- 開発が結構活発
- 様々な入力フォーマットに対応している
- cliが使いやすい
Nikolaの入力フォーマット
デフォルトのreStructuredTextはSphinxユーザにとって馴染み深く、Jupyterで作成したNotebook(ipynb)をそのままブログとしてpostすることができます。Pythonistaやデータサイエンティストにとって親和性が高そうです。
デフォルトで対応しているフォーマット
- reStructuredText (default and pre-configured)
- Markdown
- Jupyter/IPython Notebook
- HTML
- PHP
Pluginて対応できるフォーマット
- AsciiDoc
- BBCode
- CommonMark
- IRC logs
- Markmin
- MediaWiki (smc.mw)
- Misaka
- ODT
- Emacs Org-Mode
- reST with HTML 5 output
- Textile
- txt2tags
- CreoleWiki
- WordPress posts
インストール
さまざまなインストール方法がありますが、pipでインストールするのがよさそうです。
pip install Nikola
本記事では説明を省きますが、venvやvirtualenv等の仮想環境にインストールすることを推奨します。
サイトの作成
初期化用のコマンドが用意されています。いくつかの質問に答えるとサイトが作成されます。
下記の site_name は任意のディレクトリ名です。指定した名前でディレクトリが作成されます。
nikola init site_name
Creating Nikola Site
====================

This is Nikola v7.8.8.  We will now ask you a few easy questions about your new site.
If you do not want to answer and want to go with the defaults instead, simply restart with the `-q` parameter.
--- Questions about the site ---
Site title [My Nikola Site]:
サイトのタイトルを入力します。
Site author [Nikola Tesla]:
名前を入力します。
Site author's e-mail [n.tesla@example.com]:
メールアドレスを入力します。
Site description [This is a demo site for Nikola.]:
サイトの説明を入力します。
Site URL [https://example.com/]:
サイトのURLを入力します。
Enable pretty URLs (/page/ instead of /page.html) that don't need web server configuration? [Y/n]
pretty URLを有効にする場合は Y を入力します。
--- Questions about languages and locales ---
We will now ask you to provide the list of languages you want to use.
Please list all the desired languages, comma-separated, using ISO 639-1 codes.  The first language will be used as the default.
Type '?' (a question mark, sans quotes) to list available languages.
Language(s) to use [en]:
使用する言語を入力します。日本の場合は ja を入力します。
Please choose the correct time zone for your blog. Nikola uses the tz database.
You can find your time zone here:
https://en.wikipedia.org/wiki/List_of_tz_database_time_zones

Time zone [UTC]:
タイムゾーンを入力します。日本時間の場合は Asia/Tokyo を入力します。
--- Questions about comments ---
You can configure comments now.  Type '?' (a question mark, sans quotes) to list available comment systems.  If you do not want any comments, just leave the field blank.
Comment system:
コメントシステムを使う場合は入力します。使わない場合にはブランクにします。2017/06/17時点では下記のものが使用できます。
- disqus
- googleplus
- intensedebate
- isso
- livefyre
- muut
記事の投稿
下記のコマンドでテンプレートのテキストファイルが生成されます。
nikola new_post
Creating New Post
-----------------

Title:
記事のタイトルを入力すると、 post/タイトル名.rst ファイルが生成されます。
このファイルをエディタで編集します。デフォルトではreStructuredText形式です。
.. title: {{記事のタイトルを入力します。}}
.. slug: {{記事のパス(ファイル名)を入力します。}}
.. date: {{投稿日時を入力します。日本時間の場合は末尾に UTC+09:00がつきます。}}
.. tags: {{タグを入力します。カンマ区切りで複数のタグを指定できます。}}
.. category: {{カテゴリを入力します。}}
.. link: {{参照元があればリンクを入力します。}}
.. description: {{descriptionメタタグを入力します。}}
.. type: text

{{ここに記事の内容を入力します。}}
Markdown形式で記事を作成する場合には -f オプションを用いて下記のように指定します。
nikola new_post -f markdown
Creating New Post
-----------------

Title:
記事のタイトルを入力すると、 post/タイトル名.md ファイルが生成されます。このファイルをエディタで編集します。
<!--
.. title: {{記事のタイトルを入力します。}}
.. slug: {{記事のパス(ファイル名)を入力します。}}
.. date: {{投稿日時を入力します。日本時間の場合は末尾に UTC+09:00がつきます。}}
.. tags: {{タグを入力します。カンマ区切りで複数のタグを指定できます。}}
.. category: {{カテゴリを入力します。}}
.. link: {{参照元があればリンクを入力します。}}
.. description: {{descriptionメタタグを入力します。}}
.. type: text
-->

{{ここに記事の内容を入力します。}}
サイトのビルド
下記のコマンドで前述で投稿した記事をビルドします。
nikola build
サイトの確認
下記のコマンドでhttpサーバが起動します。 -b オプションをつけることでブラウザが起動します。
nikola serve -b
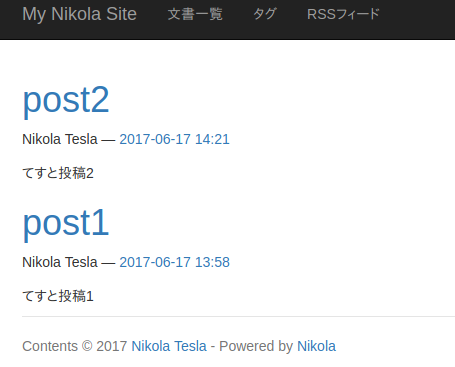
このような感じでサイトが表示されます。
次回 はJupyter Notebookのファイル(ipynb)をブログの記事として投稿する方法を紹介します。
